


![Use the [A] button to destroy obstacles](https://gamewith-en.akamaized.net/img/a29c24d0658e6fb26c0498ea2280e0a0.jpg)


Passage of the game Lost Lands 9: Tales of the First Brotherhood 100%. All the secrets, puzzles, mini games, collectibles and achievements in one place...
Hyrule Warriors: Age of Calamity Wiki - Walkthrough, Guides, Guides


Chapter 1 Stage 1 - The Battle of Hyrule Field
- ➤Start the mission and follow the instructions. Defeat the enemies in front of you.

In this first section, you'll want to get familiar with the controls for both the game itself and Link as a character. Follow the on-screen instructions and get used to the different button combinations as you take out the hordes of enemies.
- ➤Kill the Moblin on the left side of the map.
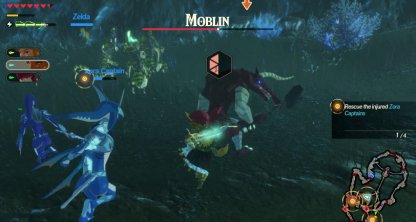
↑ Larger enemies will have a weak point indicator. When it's active, hit them until it breaks for massive damage.
Your first encounter with a larger opponent will be with Moblin. These enemies often move slowly and reveal their abilities. Practice dodging them with B when they come at you. This will be a key point in the future, so it's worth fixing.
- ➤Capture 3 outposts across the map.
You will be able to choose the order in which you play these 3 outposts, but you will need to clear them all. We recommend going left, right, down, but it doesn't matter in the end. Defeat all enemies in each area.
You will be able to switch to another character, in this case Imp, by pressing up or down on the D-keyboard. This will change your character and move you to where he is. This can save you a lot of time when moving from one goal to another, so take advantage of it!
- ➤Defeat 3 moblins in the south of the map.
The last step in this stage will be defeating 3 moblins in the southeastern part of the map. You can get 2 moblins at once, so be sure to actively use dodge to reduce the damage you take. They have a very precise movement fit, so watch their actions and react accordingly.
If you end up pulling too much, don't forget treat yourself if your health gets low!
Chapter 1 Stage 2 - Road to the ancient laboratory
- ➤Run with Zelda to the specified location
At the beginning of this mission, you will have to escape with Zelda to the center of the map. Run south and west, but don't go too far from Zelda itself.
↑ You will have the opportunity to learn how to use the Magnesis tool - it works best against opponents who have metal weapons.
When you get to the central location, a Guardian will suddenly appear and start chasing you. Don't waste your time trying to attack the Guardian, he can't be killed at this stage! Try to stay ahead of him and run for cover when he attacks you with his beam.
- ➤Activate 2 detected guards on the map.
In this part of the mission, you will need to get to two deactivated Guardians and turn them on. There will be many enemies along the way, including Moblins and Electric Whizzrob, so be prepared.
↑ First guardian discovered. Go south and then up to access it.
↑ The second guardian found in the upper left corner of the map. You must access it from the leftmost path - you cannot climb mounts to get to it.
- ➤Direct the Guardian to their destination.
After you activate two guards, you will have to lure the aggressive one to a certain place. Just walk up to him to get his attention and then run back. If you get blocked, try to avoid the beam.
- ➤Defeat the Guardian.
Your last mission in this stage will be to kill the guardian. While blocking the ability, hide behind the nearest rock. The Guardian also has a small jump ability - if you time your dodge well enough, you can call in a powerful counterattack with Y! Pay close attention to the timing of his jump and defeat him.
Chapter 2 Stage 1 - Revali, Rito's Warrior
- ➤Follow the road to go to Rito village.
- Head to the marked location and defeat Captain Rito to open the gate.
- ➤Use the headwind to jump over the platform and fight the second captain Rito.
- ➤Follow the path to the next location to fight monsters hit by elemental energy.
- ➤Go to 3 locations and defeat Captain Rito armed with a bow and arrow in this area.
Beware of arrow bombs
Arrow bombs fall from the sky in this area. The area where the bombs will fall is marked with a whirlwind on the floor, so try to avoid it as soon as you see them.
Some against the wind are blocked by boulders
There are against the wind, which are hidden by huge boulders. Use remote bombs to destroy boulders.
- ➤Fight the Revali boss.
Wind attack at the beginning of the battle
Revali will dive to the ground, releasing 5 cyclones at the start of the game. Dodging the cyclone will unlock the combo moment.
Use said rune when it's assembled
During the battle, a runic mark will appear on Revali's body. Use this rune to deal massive damage.
Hit the flying Revali with remote bombs
After dealing more than half the damage to Revali, he will fly up, making it difficult to deal damage to him. You can still damage him using runes like remote bombs.
Chapter 2 Stage 2 - Urbosa, Chief Gerudo
- Head to Gerudo City Gate and defeat Captain Gerudo.
- ➤Enter the castle in the center of town for a cutscene.
- ➤Go to the indicated location and fight the Blademaster.
- ➤Go to the three marked outposts and fight Blademaster Yiga.
- ➤Defeat Master Kohgu.
Perfectly dodge his shield for combos
Master Koch summons a shield that is easy to dodge. As soon as the shield starts moving towards you, dodge and hit while continuing to hit the boss.
Finish a combo with stasis
Stasis him after each combo so he can't run away and you can deal more damage.
Use runes to stop skills
When you fight Master Kohga, he will have a runic symbol when he uses high damage skills. Attack him with a spawning rune to stop the combo.
Chapter 2 Stage 3 - Mifa, Princess Zora
- ➤Rescue 4 Zora Captains.
Need to defeat elite enemies first
Each Zora Captain location will have different elite enemies. You will need to defeat an elite enemy in the area before you can rescue the nearby Captain Zora.
- ➤Defeat the Electric Mobin.
- ➤Defeat the monsters at 6 points in the area.
Divide the team and give orders to places
Order your party members to go and fight at any of the 6 points on the map. This will make it easier for you to go to all the points instead of having to go to each one at once.
Each point has an elite warrior
Make sure you have enough health when entering one of these points, as each of them has elite enemies. You can imprison electric moblin, blue moblin and other enemies.
- ➤Go to Mount Ploymus.
- ➤Defeat Lynel.
Dodge to the side to attack
When Lynel attacks with an attack, dodge to the side instead of jumping back. The charge will follow a straight path, so dodging to the side is the only way to get away from it.
Dodge forward/back for a lunge attack
You can dodge forward or backward to avoid Lynel as he lunges forward and slams his sword into the ground.
Use the bomb when the Lynel is charging
Stop Linel from his charged attack by throwing a bomb at him while he is still charging. This will stun him and give you the opportunity to attack him while he is down.
- ➤Control the Divine Beast Vah Ruta and destroy the horde of enemies
Attack enemies marked in red
Enemies on the field are marked in red. These are the ones you need to shoot down in order to complete the game.
Use the [A] button to destroy obstacles
The divine beast Vah Ruta will not be able to progress unless you destroy the obstacles. When you get close to them, press [A] to clear a path.
Intercept incoming attacks to avoid damage
Divine Beast Vah Ruta will take damage if you fail to intercept incoming enemy attacks. When you see a fireball coming towards you, press [L] to intercept it.
Use a special attack against big bases
When the Divine Beast is charged enough, use its special attack against large enemy bases. Don't waste it on normal enemies.
Chapter 2 Stage 4 - Daruk, the Goron Hero
- ➤Travel to the 3rd outpost and fight Moblin in the area.
Beware of falling lava rocks
Throughout the field, there is a chance that lava stones will fall on you, dealing a lot of damage. Dodge away from the glowing floor.
- ➤Fight the boss Igneo Talus.
Use the Rune of Remote Bomb to stun the enemy
During the battle, there will be a time when a remote bomb icon will appear at the top of the boss. Using a remote bomb at this time to stun the enemy.
Get on the back of the boss to deal more damage
After stunning the enemy, you can ride on his back and attack the protruding black stone to deal more damage.
- ➤Climb the mountain of death.
- ➤Fight the boss Igneo Talus one more time.
Chapter 2 Stage 5 - Yiga Clan Attacks!
- ➤Defeat the surrounding Yiga clan
- ➤Defeat 2 Yig Blademasters.
Use the stun ability to stop Yiga Blademasters
Yiga blademasters are very fast and capable of transportation. Stop their movements by using the stun ability to tie them up and prevent them from moving. It also gives you the ability to attack!
- ➤Defeat two moblins.
- ➤Travel to Hyrule Garrison to request reinforcements.
- ➤Defeat the Electric Moblin, Ice Moblin, and Fire Moblin
- ➤Capture 2 outposts
- ➤Go to the stronghold of the enemyа
- ➤Defeat Hinox
Dodge backwards during a jump attack
When Hinox attacks while jumping, dodge backwards! This will give you enough space to avoid the attack.
Dodging backwards for a frontal strike
You can dodge backwards or to the side if you get close enough to the edge of his arms when he does a frontal slash. Because he uses both hands, this attack has a wide horizontal range.
Move sideways during a roll attack
When Hinox starts to roll forward, move to the side to run away from him. This will help you escape easily as the attack has a straight trajectory.
- ➤Attack Blademaster Yig
- ➤Use Link to approach Zelda
- ➤Defeat Suga
You can only use the link here
You can only use Link when fighting Suga. You cannot change any of the other members of your group here.
Summons an ice block when it has an ice seal on it
If Suga creates a seal with an ice symbol on it, summon an ice block and paraglide towards it. Attack as often as possible, as he will be stunned right after.
Dodge to the side while cutting from above
Above Sugi's head can be easily dodged by moving to the side.
Dodge sideways/forward during a rush attack
Suga will position his blades behind him and charge forward. Avoid this by moving to the side or dodging forward.
Was the article helpful?


