Passage of the game Lost Lands 9: Tales of the First Brotherhood 100%. All the secrets, puzzles, mini games, collectibles and achievements in one place...
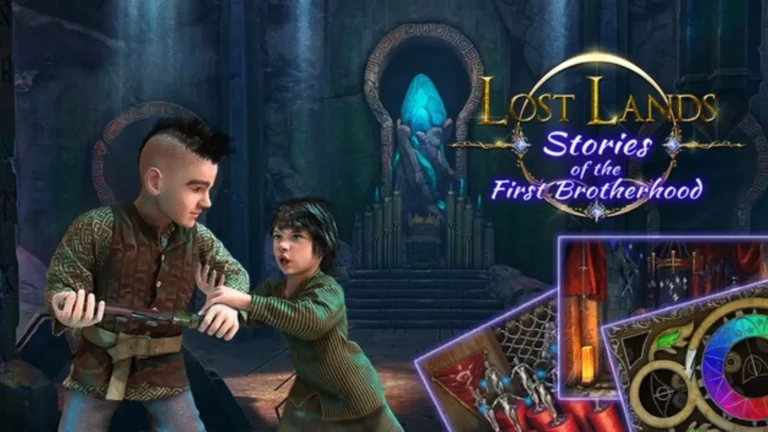
Lost Lands 9: Tales of the First Brotherhood – 100% Completion
Passage of the game Lost Lands 9: Tales of the First Brotherhood 100%. All the secrets, puzzles, mini-games, collectibles and achievements in one place.
Content
Getting into the game Lost Lands 9: Tales of the First Brotherhood begins with Folnur, a young inventor, deciding to take a walk to school. A month ago, he accidentally discovered a small cave in the canyon, where crystals with different physical properties were depicted on the walls. Having a passion for physics, he decides to create a device for the school craft fair using these crystals. On this day he plans to conduct his first experiments.
The player is also presented with a story about a mysterious entity wandering through the valleys and destroying everything in its path. Only a strong team of friends can cope with it. Panic grips the valleys due to the appearance of this mysterious villain. Incidents are reported from all sides. Witnesses claim that this fast creature is almost impossible to see.
The best student at the Academy of Magic decides to take over the investigation and sets off with his partner in the footsteps of this creature, helping the affected residents. But meeting the enemy forces friends to reconsider their plans and reconsider their ideas about the situation.
If the player encounters difficulties in completing puzzles or gets lost in searching for objects, on our website he can find tips and solutions for the game Lost Lands 9: Tales of the First Brotherhood to overcome all obstacles and defeat evil.
Walkthrough (video guide)

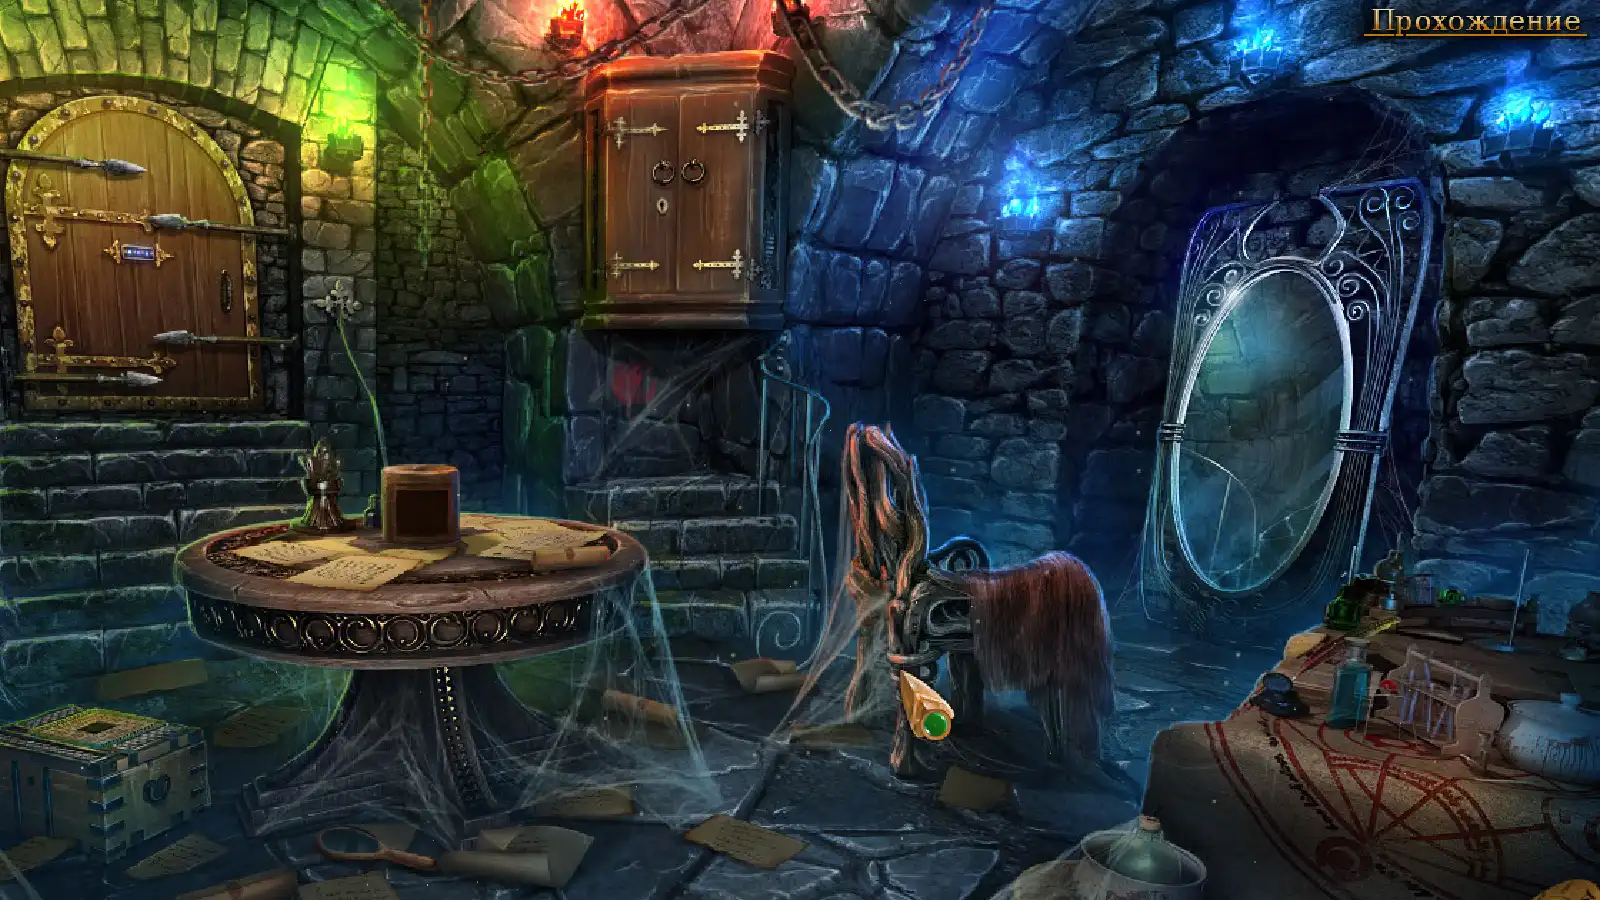
Chapter 1: Childish pranks
While skipping school in abandoned dungeons, young Folnur finds and opens an ancient sarcophagus. This is how the adventure begins.
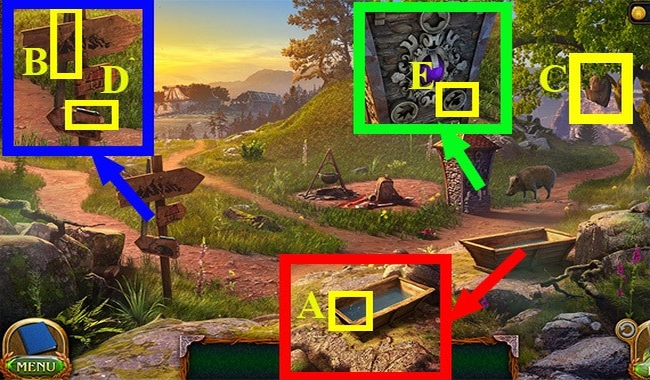
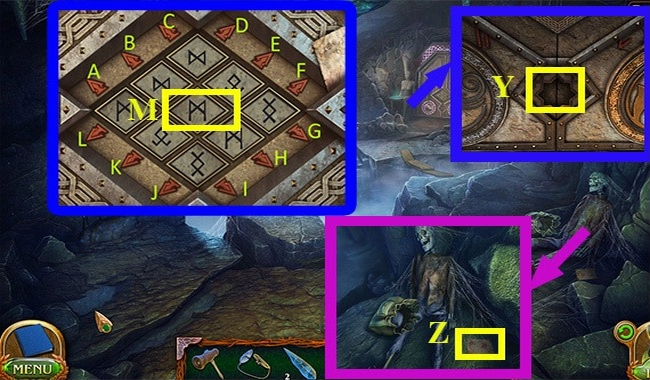
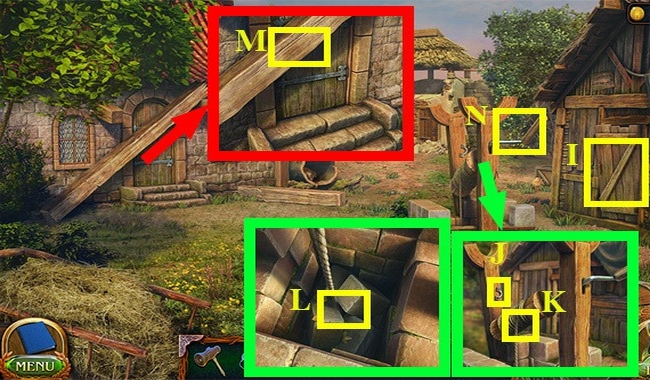
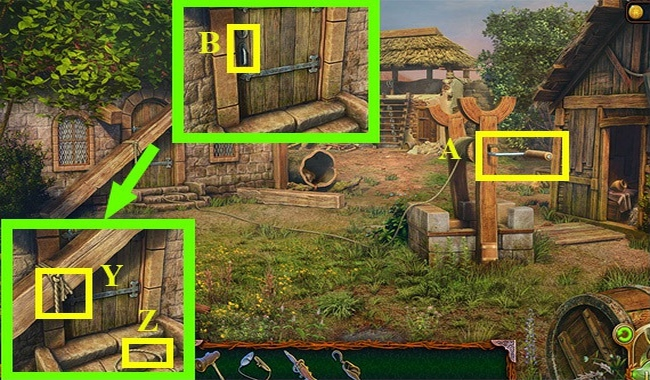
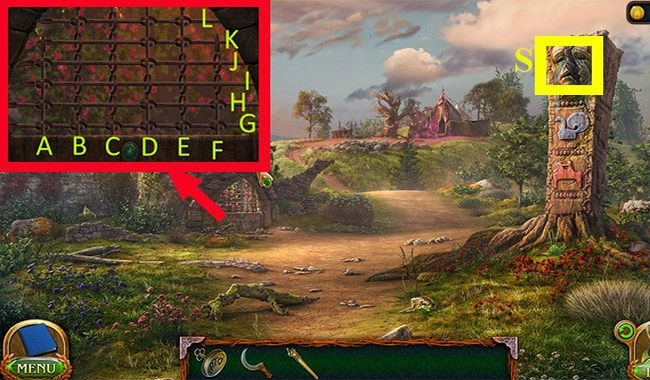
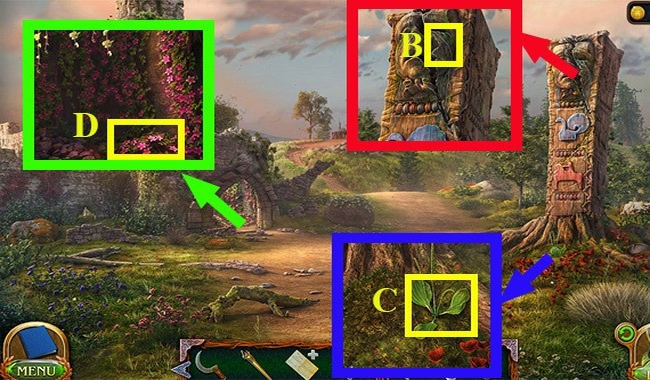
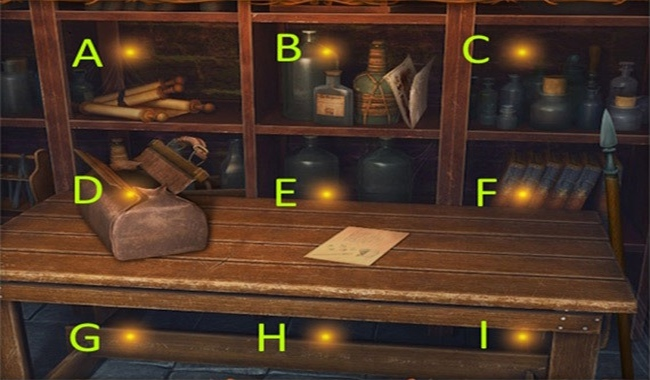
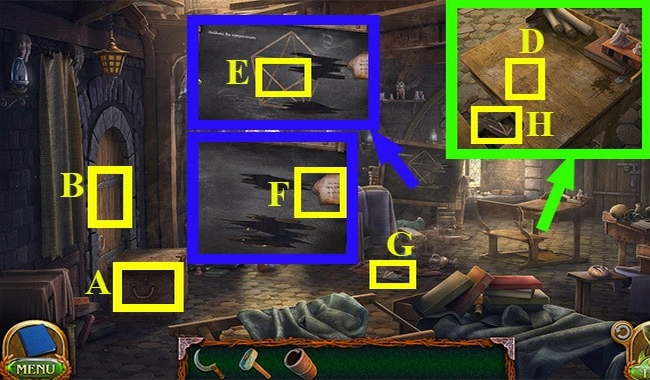
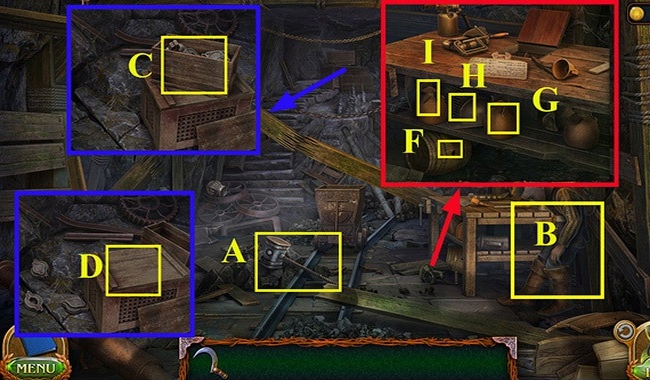
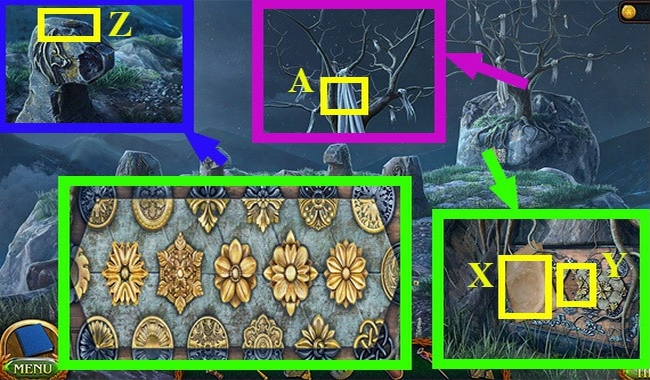
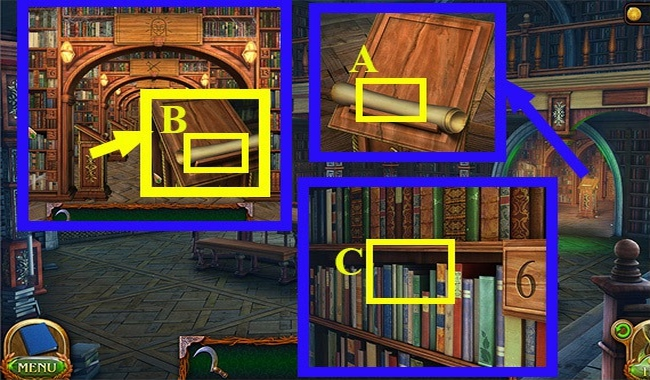
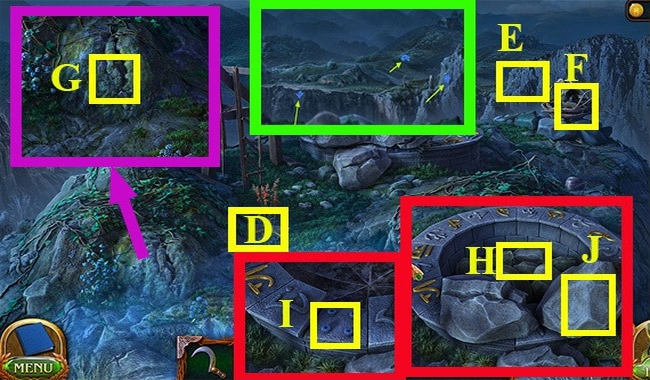
- Take the IRON FLOWER (A).
- Take the STICK (B).
- Use the STICK on (C).
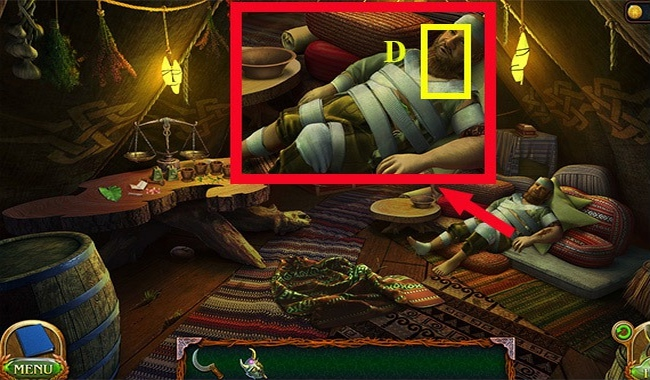
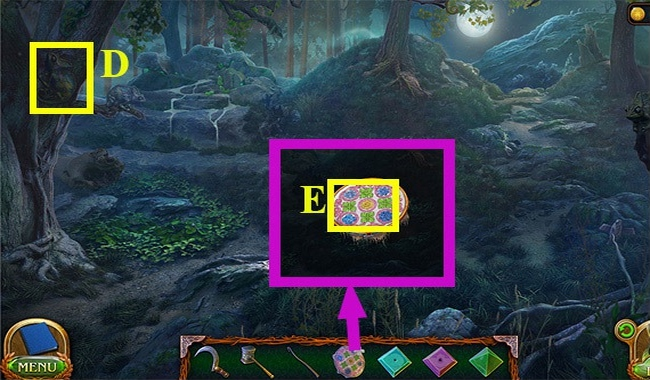
- Take the SCREWDRIVER ROD (D).
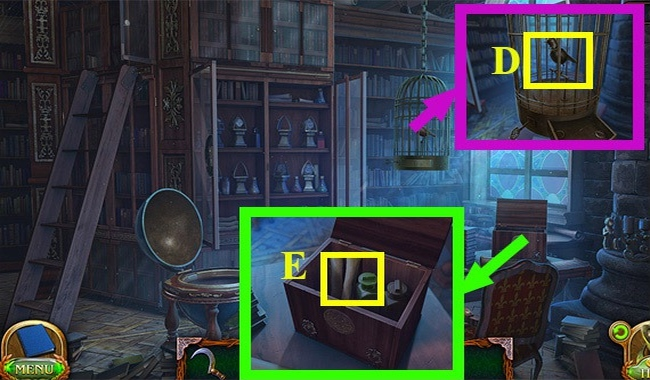
- Use the IRON FLOWER on (E).
- Go right.
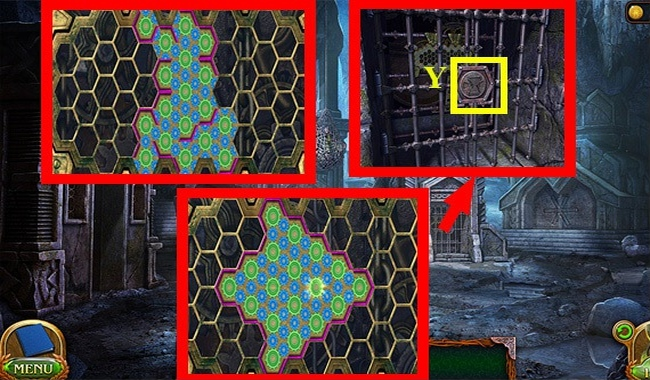
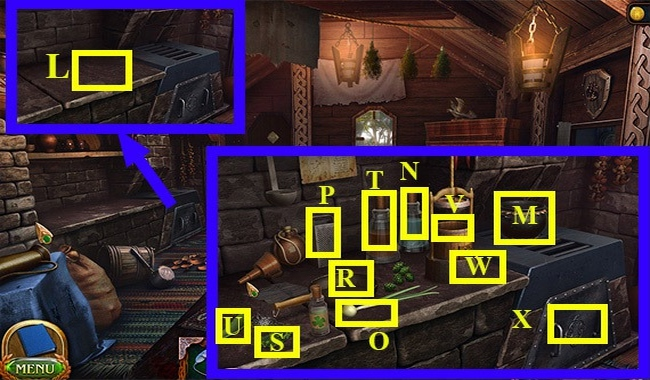
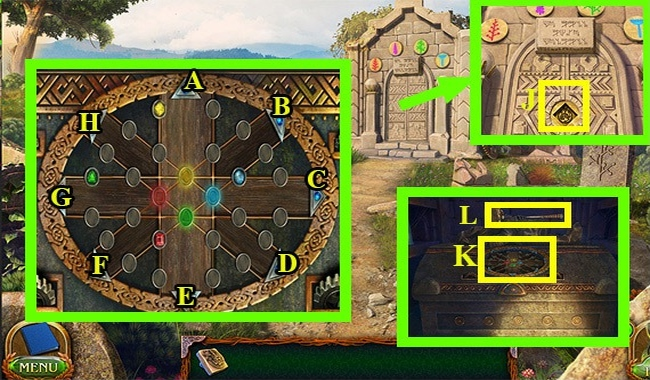
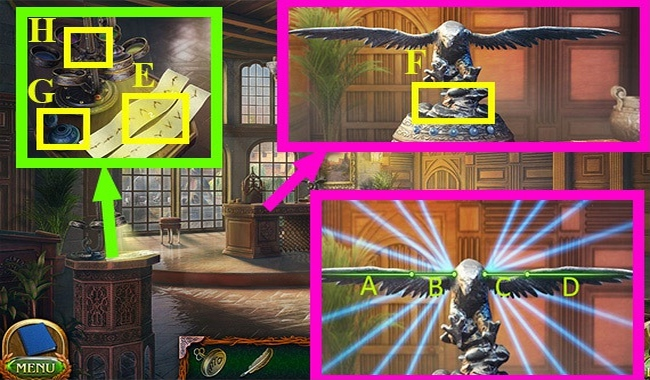
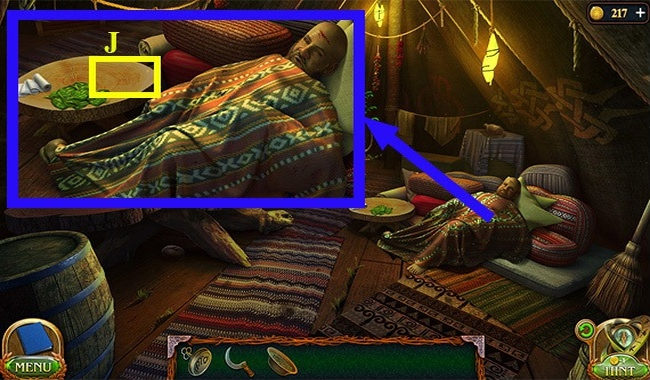
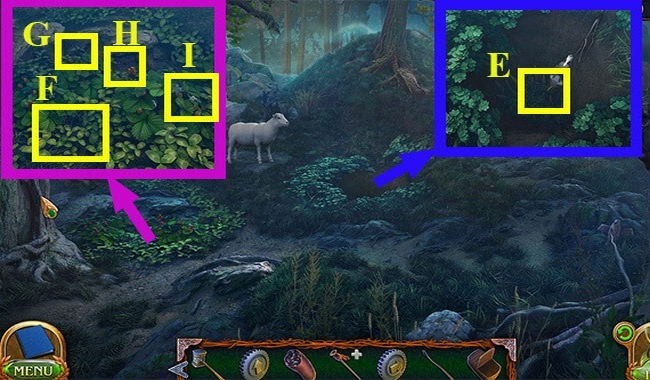
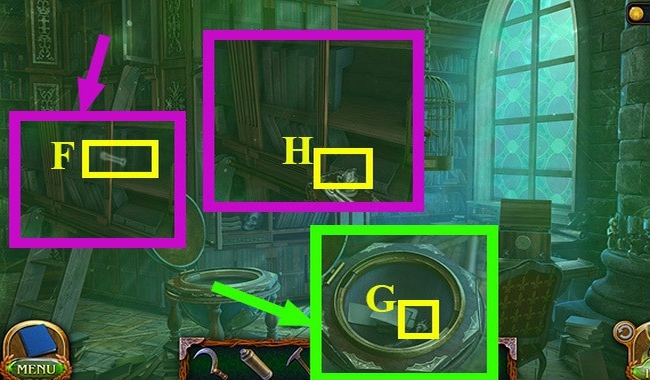
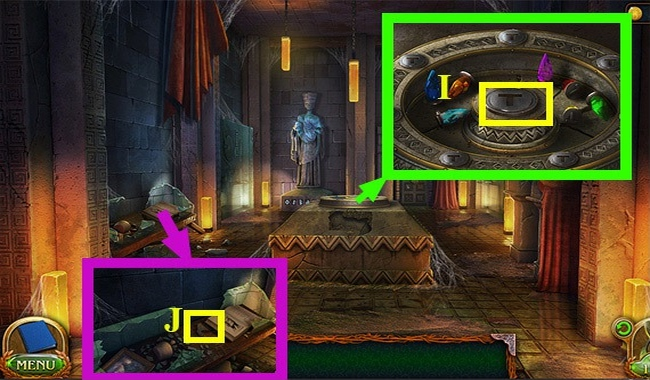
- Take the JUMAR (F).
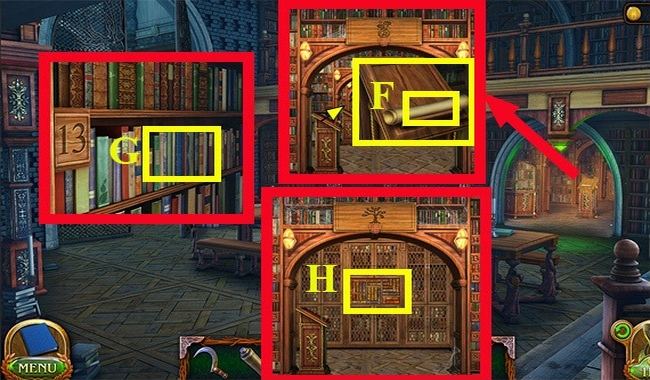
- Take the WOODEN HONEYBOOK (G).
- Take the WOODEN HONEYBOOK (H).
- Take the WOODEN HONEYBOOK (J).
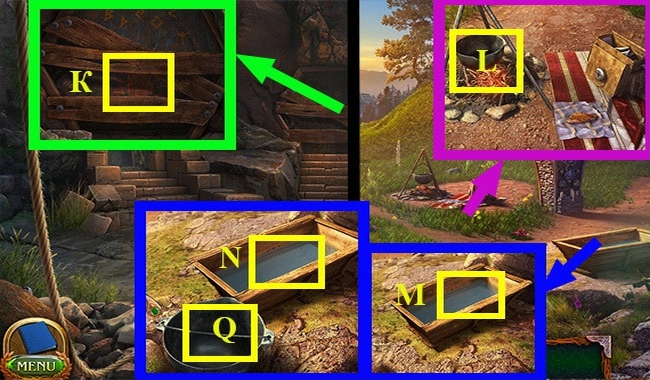
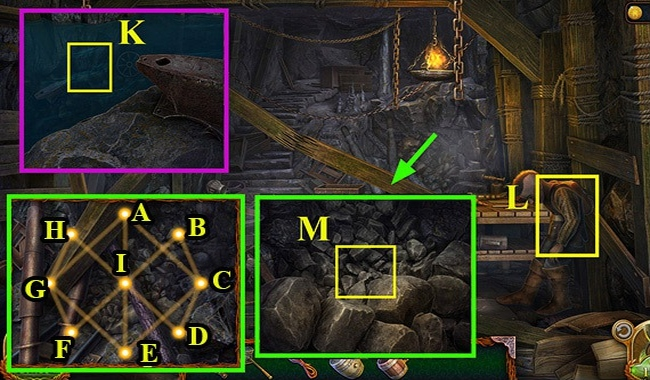
- Use the WOODEN HONEYCOMB on (I), complete the puzzle and get the ROPE ROLL and VENUE KEY.
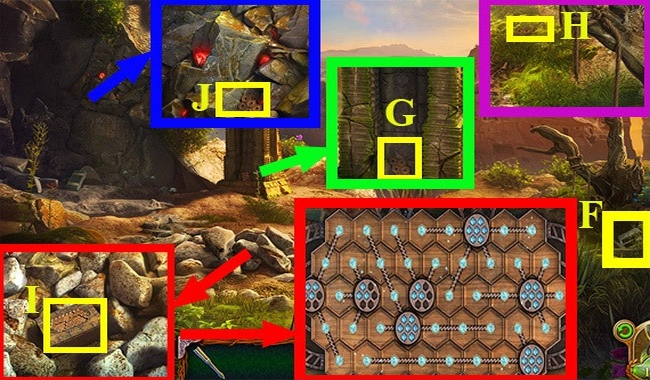
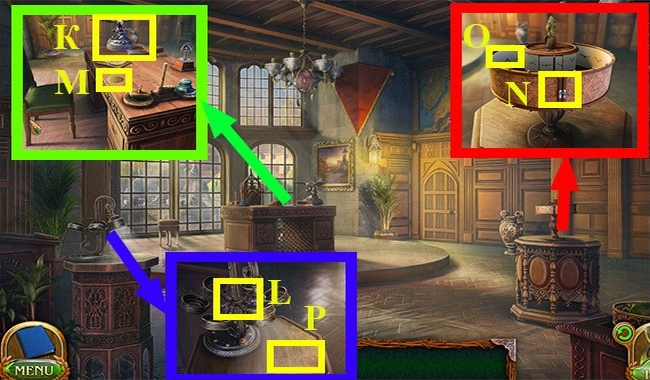
- Use the ROPE ROLL on (K).
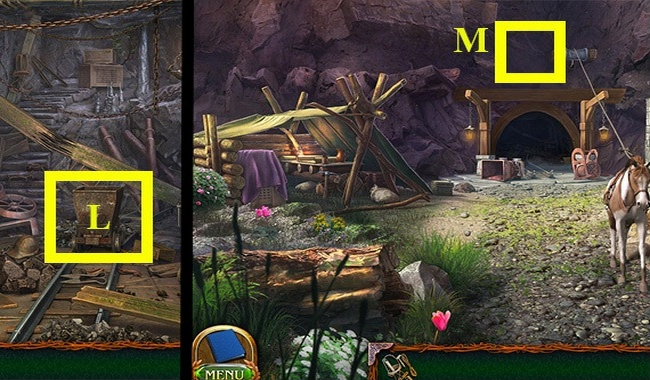
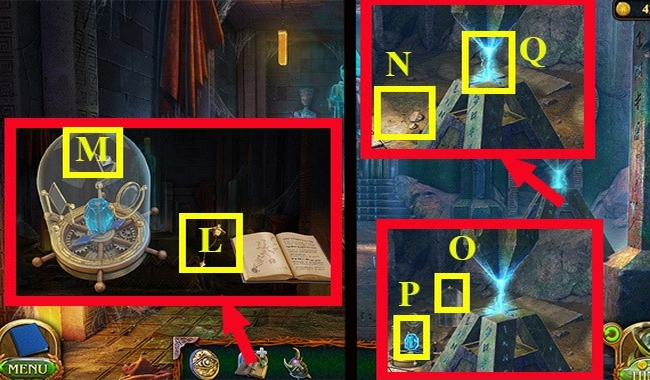
- Use JUMAR on (L).
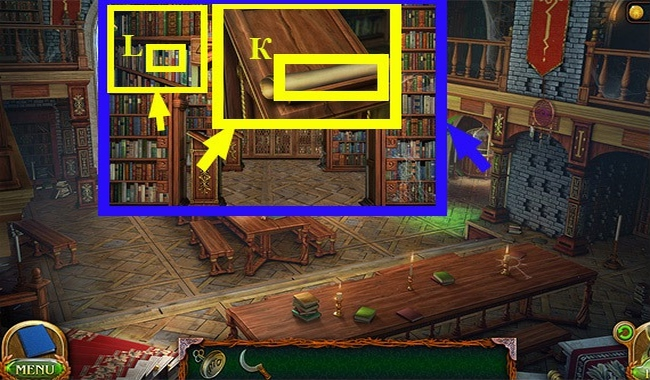
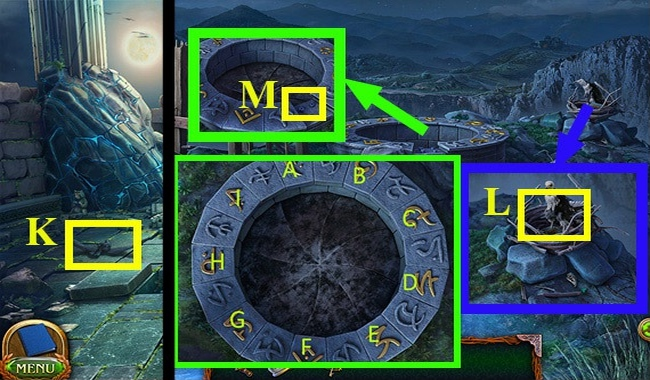
- Go down.
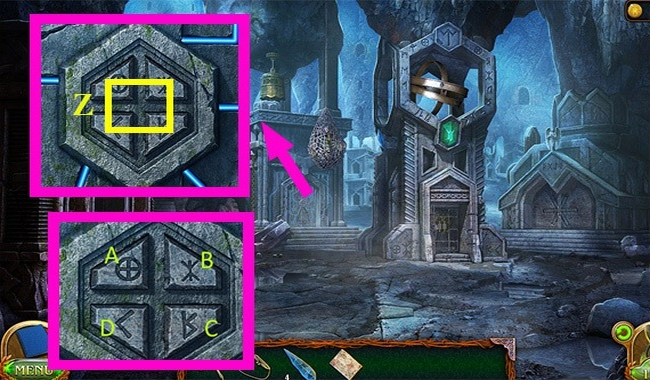
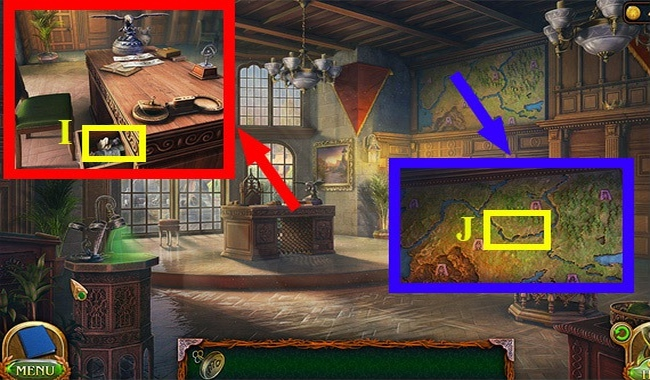
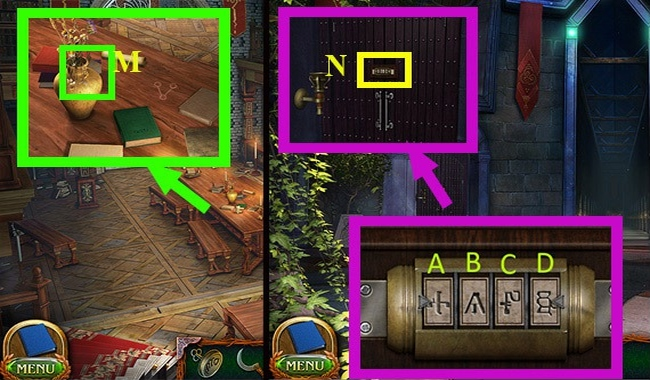
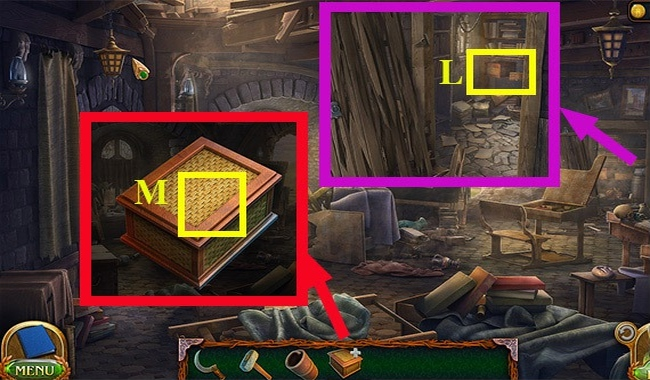
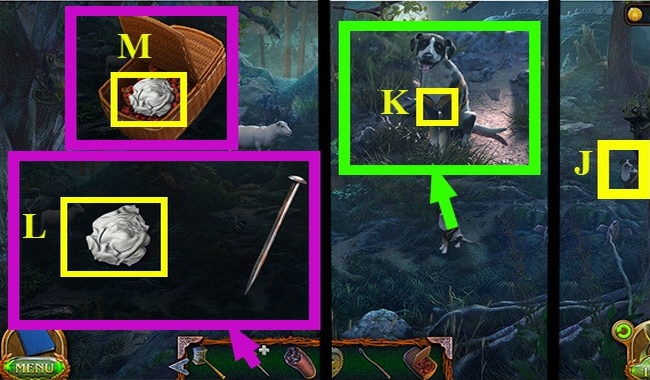
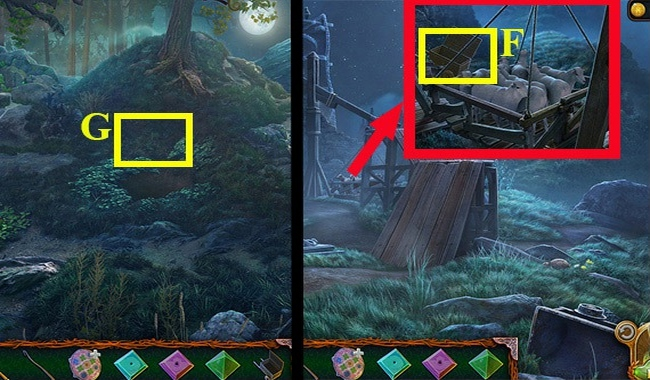
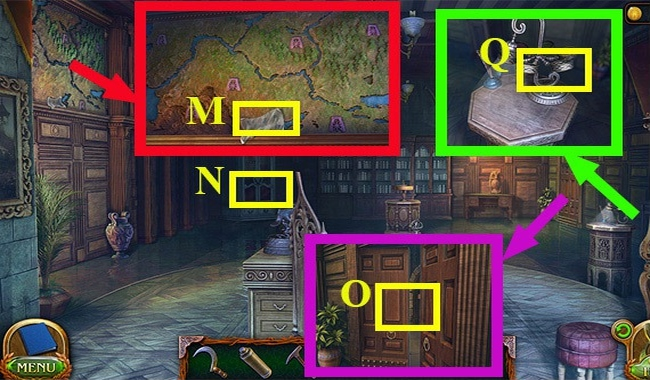
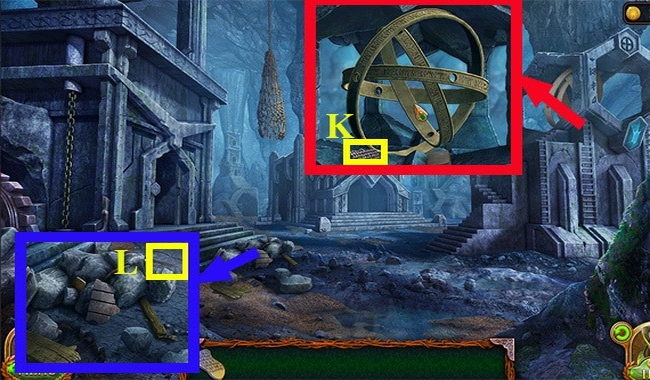
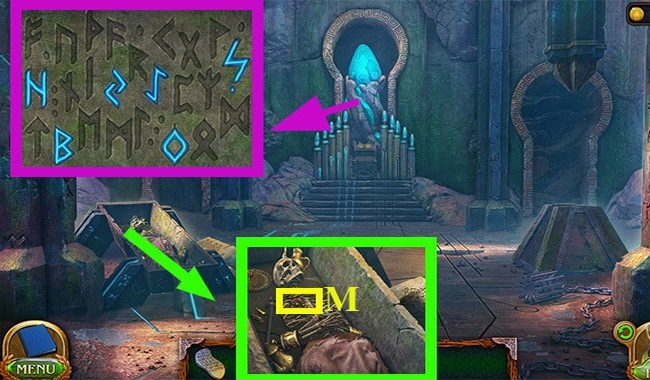
- Take the TRAVELER'S KEY (M).
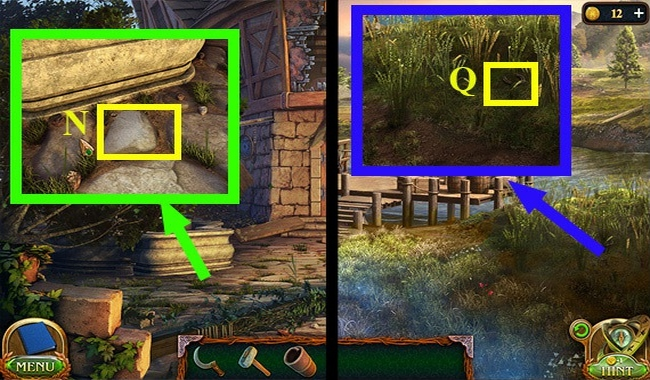
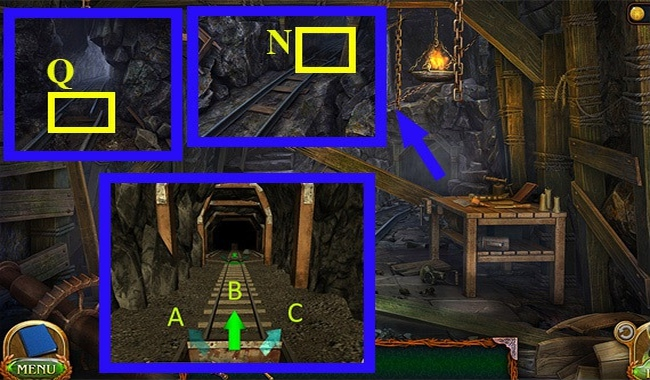
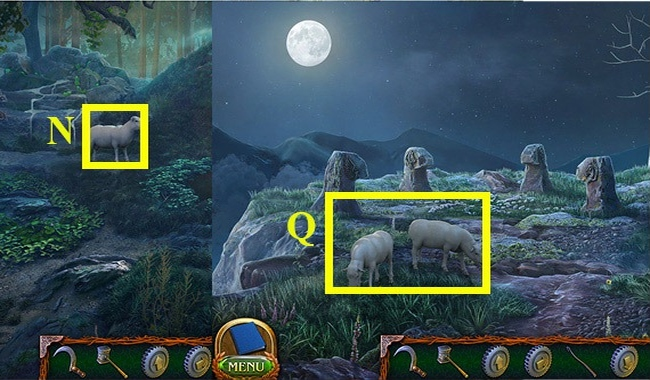
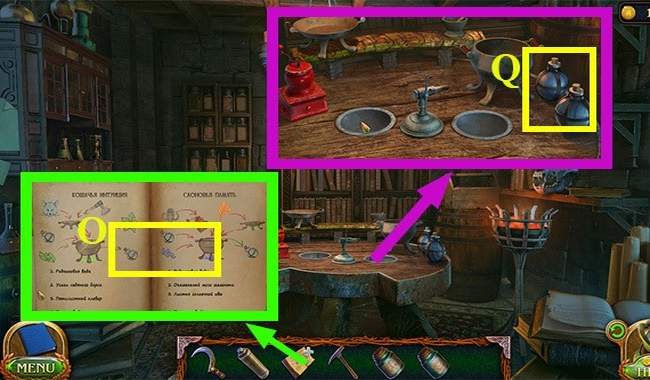
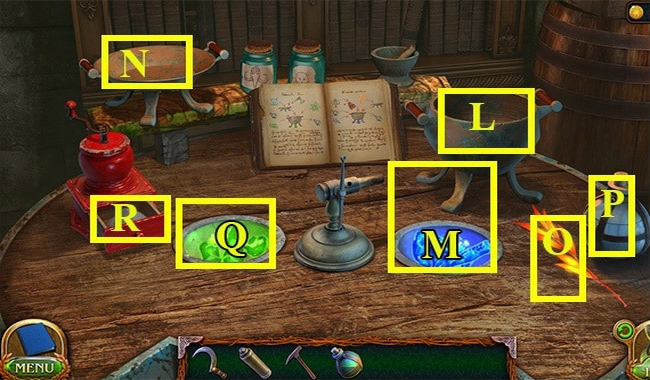
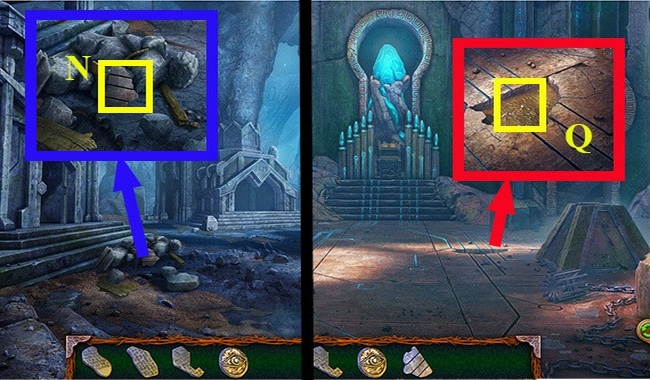
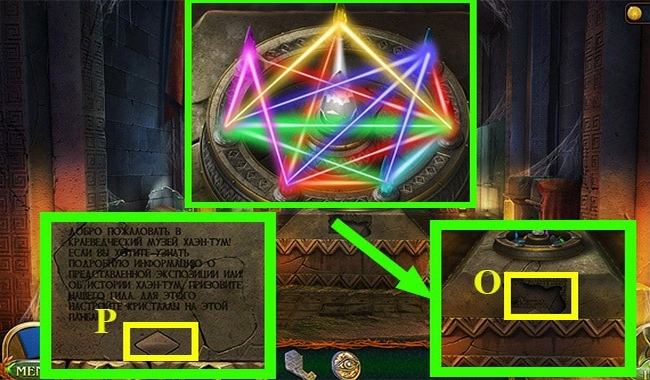
- Press (N).
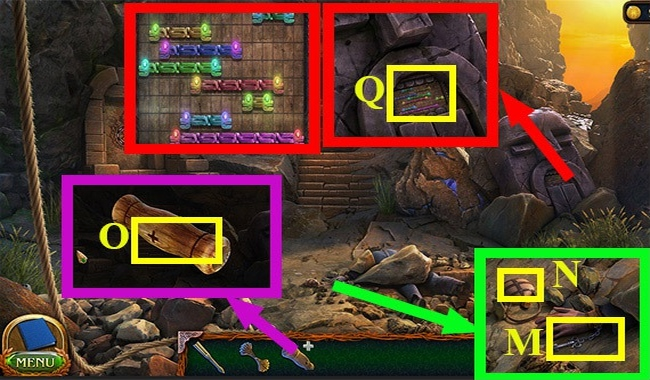
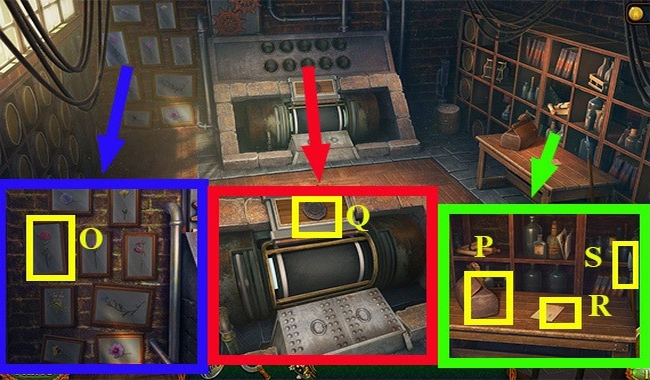
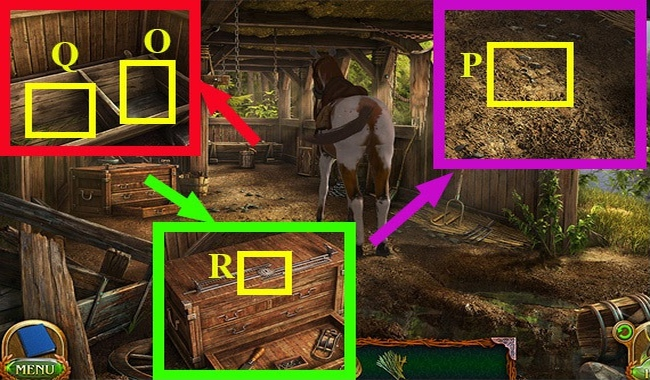
- Press (Q), complete the puzzle and receive the SCREWDRIVER HANDLE.
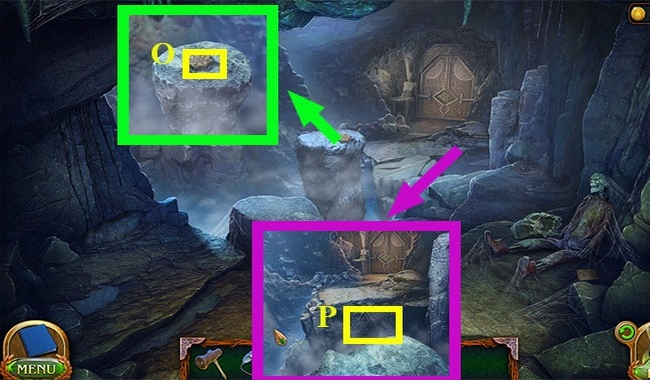
- Use the SCREWDRIVER ROD on (O) and receive a SCREWDRIVER.
- Go back 2 times.

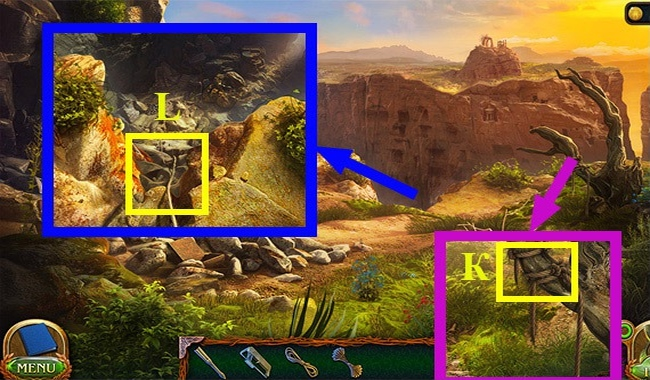
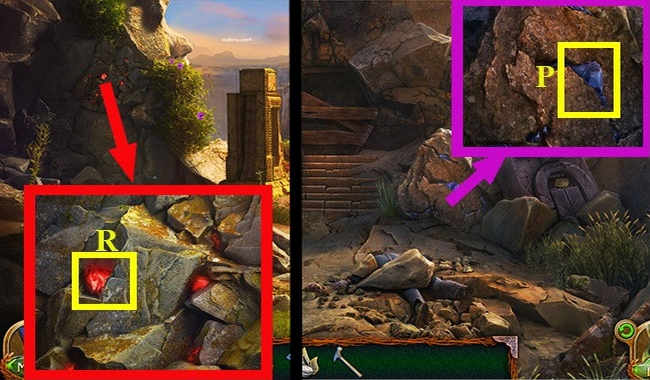
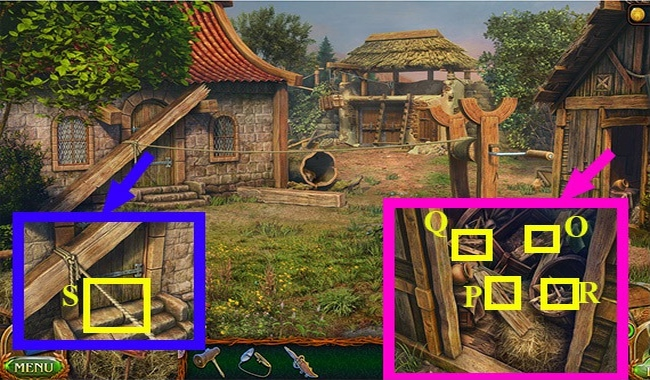
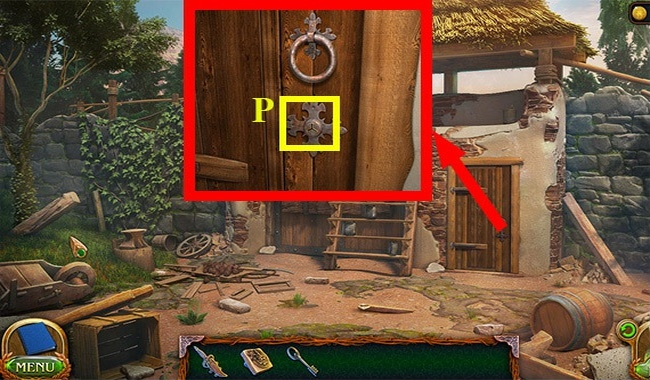
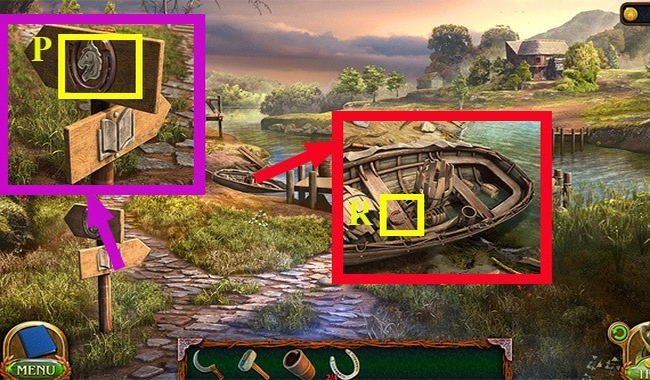
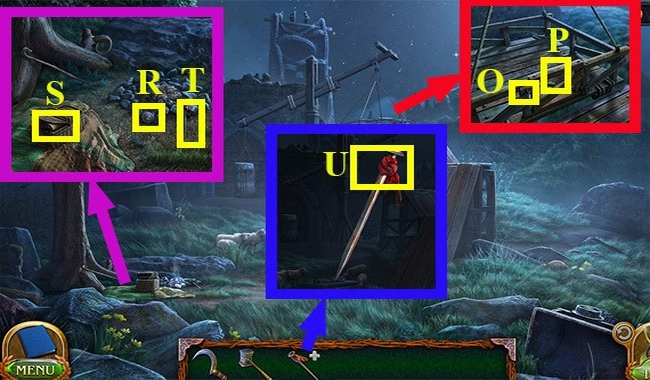
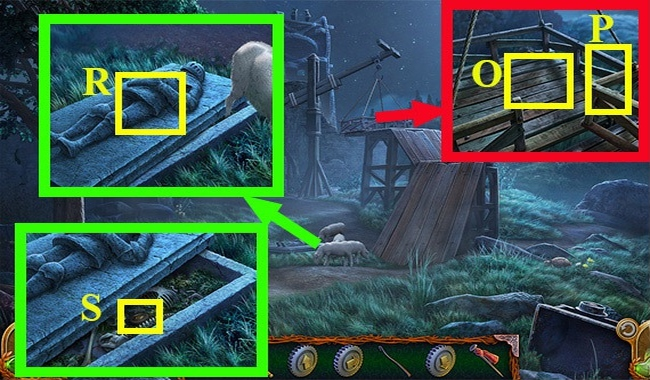
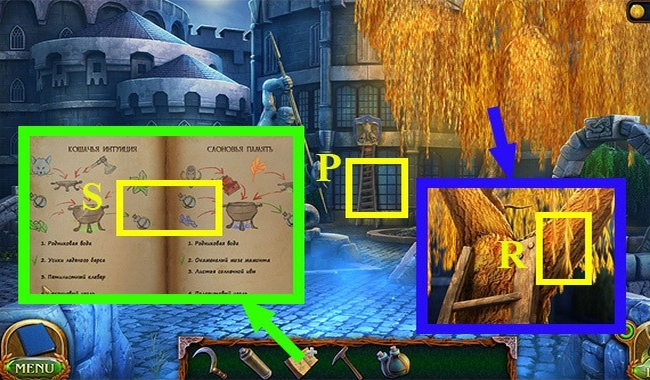
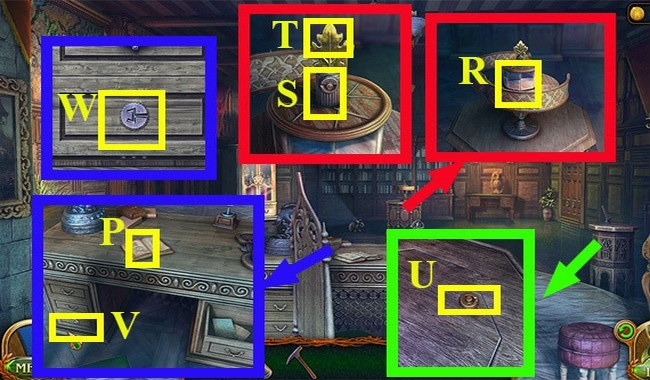
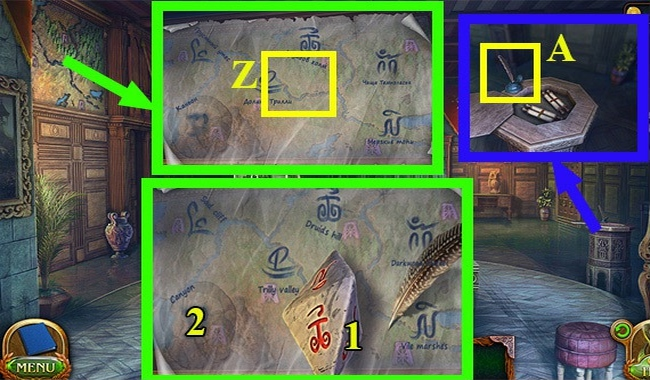
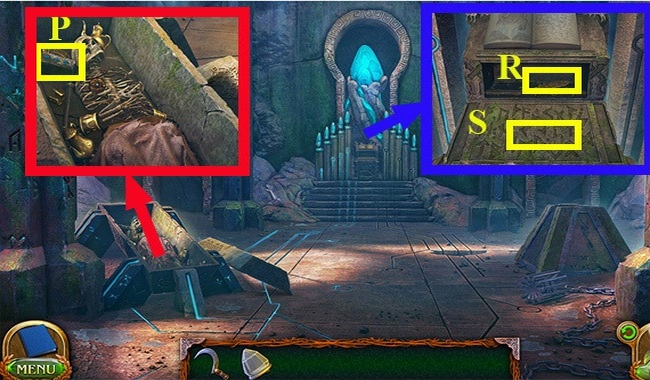
- Use the TRAVELER'S KEY on (P) and receive the FLINT.
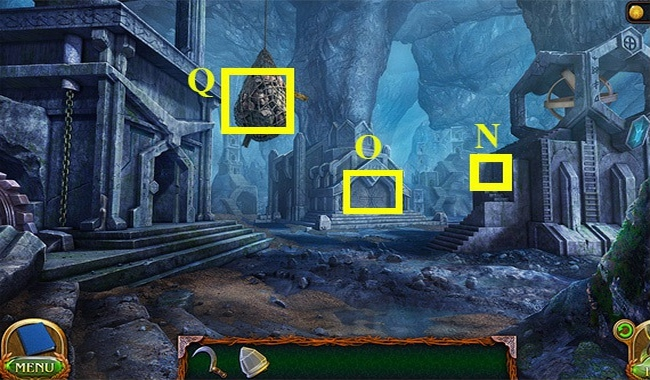
- Go left.
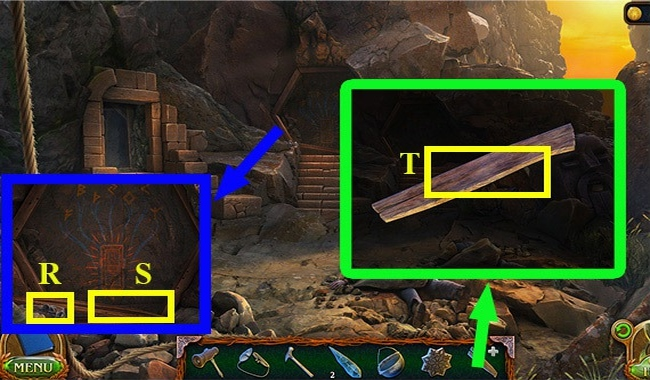
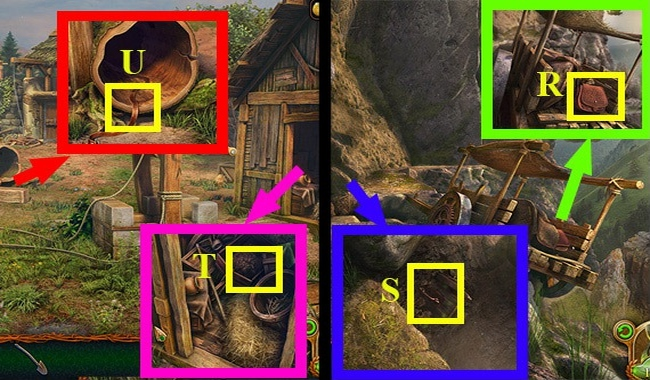
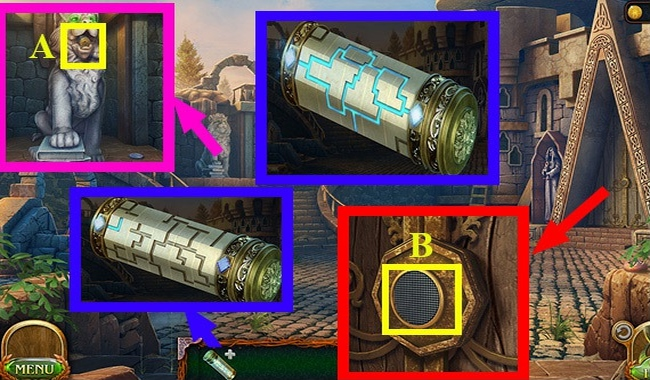
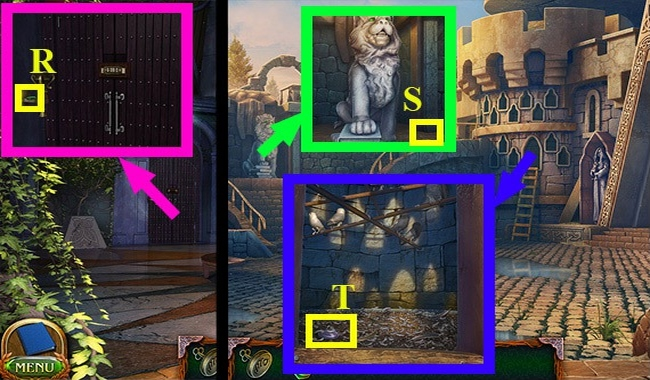
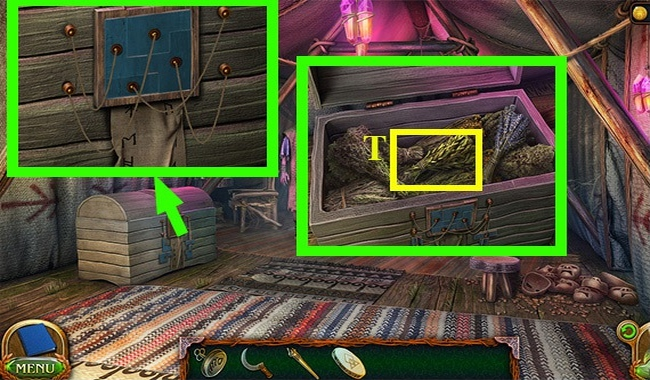
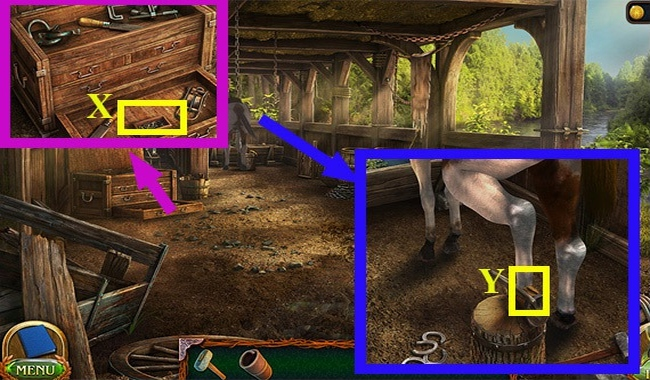
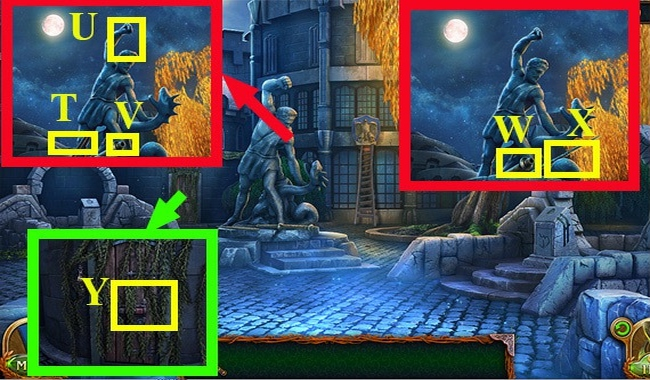
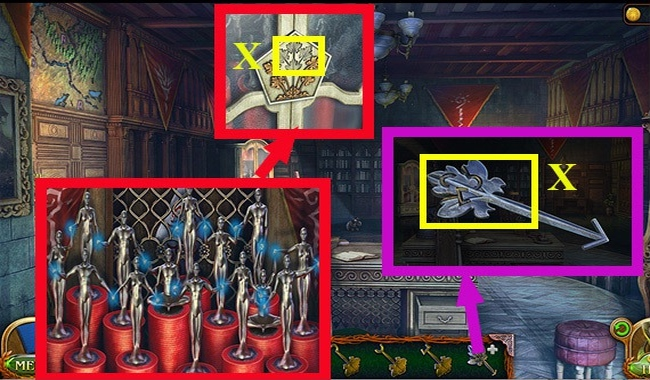
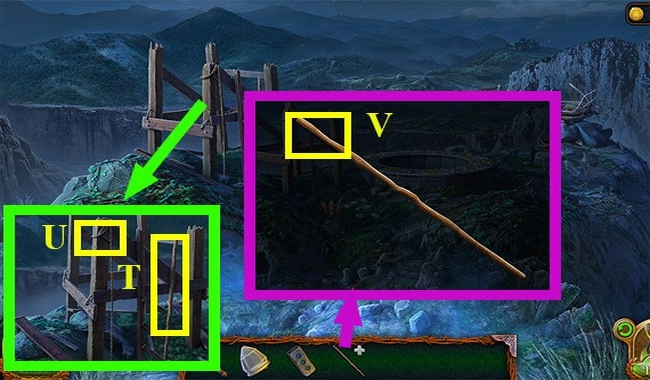
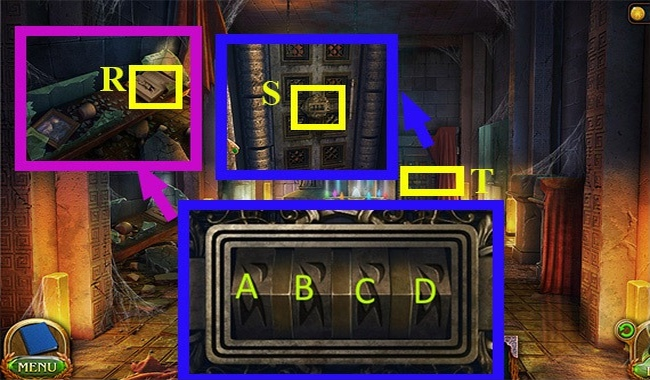
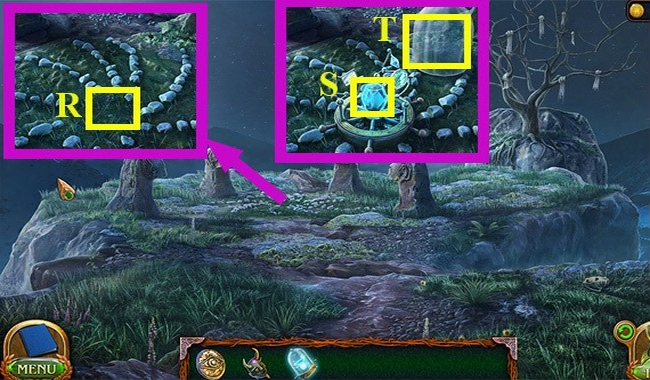
- Use the SCREWDRIVER on (R) to receive the LION MASK.
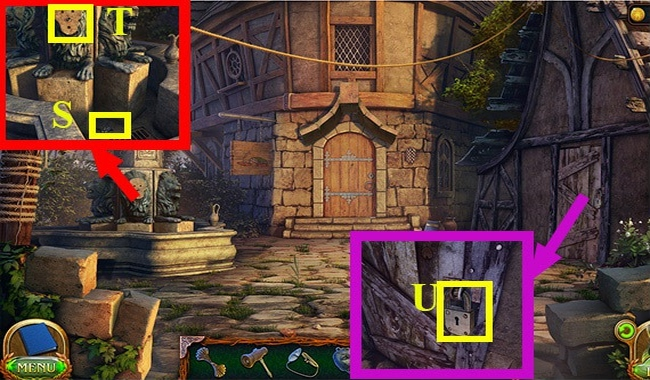
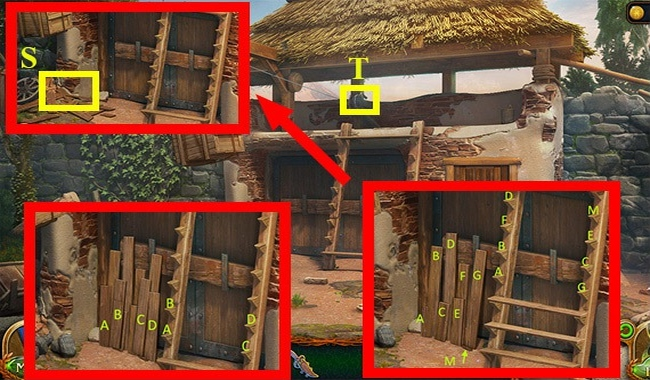
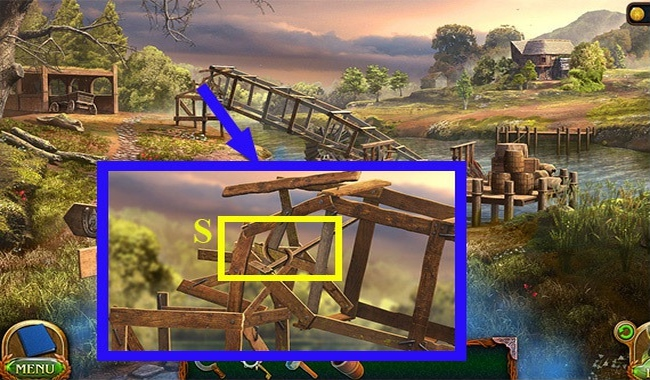
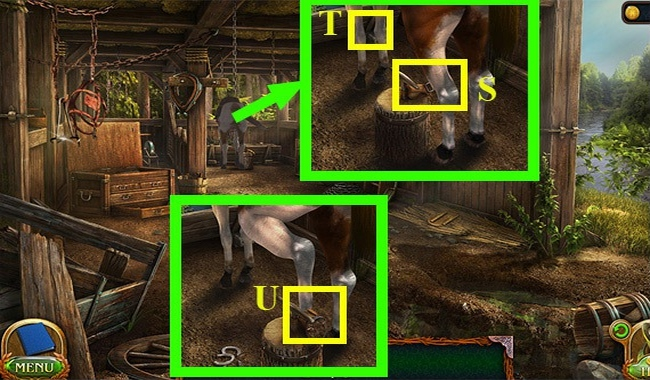
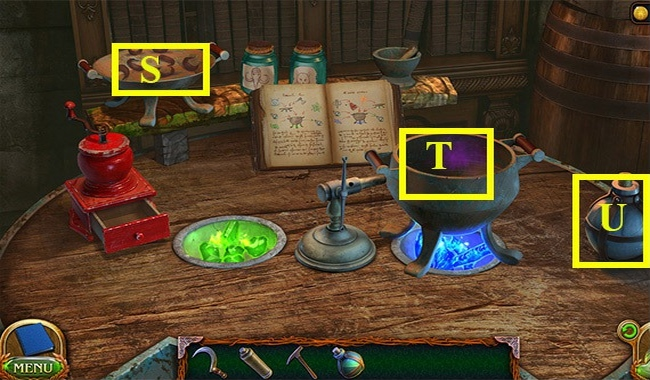
- Take the IRON FLOWER (S).
- Use the LION MASK on (T).
- Receive the BARN KEY.
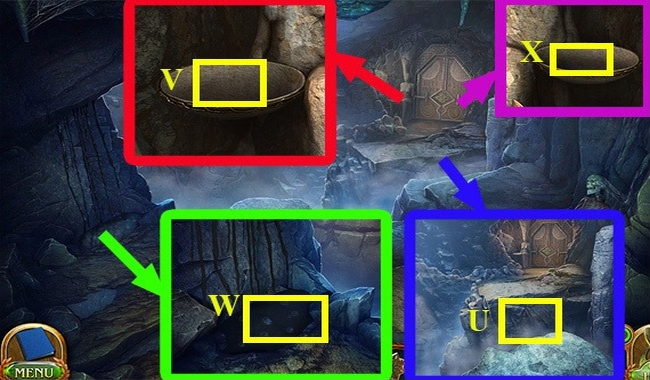
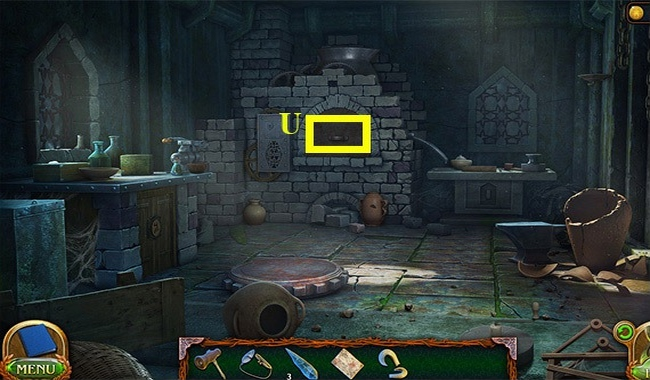
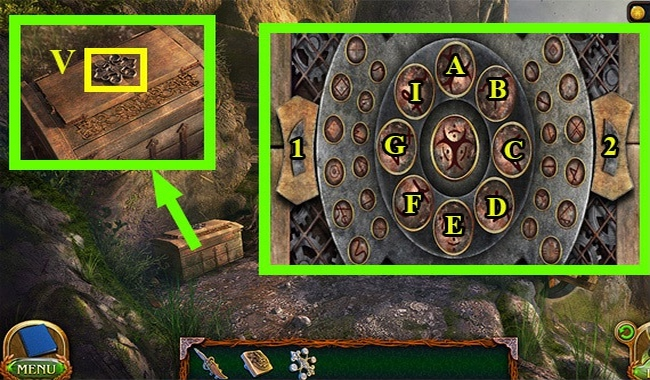
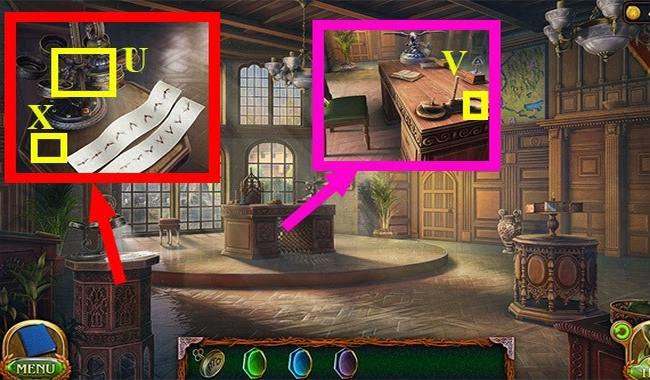
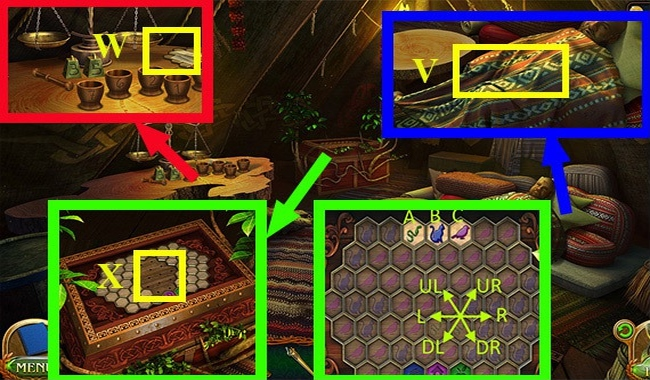
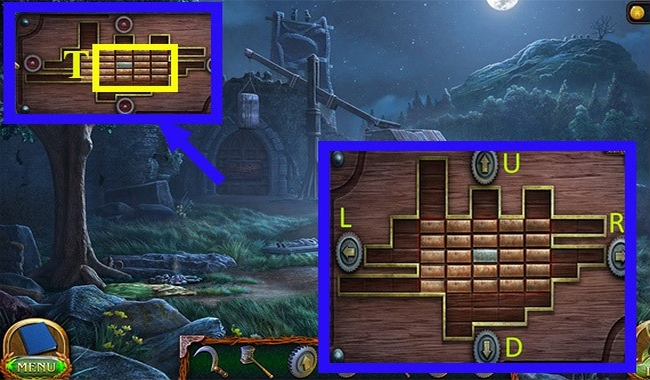
- Use the BARN KEY on (U), complete the puzzle and receive the WATER PIPE PARTS.
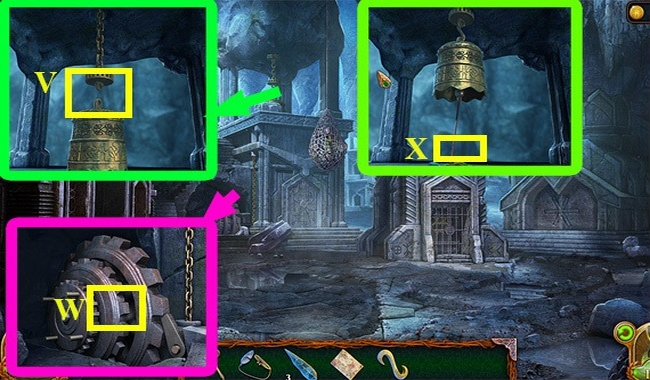
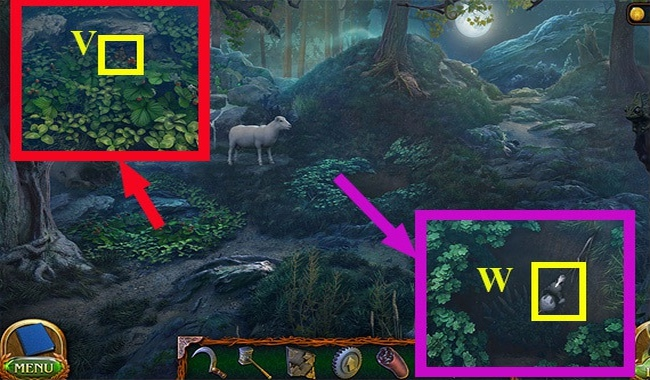
- Use the WATER PIPE PARTS on (V) and complete the puzzle.
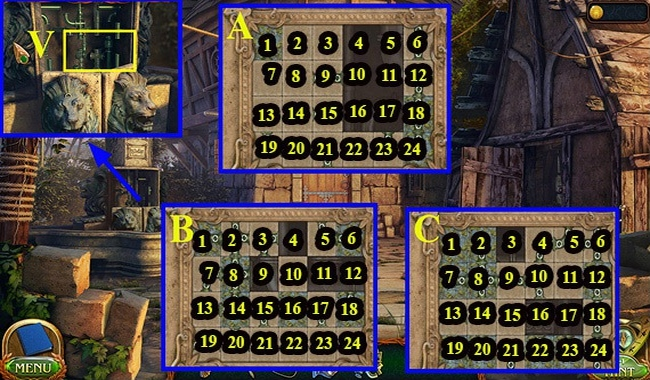
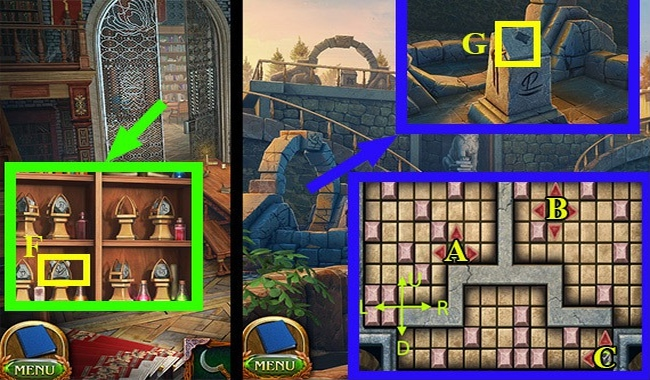
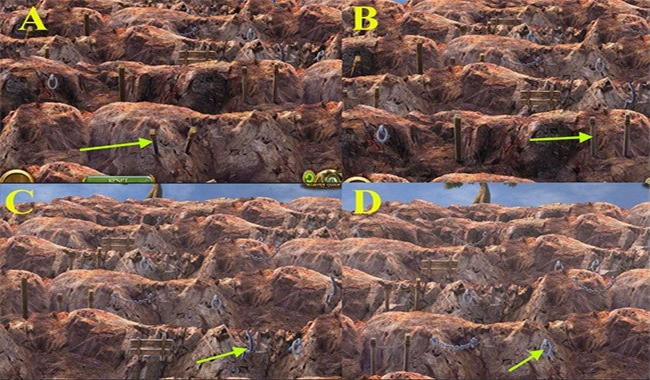
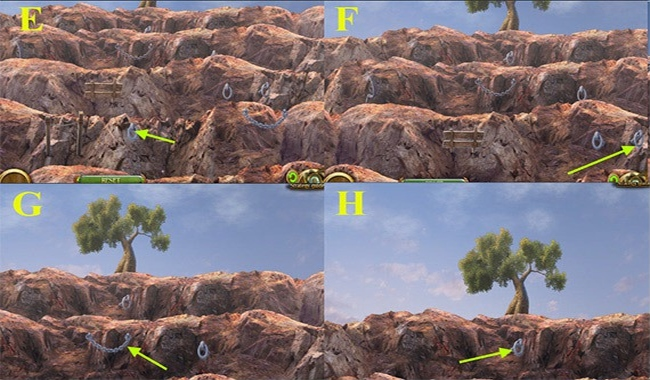
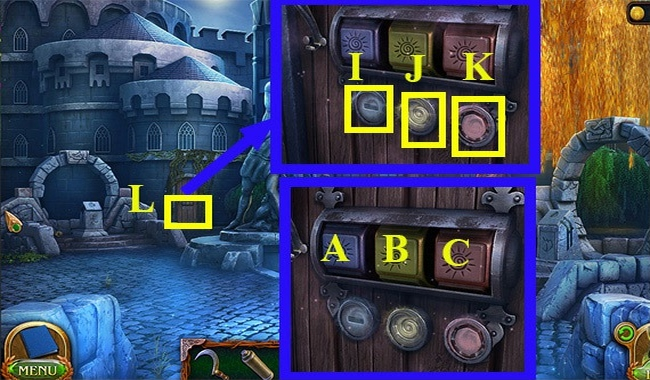
- Walkthrough: (A) 12-4, 15-17, 21-12, 9-21, 6-15, 8-6, 7-5, 15-7, 14-8, 13-9, 19-13, 20 -14, 21-15, 22-19, 23-16, 4-10, 17-11.
- Progression: (B) 10-12, 3-11, 2-10, 15-2, 21-4, 22-3, 20-22, 19-9, 13-15, 22-13, 23-19, 24 -20, 17-21, 11-24, 5-22, 24-5, 12-24, 10-23, 9-17, 15-11, 21-10, 22-9, 23-15, 17-21 , 11-22, 10-12, 9-17, 15-11, 21-10, 22-9.
- Walkthrough: (C) 9-3, 15-17, 14-9, 13-16, 21-13, 16-21, 17-15, 18-16, 11-18, 10-11, 9-10, 15 -9, 16-14, 11-15, 5-16, 10-5, 9-17, 15-9, 16-15.
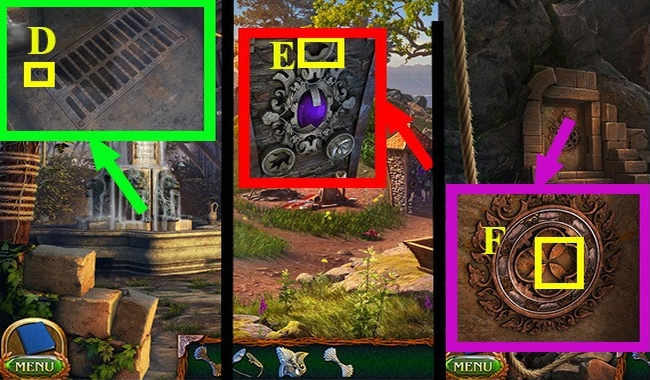
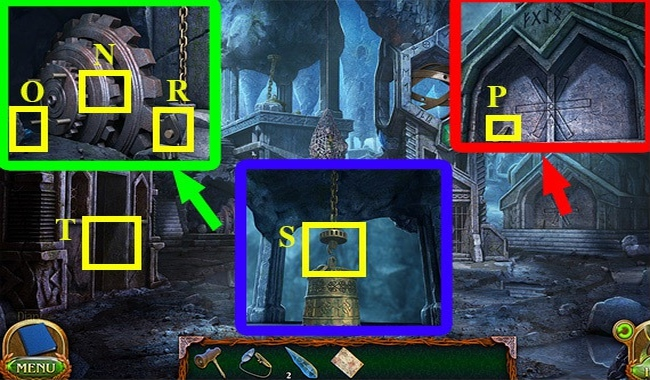
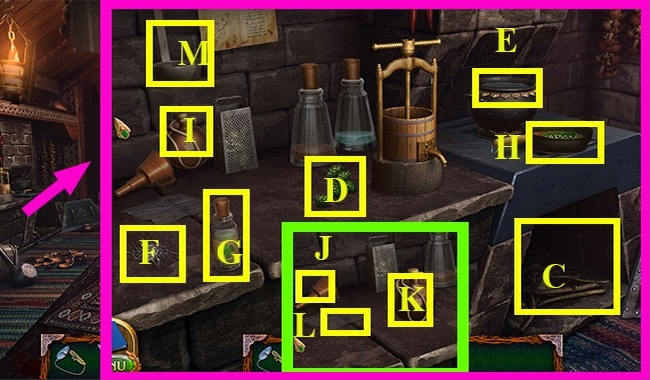
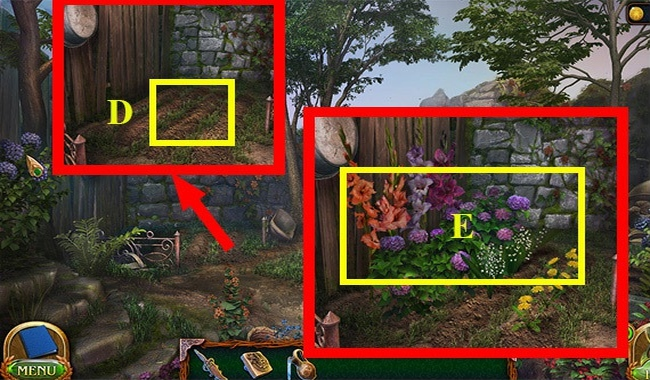
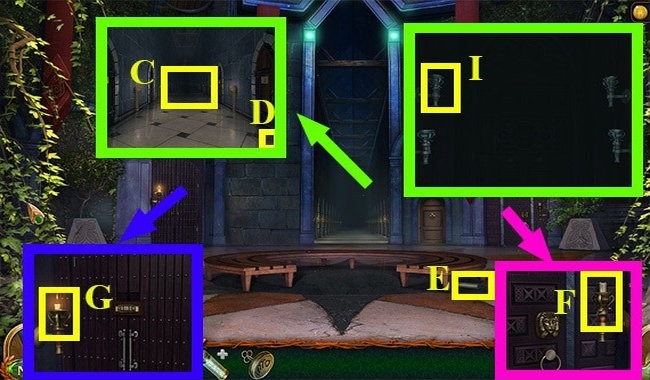
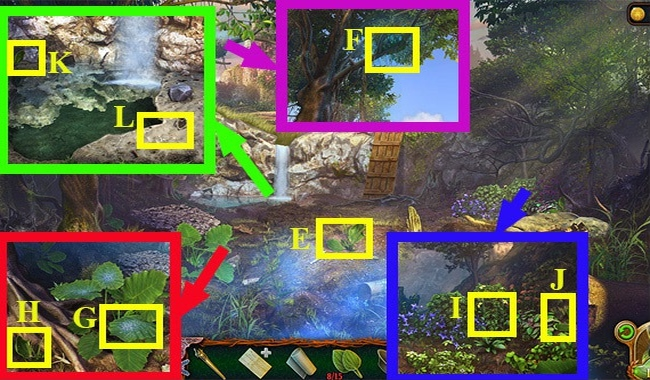
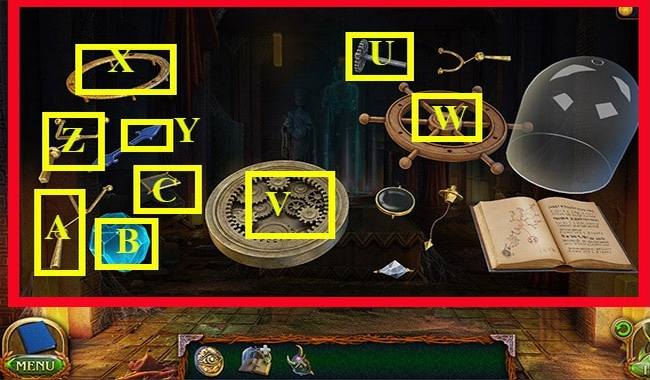
- Use the SCREWDRIVER on (D) to receive the Vault KEY.
- Use the IRON FLOWER on (E).
- Go right, then go down.
- Use the Vault KEY and Vault KEY on (F).
- Go left.
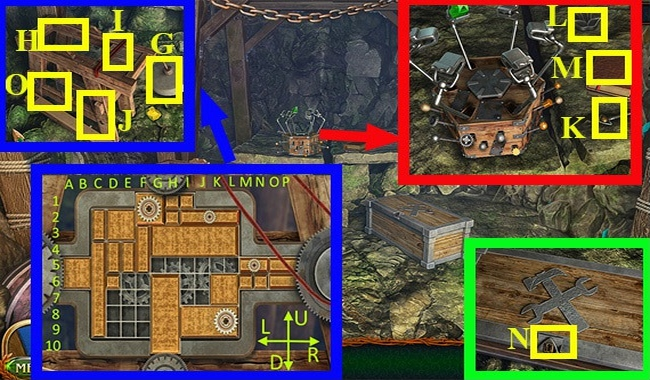
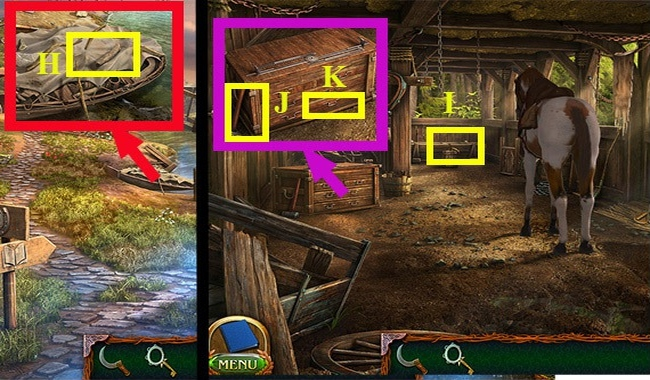
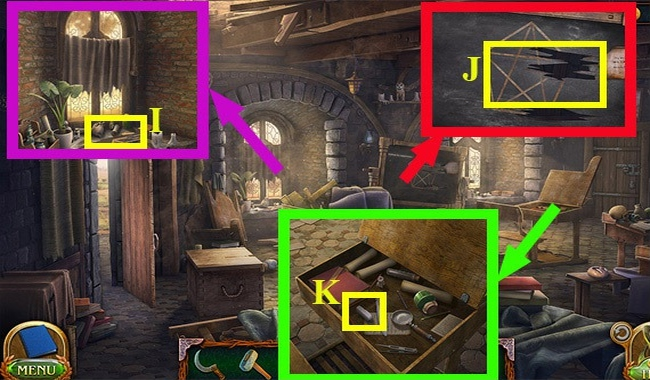
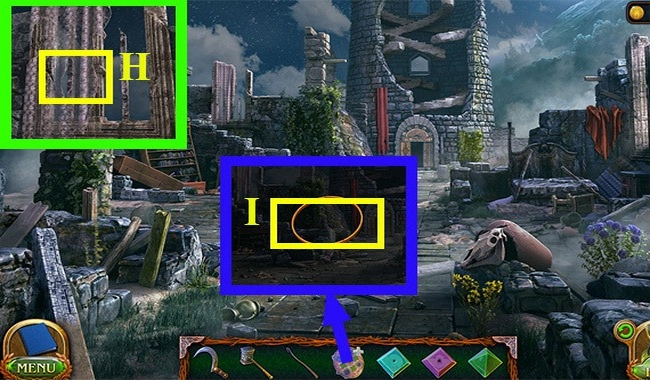
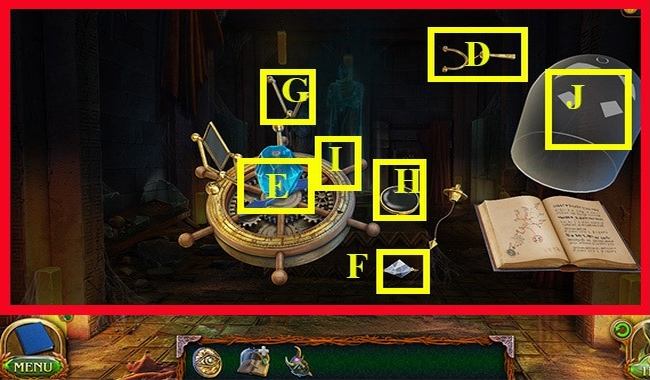
- Drag (G) to (H).
- Drag (I) to (J).
- Take the TOOLKIT KEY (K).
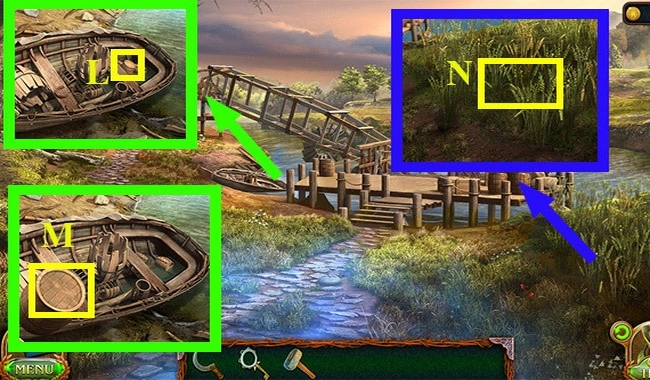
- Take the IRON FLOWER (L).
- Press (M) and look for hints.
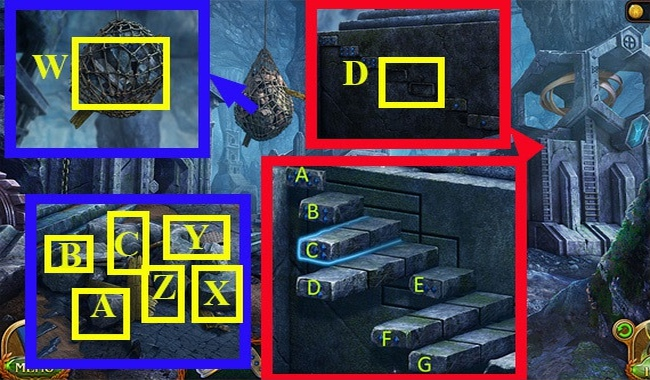
- Use the TOOL KIT KEY on (N) and take the GEAR GEAR and HAMMER.
- Use the GEAR TRANSMITTER on (O).
- Press (O) and complete the puzzle.
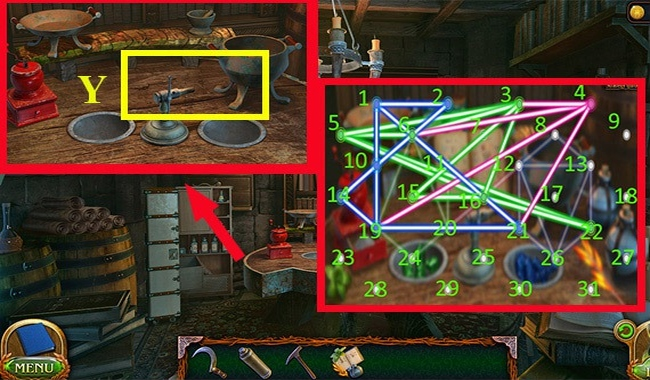
- Walkthrough: F3-D4, D6-R2, F6-U1, F5-R3, I5-D2, E4-D4, D4-D4, D2-D4, C2-R2, E2-D2, E4-R1, F4-D1, G3-D1, F1-D1, F2-L3, H1-L2, F1-D3, F4-L2, D4-D1, H2-L3, E2-D3, I1-L3, F1-D3, I2-L3.
- F2-U1, G4-U2, F4-R4, J4-D3, E5-U1, E4-R5, J4-D2, D5-U1, D4-R5, I4-D2, F5-U1, F4-R6, D6-U2, D4-R1, E4-U2, E8-U4, E4-R6, D8-U4, D4-R6, C4-R2, C2-D6, A5-R2, C5-U3, C8-U3, C5-L2, E4-L2, F7-L2, J4-L6, I6-U1, I5-L4, E5-D1, E6-L1, G6-U2, G4-L2.
- I7-L2, G7-D2, G9-L2, J7-L3, G7-D2, G9-L1, J6-U2, J4-L1, K6-L4, G6-U2, K4-D2, L4-D2, M5-L4, I5-D2, I7-L2, G7-D3, K6-L4, G6-D2, L6-L4, H6-D2, O5-L6, I5-D2, I7-L2, M6-L3, J6-U2, N6-L3, K6-U2, O6-L8, I8-U3, I5-R4.
- Walk back.
- Use the HAMMER on (P) and receive NUGGETS 1/4.
- Walk back.
- Use the HAMMER on (R) and receive NUGGTS 2/4.
- Walk back.

- Use the IRON FLOWER on (S) to receive NUGGTS 3/4.
- Go right, then go down, then go left.
- Use the HAMMER on (T) and receive NUGGETS 4/4.
- Use NUGGETS 4/4 on (U).
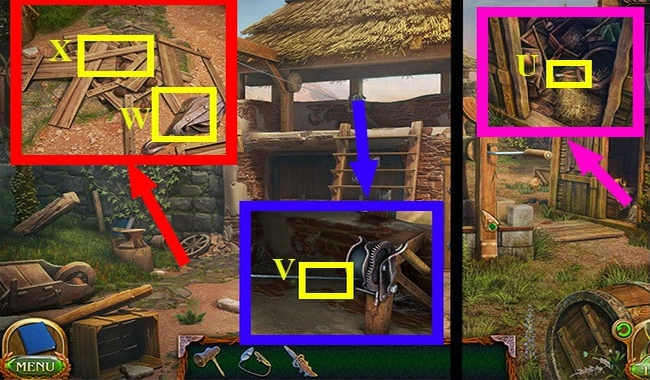
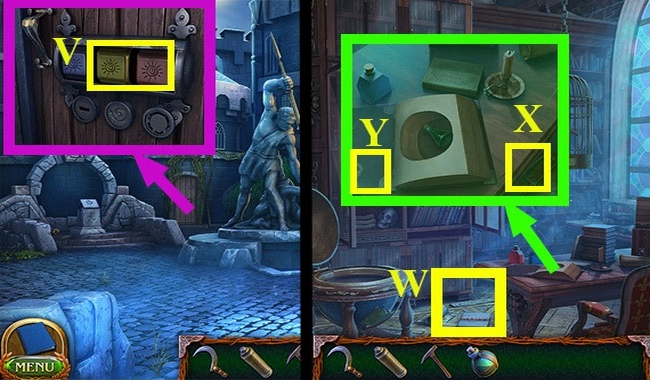
- Press (V).
- Go back 3 times.
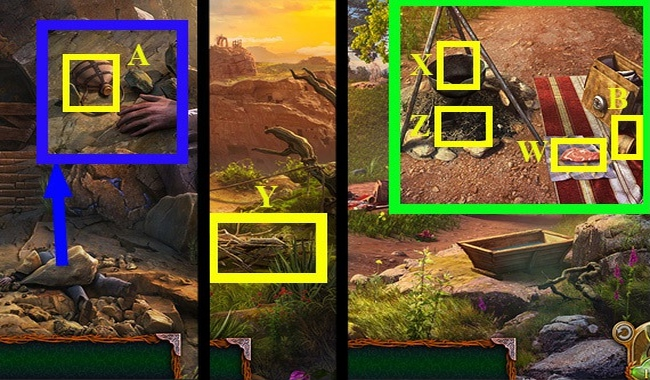
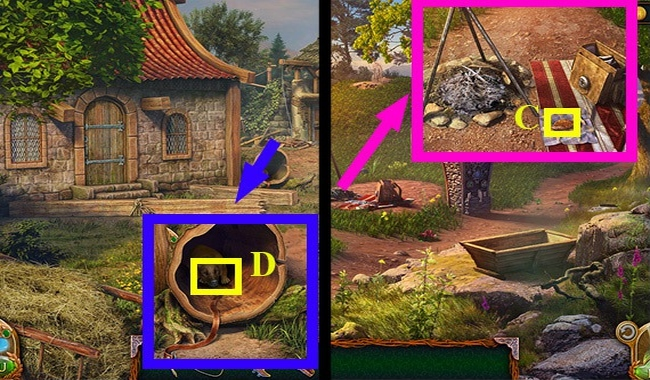
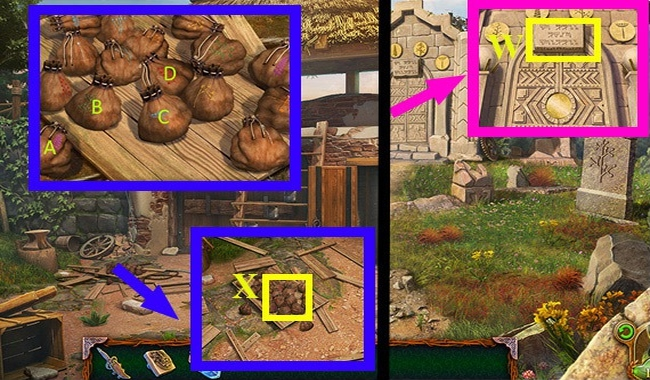
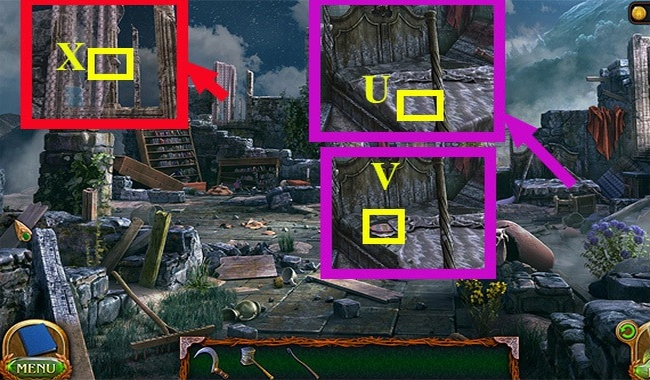
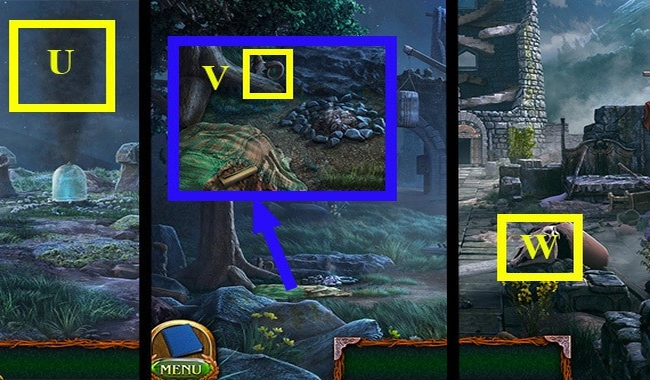
- Drag (W) to (X).
- Go right.
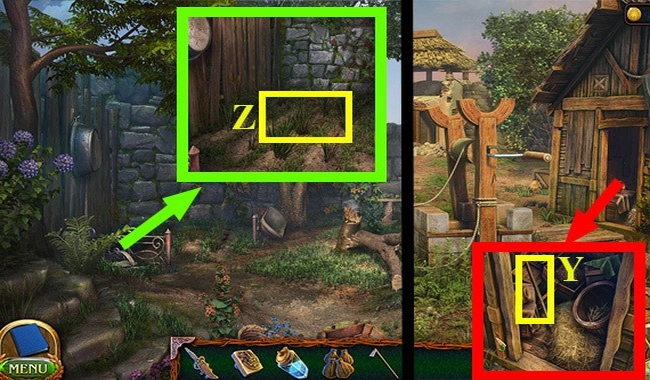
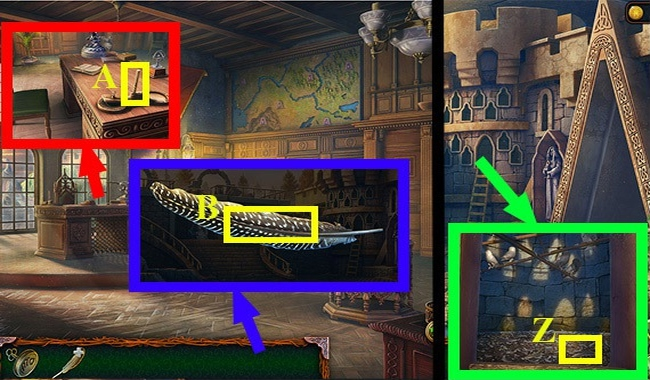
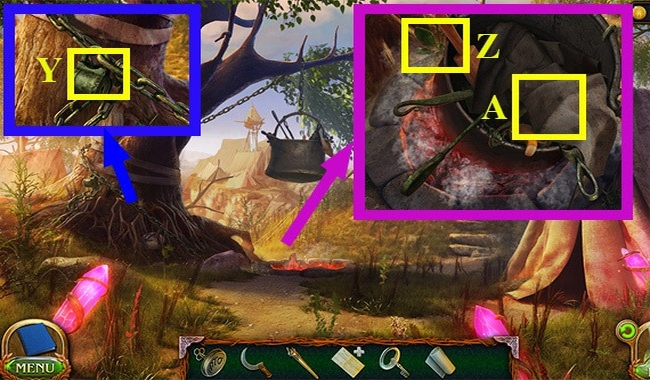
- Take the BRUSHBOARD (Y).
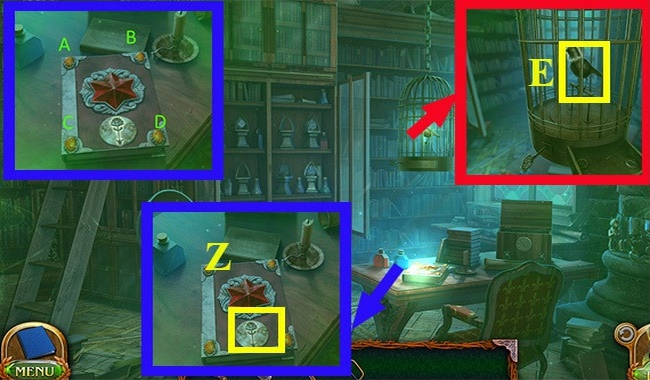
- Walk back.
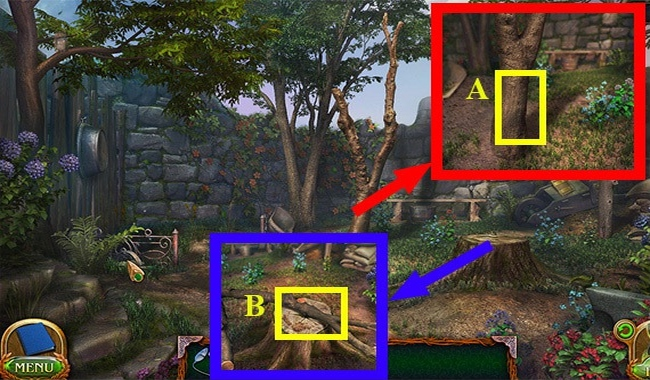
- Use the BUSH and FLINT on (Z).
- Go right, then go down.
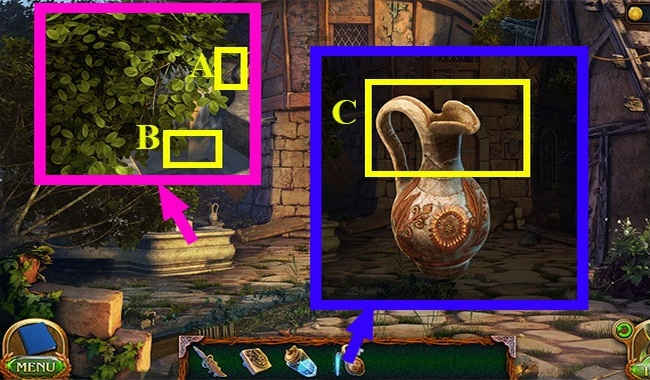
- Take the FLASK WITH ALCOHOL (A).
- Go back 2 times.
- Use the FLASK WITH ALCOHOL and FLINT on (Z).
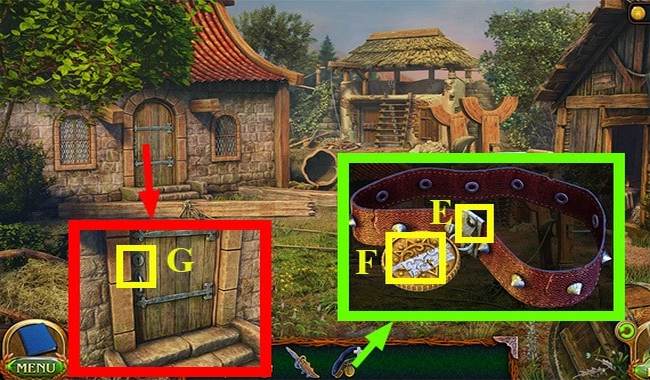
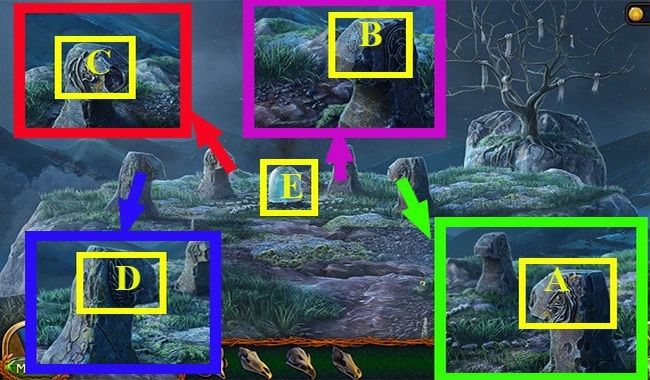
- Drag (B) onto (X) and get FAT.
- Go right, then go down, then go left.
- Use FAT on (B) and press (B).
- Drag (C) to (D) to receive CRYSTALS.
- Press (E).
- Use the CRYSTALS on (E).
- Use the HAMMER on (F).
- Complete the puzzle.
- Walkthrough: A-U2, E-D1, G-U1, F-D1, G-U1, F-D1, G-U1, F-D1, E-U1, A-D1, C-U1, D-U1, B-U1, D-U1, A-U3.
- D-U2, C-U1, G-U1, B-U2, G-U2, C-D2, A-U1, E-D1, C-U1, B-U1, C-U2, B-U1, C- U1, A-D2, E-U1, F-U1, C-D1.
- Go right.

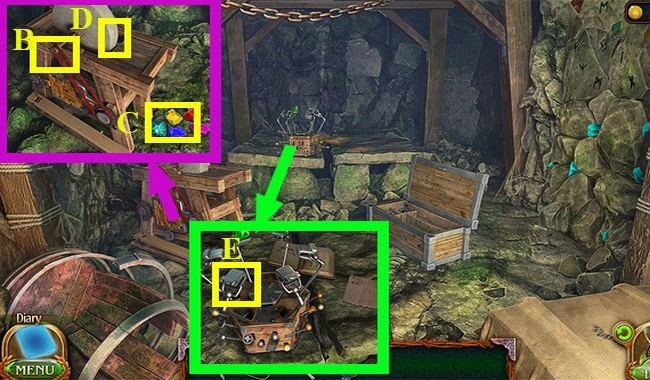
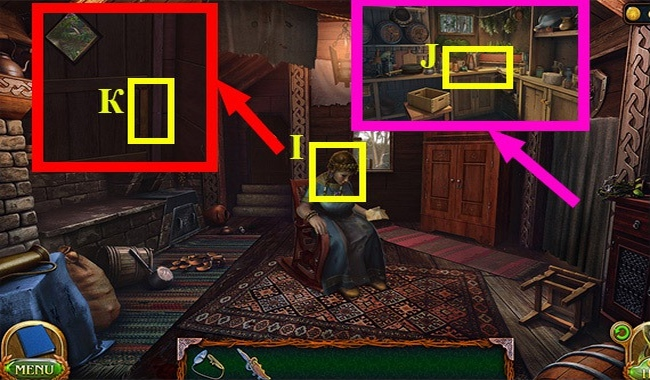
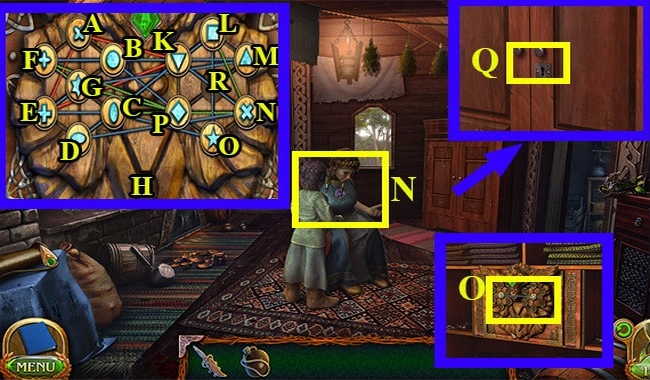
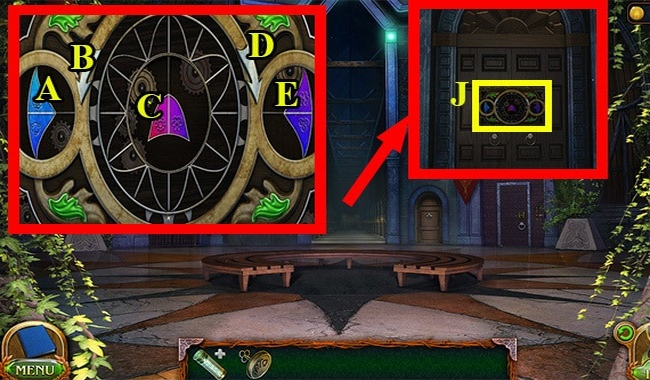
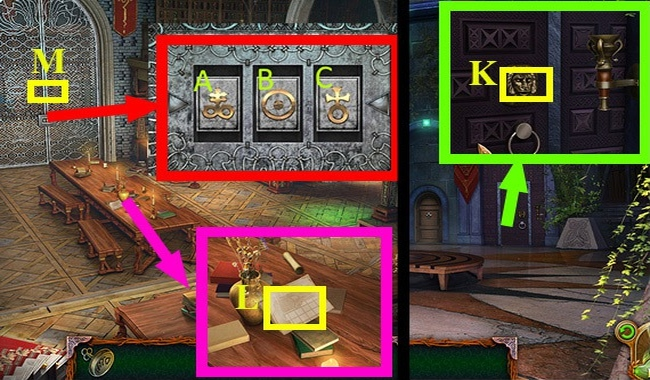
- Press (H) and take the CRYSTAL CANDLE and CROWBAR.
- Press (I).
- Take the CRYSTAL CANDLE (J).
- Go back 3 times.
- Use the CROWBAR on (K) and take the BOARD.
- Go back 2 times.
- Take the KOT (L).
- Use the CAULDRON on (M).
- Drag (N) onto (Q) to receive a KOT OF WATER.
- Go right, then go down, then go left, then go right.
- Use the BOARD on (O). Take the ANCIENT SEAL and BOARD.
- Use the BOARD on (P) and receive the BOARD.
- Go back 3 times.
- Take the NAILS (R).
- Take the BOARDS (S).
- Use the BOARDS, NAILS and HAMMER on (T) to receive a MADE BRIDGE.
- Go left, then go right.
- Use the IMPROVE BRIDGE on (U).
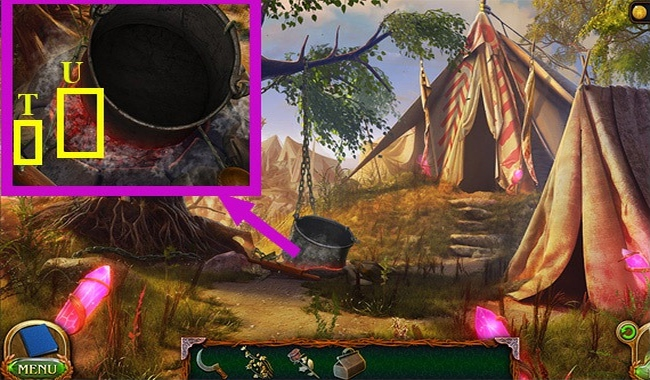
- Use the KOT WITH WATER on (V) to receive the KOT.
- Use the KETTLE on (W) to receive a KETTLE WITH BLACK OIL.
- Use the KOT WITH BLACK OIL and FLINT on (X).
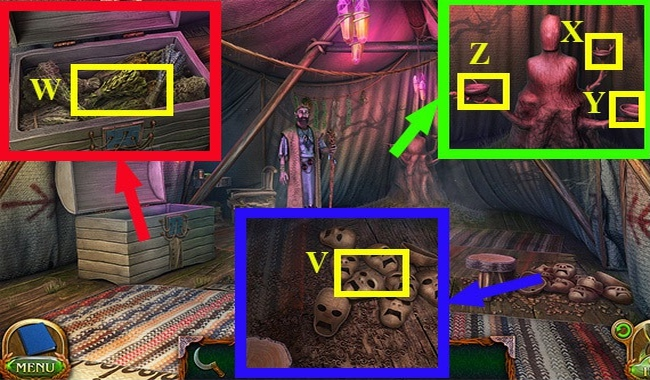
- Use the ANCIENT SEAL on (Y).
- Take the TREASURE HUNTER'S NOTE (Z).
- Use the TREASURE HUNTER'S NOTE on (M), complete the puzzle and receive the TREASURE HUNTER'S NOTE.
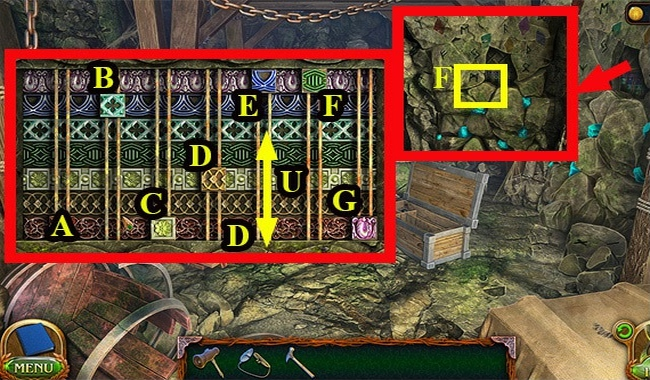
- Walkthrough: A, K, H, D, B, E, H, K, B, J, I, F, I.
- Go forward.
- Press (N).
- Press (O) and take the CRYSTAL CANDLE.
- Take the SHAFT RETAINER (P).
- Use the SHAFT RETAINER on (R).
- Take the BROKEN CONNECTOR (S).
- Press (T).
- Use the BROKEN CONNECTOR on (U), complete the puzzle and receive the CONNECTOR.
- Use the CONNECTOR on (V).
- Press (W).
- Возьмите ФИГУРКУ “ПЕСОЧНЫЕ ЧАСЫ” и КРИСТАЛЛИЧЕСКУЮ СВЕЧУ (X).
- Используйте ФИГУРКУ “ПЕСОЧНЫЕ ЧАСЫ” на (Y) и пройдите головоломку.
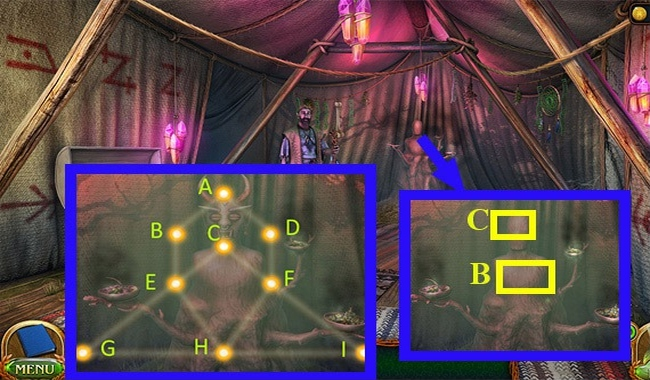
- Use the TREASURE HUNTER'S NOTE on (Z) and complete the puzzle.
- Passage: C, B, A, D.
- Go forward.
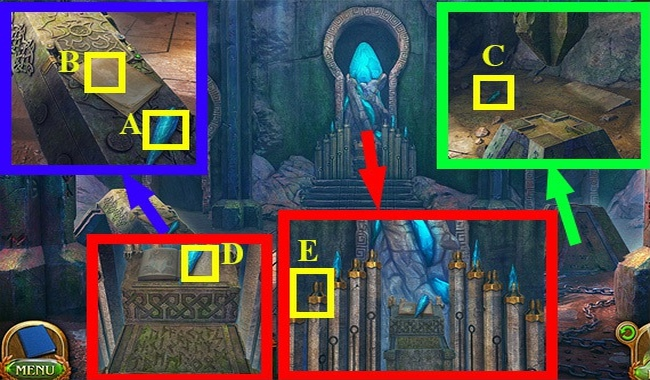
- Take the CRYSTAL CANDLE (A).
- Press (B).
- Take the CRYSTAL CANDLE (C).
- Take CRYSTAL CANDLE 7/7 (D).
- Use the CRYSTAL CANDLES on (E).
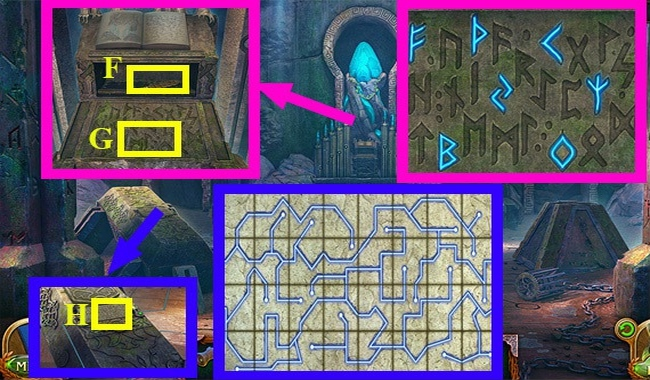
- Drag (F) to (G) and complete the puzzle.
- Click and complete the puzzle (H) to receive the DAGGER.
- Go forward.
- Press (I).
- Use the SCREWDRIVER on (J).
- Click 2 times (K).
- Use the DAGGER on (L) and receive the END OF ROPE.
- Use ROPE END on (M).
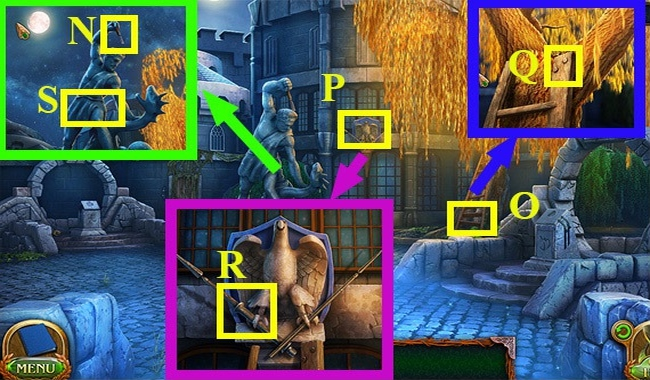
- Press (N).
- Press (Q) (O) (P) (R).
- Use the DAGGER on (S).
- Go forward.
- Press (S) and complete the puzzle.
- Walkthrough: 1. (A) to (A), (B) to (B), (C) to (C), (D) to (D).
- 2. (A) to (A), (B) to (B), (C) to (C), (D) to (D), (E) to (E), (F) to (F), (G) to (G), (M) to (M).
- Press (T).
- Walk back.
- Take the NIPPERS (U).
- Go forward.
- Use the NIPPERS on (V).
- Press (X).
- Take the POWER PULL (W).
- Walk back.
- Use the POWER PULLER on (Y).
- Press (Z).
- Press (A).
- Press (B).
- Walk back.
- Take the FRILLED MEAT (C).
- Go forward.
- Use the ROASTED MEAT on (D) and receive a COLLAR.
- Use the SCREWDRIVER on (E).
- Press 2 times (F) and receive the HOUSE KEY.
- Use the HOUSE KEY on (G).
- Go left.
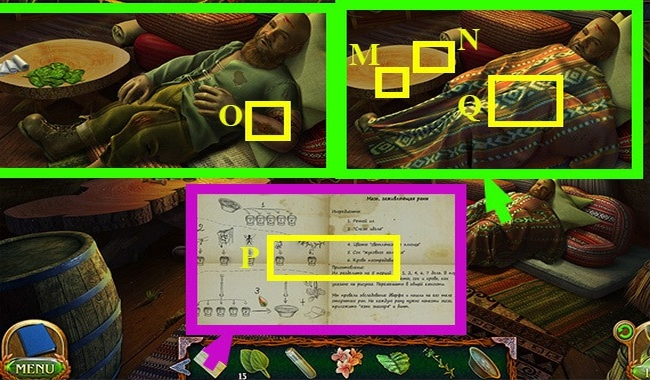
- Press (I) to receive a MEDICINE PRESCRIPTION.
- Use the MEDICINE RECIPE on (J), complete the puzzle and receive the INGREDIENT SET.
- Press (K).
- Use the INGREDIENT SET on (L).
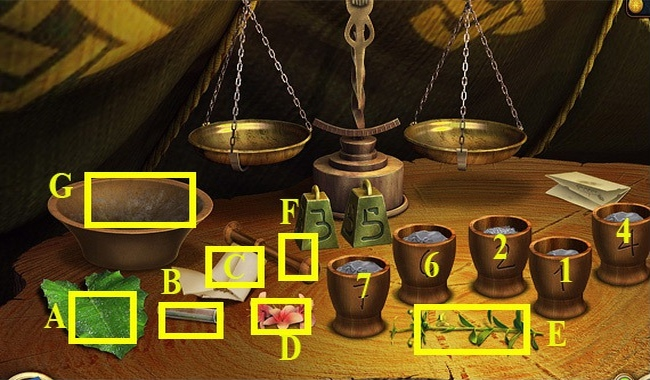
- Drag (N) to (M).
- Drag (O) to (P).
- Drag (S) to (R).
- Drag (T) to (R).
- Drag (U) to (V).
- Drag (R) to (W).
- Press (X).
- Go back 2 times.

- Take the AX (Y).
- Go left.
- Use the AX on (Z).
- Go forward.
- Use the AX on (A).
- Use the AX on (B) and get the FIREWOOD.
- Walk back.
- Use the FIREWOOD and FLINT on (C).
- Drag (D) to (E).
- Drag (F) to (E).
- Drag (G) to (E).
- Drag (H) to (E).
- Press (I).
- Drag (J) to (K).
- Drag (L) to (K).
- Drag (M) to (E) to receive a MEDICINE.
- Use the MEDICINE on (N) and receive the CABINET KEY.
- Use the CABINET KEY on (Q).
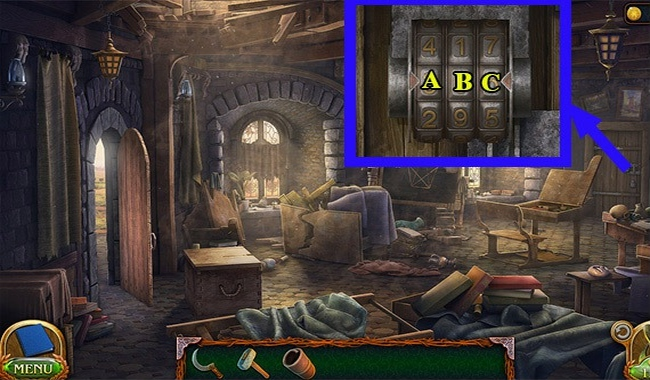
- Press (O), complete the puzzle and receive the FAMILY SEAL and the GATE KEY.
- Walkthrough: N, O, R, M, L, K, P, H, C, D, P, C, P, H, C, D, P, H, R, P, C, H, P, R, K, L, R, O, P, O, K, R, P.
- R, C, P, G, A, B, C, B, G, C, H, E, G, C, B, G, E, D, G, B, C, D, P, C, G, D, C, P, E, G, E, P, R.
- Go back, then go forward.
- Use the GATE KEY on (P).
- Go forward.
- Press (R) to receive a PATTERNED CHIP.
- Press (S).
- Go back 2 times.
- Take the SHOVEL (T).
- Take the LEASH (U).
- Go forward 2 times.
- Use the LEASH on (S).
- Use SHOVEL on (S).
- Use the PATTERNED CHIP on (V), complete the puzzle and receive the FAST TIME POTION.
- Walkthrough: A, 1, A, E, 1, 1, A, D, 2, 2, D, F, 1, D, G, 2, G, B, 2, 2, G, I, 2, I, C, 1, I, A, 2, A, D, 1, D, E, 1, 1, A.
- D, G, 1, 1, G, B, 2, B, F, 2, 2, B, G, I, 1, I, E, 1, I, C, 2, C, A, 2, 2, C, I, 2, I, F, 1, I, E, 1, D, C, 1, 1, G, B, A, G, F, C, I, D, E.
- Go forward.
- Press (W).
- Go back 2 times.
- Press (X), complete the puzzle and receive the FLOWER SEEDS.
- Passage: A, B, C, D.
- Walk back.
- Take the HOE (Y).
- Go left, then go forward.
- Press (Z).
- Use the HOE on (Z).
- Use the FLOWER SEEDS on (Z).
- Go back 3 times, then go left.
- Drag (A) to (B) to receive a JUG OF WATER.
- Use the FAST TIME POTION on (C) to receive ENCHANTED WATER.
- Go back, then go forward, then go left, then go forward.
- Use the ENCHANTED WATER on (D).
- Use the DAGGER on (E) to receive a BOUQUET OF DANDELIONS.
- Use the DAGGER on (E) to receive a BOUQUET OF LILY OF THE LILE.
- Use the DAGGER on (E) to receive a BOUQUET OF HYDRANGEAS.
- Use the DAGGER on (E) and receive a BOUQUET OF GLADIOLIS.
- Go back 2 times, then go forward 3 times.
- Use the GLADIOLI BOUQUET on (F).
- Use the BOUQUET OF LILY OF THE VALIES on (G).
- Use the HYDRANGEA BOUQUET on (H).
- Use the DANDELION BOUQUET on (I).
- Use FAMILY STAMP on (J).
- Press (K), complete the puzzle and take the HAMMER (L).
- Walkthrough: F, E, B, E, B, B, C, C, D, F, A, A.
Chapter 2: (Bonus): Academic Interest
A student at the Academy of Magic, Maaron, is assigned as a practical lesson to find and capture an “unknown beast” that is tormenting the inhabitants of the area.
- Take the CRYPTEX (A).
- Complete the puzzle and receive the NAME STAMP.
- Use the NAME STAMP on (B).
- Go right.
- Press (C).
- Take CANDLES 1/4 (D).
- Take CANDLES 2/4 (E).
- Take CANDLES 3/4 (F).
- Take CANDLES 4/4 (G).
- Use CANDLES 4/4 on (I).
- Press (J) and complete the puzzle.
- Walkthrough: A, D, D, A, D, C, B, B, B, B, A, D, C, B, C, D, D, C, D, D, D, C, E, B, B, C, B, E, B, E.
- Go forward.
- Press (K).
- Press (L).
- Take the YELLOW LIGHT FILTER (M).
- Press 2x (N) and take the RED LIGHT FILTER.
- Press (O) to receive ANIMATION TAPE.
- Use the RED LIGHT FILTER and YELLOW LIGHT FILTER on (L).
- ANIMATION TAPE on (P).
- Walk back.
- Take the GREEN LIGHT FILTER (R).
- Walk back.
- Take the BLUE LIGHT FILTER (S).
- Take the PURPLE LIGHT FILTER (T).
- Go right, then go forward.
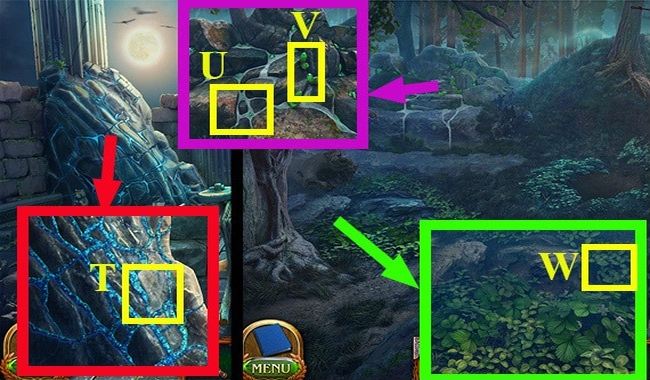
- Use GREEN LIGHT FILTER, BLUE LIGHT FILTER, PURPLE LIGHT FILTER on (U).
- Take the INKBOTTLE (V).
- Use the INKBOTTLE on (X).
- Go back 2 times.
- Take the OWL FEATHER (Z).
- Go right, then go forward.
- Take the STATIONERY BLADE (A).
- Use the STATIONERY BLADE on (B) to receive a WRITING FEATHER.
- Use the WRITING FEATHER on (G).
- Press (G).
- Then press (H) and so on for each LIGHT FILTER.
- Take the STORYBOARD (E).
- Use the STORYBOARD on (F) and complete the puzzle.
- Passage: B, B, A, A, A, D.
- B, B, B, B, B, B, C, C, C, C, D.
- B, B, A, A, C, C, C, C, C, C, D.
- B, B, A, C, C, C, C, C, C, C, C.
- B, B, B, B, B, B, B, B, D, D.
- Press (I) and take TRAKING PAPER WITH SYMBOLS and LIBRARY KEY.
- Use the TALKING PAPER WITH SYMBOLS on (J).
- Walk back.
- Use the LIBRARY KEY on (K).
- Go right.
- Press 2 times (L) and remember the HINT.
- Complete the puzzle.
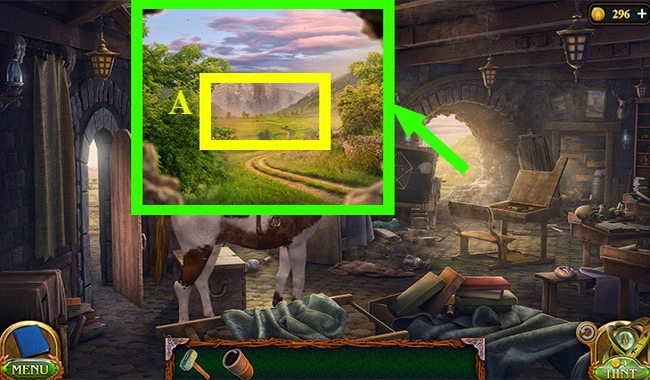
- Passage: C, B, A, A.
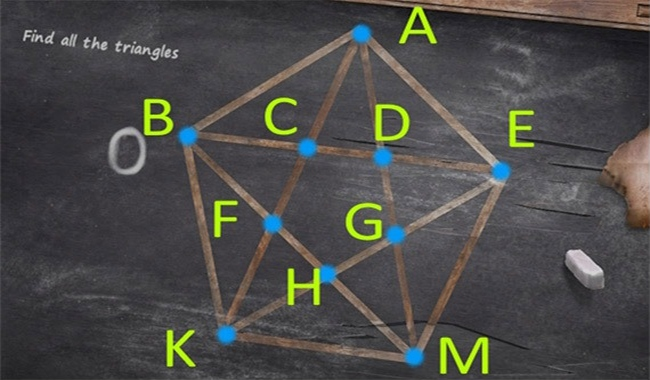
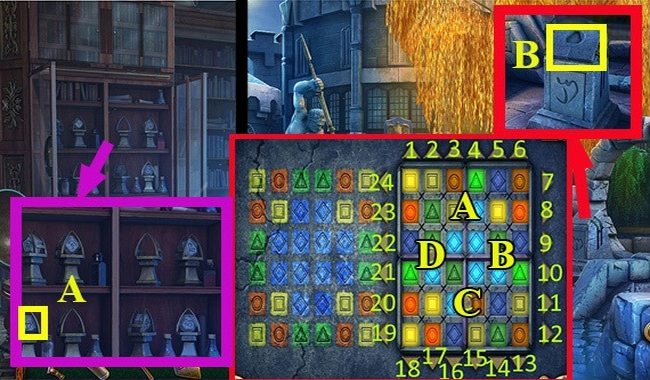
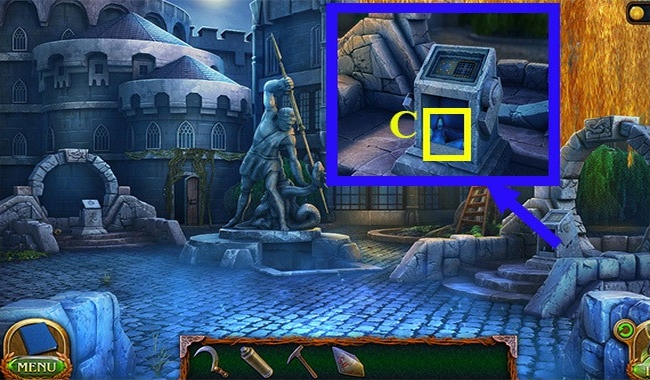
- Press (M), complete the puzzle and receive the RUNE STONE.
- Go back 3 times.
- Use the RUNE STONE on (N) and complete the puzzle.
- Passage: AE, EB, DF, CF, FC, DB, DA.
- Go forward.

- Press (Q) and take the SICKLE.
- Press (O) and receive the SHUTTLE.
- Press (P).
- Use SHUTTLE on (R).
- Go forward.
- Complete the puzzle.
- Walkthrough: A, I, D, J, F, H, E, K, B, L, C, G.
- Press (S).
- Go forward 2 times.
- Receive the SPELL FORMULA.
- Complete the puzzle.
- Press (T).
- Walk back.

- Use the SPELL FORMULA on (U) and complete the puzzle.
- Walkthrough: H, D, B, F, H, G, E, I, H, E.
- Go right.
- Press (V).
- Take the OINTMENT RECIPE and PUZZLE PIECE (W).
- Use the PUZZLE PIECE on (X), complete the puzzle and receive the CHAIN KEY and BANDAGE.
- Walkthrough: C-DR-1, C-DL-2, CL-1, C-DL-1, C-DR-1, CR-1, C-DL-1.
- BR-1, B-DR-1, B-DL-2, BR-2, B-DL-2, BL-2, B-DL-1, AR-2, A-DR-3, A-DL- 3.
- Walk back.
- Используйте КЛЮЧ ОТ ЦЕПИ на (Y) и получите ЛИСТЬЯ “ЯЗЫКА ЗНАХАРЯ” 3/15.
- Возьмите “ЛИСТЬЯ ЯЗЫКА ЗНАХАРЯ” 5/15 (Z).
- Press 2 times (A) and receive a BEAKER and a BOWL.
- Walk back.
- Use the BEAKER on (B) to receive IDOL'S TEARS.
- Возьмите ЛИСТЬЯ “ЯЗЫКА ЗНАХАРЯ” 8/15 (C).
- Take the FIREFLY IVY FLOWERS (D).
- Walk back.
- Возьмите ЛИСТЬЯ “ЯЗЫКА ЗНАХАРЯ” 10/15 (E).
- Use the SHUTTLE on (F).
- Take the FOREST FAIRY POLLEN (G).
- Возьмите ЛИСТЬЯ “ЯЗЫКА ЗНАХАРЯ” 11/15 (H).
- Возьмите СТЕБЕЛЬ “ЖУКОВОГО МОЛОЧКА” (I).
- Возьмите ЛИСТЬЯ “ЯЗЫКА ЗНАХАРЯ” 14/15 (J).
- Возьмите ЛИСТЬЯ “ЯЗЫКА ЗНАХАРЯ” 15/15 (K).
- Use the BOWL on (L) and receive the IL.
- Go forward 2 times, then go right.
- Используйте ЛИСТЬЯ “ЯЗЫКА ЗНАХАРЯ” 15/15 на (M).
- Use the BANDAGE on (N).
- Press (Q).
- Use the SICKLE on (O) and receive the VICTIMER'S BLOOD.
- Используйте КРОВЬ ПОСТРАДАВШЕГО, ЦВЕТЫ СВЕТЛЯЧКОВОГО ПЛЮЩА, ИЛ, СТЕБЕЛЬ “ЖУКОВОГО МОЛОЧКА”, ПЫЛЬЦУ ЛЕСНЫХ ФЕЙ, СЛЕЗЫ ИДОЛА и получите НАБОР ИНГРЕДИЕНТОВ.
- Walk back.

- Use the INGREDIENT SET on (R) and complete the puzzle.
- Walkthrough: (2-X, 1-Y, 5-Y, 8-Y, 5-Z, 2-Z, 1-Z), (2-X, 5-X, 3-Y, 8-Y, 5 -Z, 2-Z, 3-Z), (3-X, 1-Y, 7-Y, 8-Y, 3-Z, 7-Z, 1-Z).
- (5-X, 7-X, 4-Y, 8-Y, 7-Z, 5-Z, 4-Z), (3-X, 4-Y, 6-Y, 8-Y).
- Drag (A) to (2).
- Drag (D) to (1).
- Drag (B) to (6).
- Drag (E) to (4).
- Drag (C) to (7).
- Drag (F) to (6).
- Click (6).
- Drag (F) to (G).
- Take the OINTMENT (G).
- Use the OINTMENT on (J) and complete the puzzle.
- Go back 4 times, then go right 2 times.
- Press (K).
- Press (L).
- Go back 2 times.
- Take the DRY CHAMOMILE (M).
- Walk back.
- Press (N) and complete the puzzle.
- Walkthrough: A, A, A, B, C, C, D, D, D.
- Go left.
- Use the NAME STAMP on (Q).
- Take the DRY ROSE (O).
- Press (P).
- Press (R) and complete the puzzle.
- Press (S).
- Take the BOTTOMLESS BAG (P).
- Go back 2 times, then go forward 3 times.
- Passage: C, B, D, H, F, E, H.
- Drag (T) onto (U) to receive BURNING COALS.
- Go forward.
- Use the BOTTOMLESS BAG on (V) to receive BLANK MASKS.
- Take the DRY MINT (W).
- Use the DRY MINT on (X).
- Use the DRY CHAMOMILE on (Y).
- Use the DRY ROSE on (Z).
- Use the BURNING COALS on (Y).
- Go back 4 times, then go right, then go left.

- Use the BLANK MASKS on (A), complete the puzzle and receive the RITUAL MASK.
- Choose a mask with unique horns.
- Choose a mask that has a unique smile.
- Choose a mask with unique teeth.
- Choose a mask that has unique ears.
- Choose a mask that has a unique beard.
- Choose a mask with unique eyes.
- Choose a mask that has a unique nose ring.
- Choose a mask with a unique earring.
- Go back 2 times, then go forward 4 times.
- Use the RITUAL MASK on (B) and complete the puzzle.
- Walkthrough: A, B, E, G, H, E, C, F, H, I, F, D, A, C.
- Press (C) and take the TALKING MASK.
- Go back, then go right.
- Use the TALKING MASK on (D) to receive the SCHOOL KEY.
- Go back 4 times, then go right, then go forward.

- Press (E).
- Go back then go right.
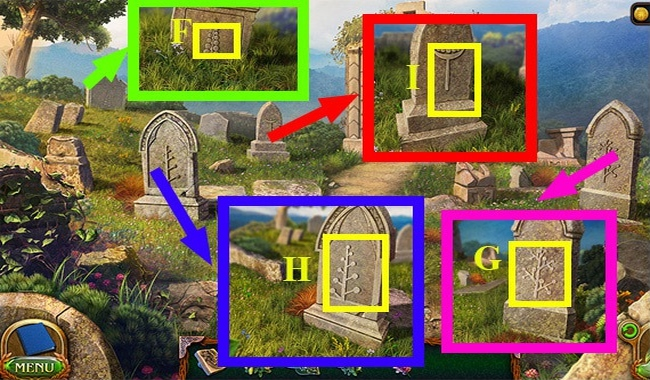
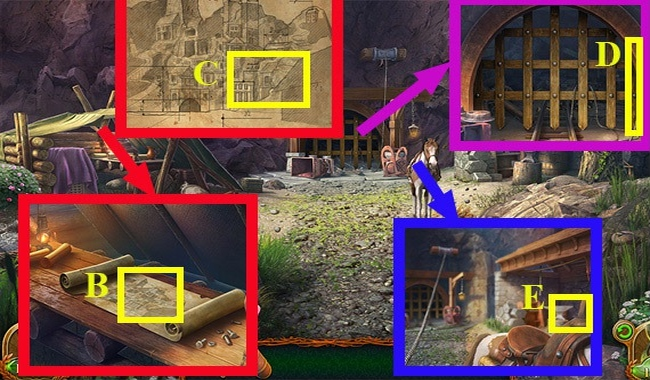
- Take the RUNE STONE (F).
- Go back 3 times.
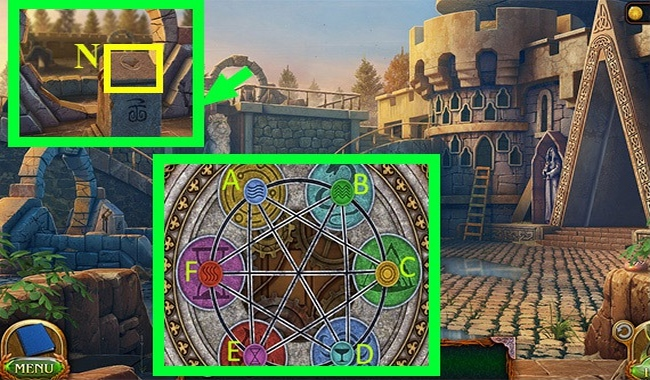
- Use the RUNE STONE on (G) and complete the puzzle.
- Walkthrough: AR, AU, AL, AD, AL, AU, AL, AU, AL, AD, AR, AD, AR, AD, AL, AU, AL, AU.
- AR, AU, AL, AU, BD, BL, BU, BR, BU, BR, BD, BR, BU, BR, BU, BR, BD, BL, BU, BL, BU.
- BR, CU, CL, CD, CL, CU, CL, CU, CL, CD, CR, CD, CL, CD, CL, CU, CL, CD, CR.
- Go left.
- Press (H).
- Use the SICKLE on (H).
- Go left.
- Press (I).
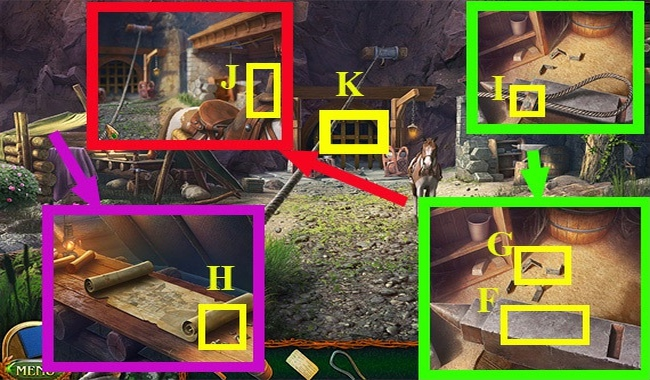
- Take the HAMMER (J).
- Press (K).
- Walk back.
- Press (L).
- Use the HAMMER on (M) and receive WATER.
- Use the SICKLE on (N) to receive OATS.
- Go left.
- Use the WATER on (O).
- Use OATS on (Q).
- Use the KEY on (R) and take the TOOL SET.
- Walk back.
- Use the TOOL SET on (S) and complete the puzzle.
- Go left.
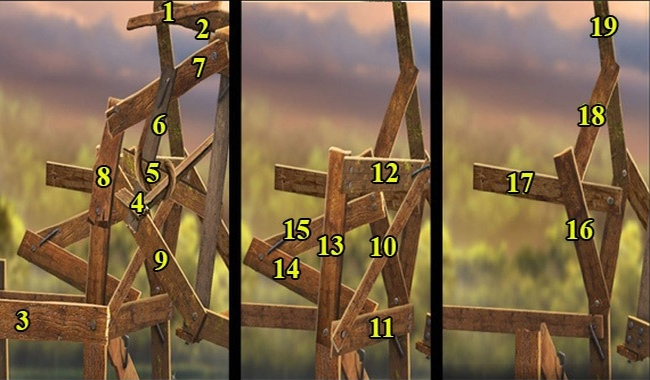
- Walkthrough: 1, 2, 3, 4, 5, 6, 7, 8, 9, 10, 11, 12, 13, 14, 15, 16, 17, 18, 19.
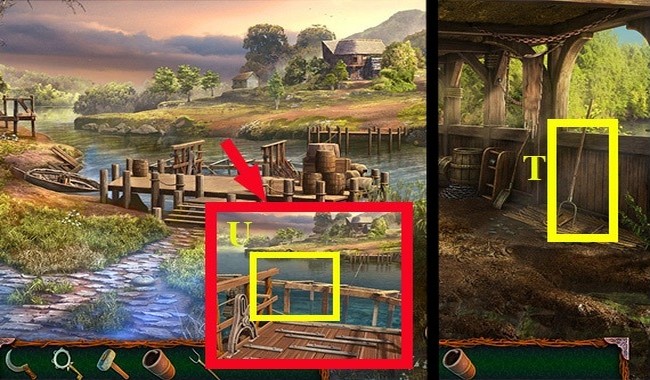
- Take the FORK (T).
- Use the FORK on (U).
- Go forward.

- Use the SCHOOL KEY on (V).
- Press (X).
- Press (Y), complete the puzzle and get the BOXES.
- Go down.
- Press (A).
- Press (B).
- Press (D).
- Press (E).
- Press (F).
- Take the PIECE OF BOARD (G).
- Take the PIECE OF BOARD (H).
- Take the PIECE OF BOARD (I).
- Use the BOARD PIECE, BOARD PIECE and BOARD PIECE on (J).
- Take the CHALK (K).
- Use the CHALK on (J), complete the puzzle and receive a HINT.
- Passage: BAC, ADE, MGE, KHM, BFK, ACD, GDE, HGM, KFH, FBC, BAE, BEH, BMK, KEM, BAM.
- AEK, MEB, KAM, KBE, KBA, AEM, KAG, BAD, DEM, KGM, BCK, FBA, CAE, MHE, KFM, EGA, BHK, MBD, KCE, FAM.
- Complete the puzzle.
- Walkthrough: A, A, A, A, A, A, A, B, B, B, C, C, C, C, C, C, C, C, C.
- Take the BOX (L).
- Press (M) to receive a HINT.
- Go left.
- Press (N) and take the 1/4 HORSESHOE.
- Walk back.
- Take HORSESHOE 2/4 (Q).
- Use the TOOL SET on (P) and receive HORSESHOE 3/4.
- Take HORSESHOE 4/4 (R).
- Go left.
- Use HORSESHOE 4/4 on (S).
- Press (T).
- Use the SICKLE on (U).
- Use the HAMMER on (U).
- Take the NAILS (X).
- Use the NAILS on (Y).
- Go back, then go right, then go forward.
- Press (A).
- Press (B).
- Press (C) and take the CLIMBER'S MEMO.
- Take the ROPE END (D).
- Use ROPE END on (E).
- Use ROPE END on (F).
- Drag (G) to (F).
- Use the HAMMER on (F).
- Take the BOLT AND NUT (H).
- Use the BOLT AND NUT on (I).
- Use the TOOL SET on (I) and receive the ROPE LOOP.
- Use the ROPE LOOP on (J).
- Press (K).
- Use the CLIMBER'S MEMO on (L), complete the puzzle and receive the CLIMBER'S GEAR.
- Use the CLIMBER GEAR on (M) and complete the puzzle.
- Passage: A, B, C, D.
- Passage: E, F, G, H.
Chapter 3: First Brotherhood
Maaron and Folnur join forces to find and capture the Entity. One catch: each of them has its own goal.
- Take FOLNUR'S HAMMER (A).
- Press (B).
- Click 3 times (C).
- Press (D) and take the CORD.
- Press (F) and take the KEG OF GUNDOWPOWDER.
- Press (G).
- Press (H).
- Press 2x (I) and take the MUG.
- Use the MUG on (K) to receive a MUG WITH WATER.
- Use the MUG WITH WATER on (L).
- Use the KEG OF GUNDOWPOWDER on (M).
- Use the CORD on (M) and complete the puzzle.
- Walkthrough: E, I, F, G, H, I, B, C, D, I, A, C, E, G, A.
- Press (N).
- Use FOLNUR'S HAMMER on (Q).
- Go forward and complete the puzzle.
- Walkthrough: Press, C, B, A, B, A, A, B, C, A, A, C, C.
- Press (O).
- Take the PUZZLE PIECE (P).
- Take the CASTLE GATE PIECE (R).
- Press (S) and take the SAUSAGE.
- Take the DAMAGED FLAG (T).
- Press (U).
- Go up.
- Take the PUZZLE PIECE (V).
- Press (W).
- Go forward.
- Press (X).
- Use the PUZZLE PIECES on (Y) and complete the puzzle.
- Take the CASTLE GATE PIECE (Z).
- Use the SICKLE on (A) to receive a PIECE OF CLOTH.

- Use the PIECE OF CLOTH on (B).
- Go back 2 times.
- Take the SHEPHERD'S CRAZE (C).
- Take the EMPTY BULLET (D).
- Go up.
- Use the SHEPHERD'S CRAWL on (E).
- Press (G) (H) (I) and collect all the berries and take the RIPED STRAWBERRY.
- Use SAUSAGE on (J).
- Take the CASTLE GATE PIECE (K).
- Use the RIPE STRAWBERRY on (L).
- Press (M).
- Press (M) to receive a RED FLAGGER.
- Use the RED FLAG on (N).
- Go forward.
- Use the RED FLAG on (Q).
- Go back 2 times.
- Use the RED FLAG on (O).
- Use FOLNUR'S HAMMER on (P).
- Use the SHEPHERD'S CRAWL on (R).
- Take the CASTLE GATE PIECE (S).
- Use the CASTLE GATE PARTS on (T) and complete the puzzle.
- Walkthrough: R, R, U, U, L, D, D, D, R, D, L, L, U, U, U, L, D, D, D, L, U, U, U, U, R, R, R, R.
- Go forward.
- Press (U).
- Take the EMBROIDERED HOOP (V).
- Press (X) and take the GLASS PRISM.
- Complete the puzzle.
- Walkthrough: D, A, B, E, D, G, H, E, D, A, B, E, F, C, B, A, D, G, H, E, D, G, H, E, D, A, B, E.
- Go forward, then back.

- Take the RAKE (Y).
- Take the GLASS PRISM (Z).
- Press (A).
- Go forward.
- Use the RAKE on (B).
- Take the GLASS PYRAMID (C).
- Go back 2 times, then go right.
- Press (D).
- Press (E).
- Walk back.
- Take the BASKET ON WHEELS (F).
- Go up.
- Use the BASKET ON WHEELS on (G).
- Go back, then go forward.
- Use the SICKLE on (H) to receive the LACE CURTAIN.
- Use the LACE CURTAIN on (I).
- Use the SICKLE on (I).
- Use the SHEPHERD'S CRAZE on (I) to receive the NET.
- Go back, then go up.

- Use the NET on (J), complete the puzzle and take the BOX WITH CHAMELEONS.
- Go back, then go forward 2 times.
- Use the CHAMELEON BOX on (K).
- Use the GLASS PRISMS and GLASS PYRAMID on (L) and take the RUNE STONE.
- Use the RUNE STONE on (M) and complete the puzzle.
- Passage: DR, D, DL, UL, U, U, U, U, UR, DR, D, DR.
- Go forward.
- Take the CHISEL (N).
- Use the CHISEL on (Q).
- Use FOLNUR'S HAMMER on (Q).
- Drag (O) to (P).
- Take the SPEARS (R).
- Use the SPEARS on (S).
- Drag (T) to (U).
- Drag (V) to (U).
- Drag (W) to (X).
- Press (Y).
- Go down.
- Press (A).
- Press (B).
- Press (C).
- Go left.
- Press (D).
- Press (E) and take the MONOCULAR.
- Walk back.
- Press (F).
- Press (G) and receive the BOOK OF POTIONS.
- Press (H) and complete the puzzle.
- Go forward.
- Passage.

- Take the MINI PICK AX (I).
- Take the CABINET KEY (J).
- Use the CABINET KEY on (L).
- Take the FOSSILED MAMMOTH BRAIN (M).
- Press (N) and take the ICE LEOPROAD MUSTACHE.
- Take the EMPTY VIALS (Q).
- Use the FOSILIZED MAMMOTH BRAIN and ICE LEOPARD MUSTACHE on (O).
- Go back 3 times.
- Press (P).
- Take the SUN WILLOW LEAVES (R).
- Use SUN WILLOW LEAVES on (S).
- Walk back.
- Use the MINI PICKAXE on (T) to receive PALERITE CRYSTALS.
- Go back 2 times, then go up.
- Use the EMPTY BOTTLES on (U) to receive SPRING WATER.
- Use the MINI PICKAXE on (V) to receive VECONIUM CRYSTALS.
- Take the FIVE LEAF CLOVER (W).
- Use the SPRING WATER on (X).
- Use the PALERITE CRYSTALS on (X).
- Use on the VECONIUM CRYSTALS (X).
- Use on the FIVE LEAF CLOVER (X) to receive an INGREDIENT SET.
- Go back, then go forward 3 times, then go down, then go right, then go forward 7 times.
- Use the INGREDIENT SET on (Y) and complete the puzzle.
- Passage: 19-12, 14-8, 10-13, 22-10, 2-22, 1-26, 6-11, 5-6, 3-20, 16-19, 15-24, 4-16.
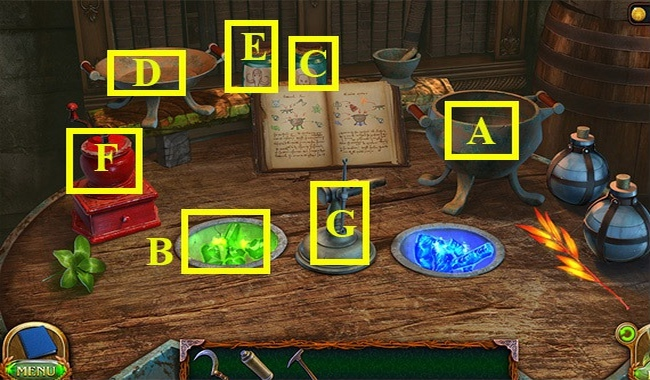
- Drag (A) to (B).
- Drag (C) to (D).
- Drag (E) to (F).
- Drag (G) to (D).
- Drag (H) to (I).
- Drag (J) to (I).
- Drag (K) to (I).
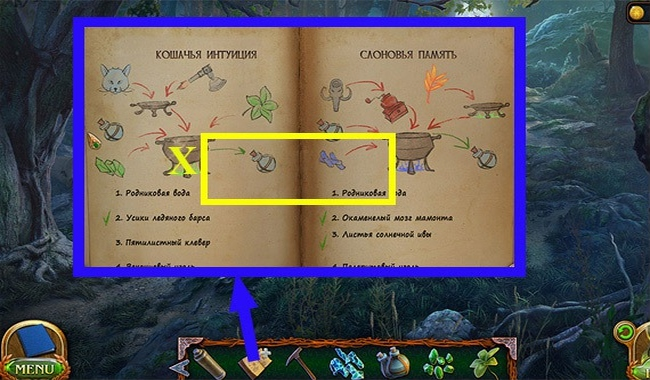
- Перетащите (I) на (H) и получите ЗЕЛЬЕ “КОШАЧЬЯ ИНТУИЦИЯ”.
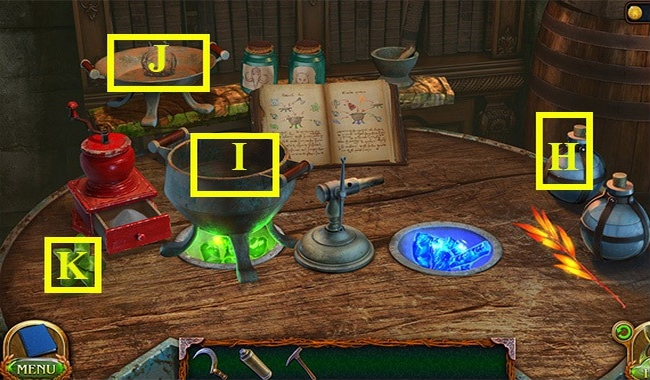
- Drag (L) to (M).
- Drag (N) to (Q).
- Drag (O) to (Q).
- Drag (P) to (M).
- Drag (R) to (M).
- Press (Q).
- Drag (S) to (T).
- Перетащите (T) на (U) и получите ЗЕЛЬЕ “СЛОНОВЬЯ ПАМЯТЬ”.
- Go back 3 times.
- Используйте ЗЕЛЬЕ “СЛОНОВЬЯ ПАМЯТЬ” на (V).
- Go down, then go left.
- Используйте ЗЕЛЬЕ “КОШАЧЬЯ ИНТУИЦИЯ” на (W).
- Take the JIGSAW (X).
- Press (Y).
- Press (Z), complete the puzzle and receive CASANDRA'S SECRET KEY.
- Passage: C, D, D, C, D, D, B, A.
- Use the JIGSAW on (E) and take CASANDRA'S SECRET KEY.
- Press 2 times (F).
- Take the HORSE FIGURINE PART (G).
- Use the HORSE FIGURINE PART on (H) to receive CASANDRA'S SECRET KEY.
- Go back 2 times.
- Use CASANDRA'S SECRET KEY on (I).
- Use CASANDRA'S SECRET KEY on (J).
- Use CASANDRA'S SECRET KEY on (K) and complete the puzzle.
- Walkthrough: A, A, A, A, B, B, B, B, B, C.
- Press (L) and complete the puzzle.
- Press (M).
- Press (N).
- Take the LAMP (Q).
- Use the LAMP on (N).
- Press (O).
- Press (P).
- Press (P) and take the PATTERN ELEMENT.
- Press (R).
- Use the PATTERN ELEMENT on (S) and take the PATTERN ELEMENT (T).
- Use the PATTERN ELEMENT on (U) and take the PATTERN ELEMENT.
- Use the PATTERN ELEMENT on (W) and take the PATTERN ELEMENT.
- Use the PATTERN ELEMENTS on (X) to receive the PATTERN ELEMENTS.
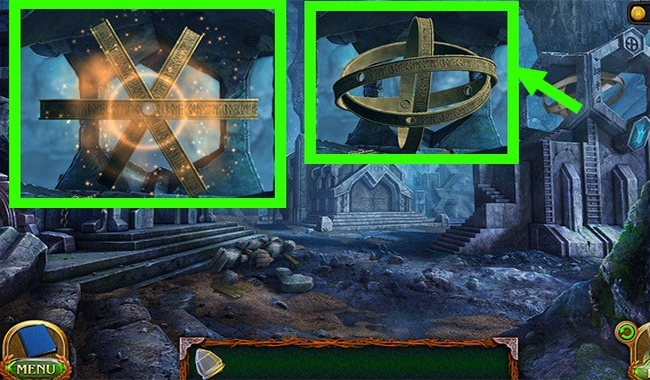
- Use the PATTERN ELEMENTS on (Y), complete the puzzle and take the RUNE HYPERSTONE.
- Use the RUNE HYPERSTONE on (Z).
- Take the WRITING FEATHER (A).
- Use the WRITING PEN on (Z) and complete the puzzle.
- Walkthrough: 1, 1, 2.
- Go back, then go down, then go left.
- Take the RUNE STONE (A).
- Go back 2 times.
- Use the RUNE STONE on (B) and complete the puzzle.
- Walkthrough: 16, 16, 11, 11, 12, 12, 24, 23, 23, A, 8, 8, A, 8, A, 22, 9, 8, 4.
- Use the RUNE HYPERSTONE on (C).
- Go right.
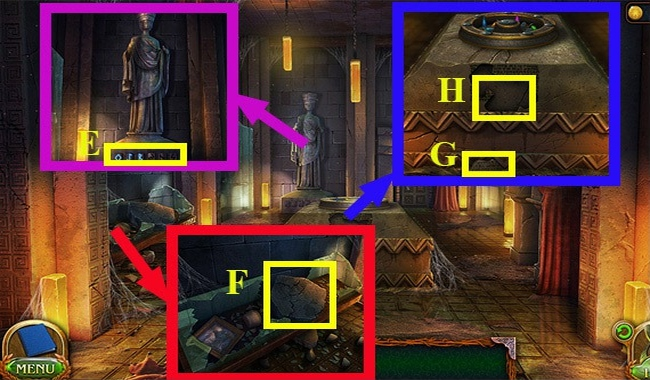
- Take the WELL TILE (D).
- Use the MONOCULAR on (E) and find the symbols.
- Press (F).
- Use the MINI PICK AX on (G) and take the PROJECTION CRYSTAL.
- Press 2 times (H).
- Use the WELL TILE on (I).
- Press (J).
- Go back 2 times.
- Take the DEAD CROW (K).
- Go forward, then go right.
- Use the DEAD CROW on (L) to receive a WELL TILE.
- Use the WELL TILE on (M) and complete the puzzle.
- Passage: C, D, G.
- Press (N).
- Press (Q).
- Press (O).
- Go left.
- Take the PATTERN BLOCK (P).
- Drag (R) to (S).
- Go back 2 times.
- Take the LONG Pole (T).
- Use the SICKLE on (U) and receive a PIECE OF ROPE.
- Use the SICKLE on (V).
- Use the PIECE OF ROPE on (V) to receive an EXTENDED SICKLE.
- Go down.
- Use ELONGED SICKLE (W).
- Press (X) (Y) (Z) and take the PATTERN BLOCK.
- Press (A) (B) (C).
- Use the PATTERN BLOCKS on (D) and complete the puzzle.
- Walkthrough: D, D, D, B, B, F, G, C, B, A, D, F, G, C, E, A, F, G, C, E.
- Complete the puzzle.
- Go forward.
- Select the runes (E).
- Press 2 times (F).
- Drag (G) to (H).
- Use the PROJECTION CRYSTAL on (I).
- Take the TEXT SHARD (J).
- Walk back.
- Take the TEXT SHARD (K).
- Take the TEXT SHARD (L).
- Go left.
- Take OIGELA'S MEDALLION (M).
- Complete the puzzle.
- Walk back.
- Take the STONE FLOOR PIECE (N).
- Use the STONE FLOOR PIECE on (Q).
- Go back, then go forward.
- Use the TEXT SHARDS on (O).
- Press (P) and complete the puzzle.
- Press (R) to receive the SOUL CATCHER BOOK.
- Press (S) and complete the puzzle.
- Walkthrough: A, A, A, A, B, B, B, B, B, C, D, D, D.
- Press (T), complete the puzzle and receive the SOUL CATCHER PART SET.
- Receive the TALKING MASK.
- Drag (U) to (V).
- Drag (W) to (V).
- Drag (X) to (V).
- Drag (Y) to (V).
- Drag (Z) to (V).
- Drag (A) to (V).
- Drag (B) to (V).
- Drag (C) to (V).
- Drag (D) to (E).
- Drag (F) to (G).
- Drag (H) to (I).
- Drag (J) to (E).
- Drag (L) to (M) to receive an UNCHARGED SOUL CATCHER.
- Go back, then go left.
- Use the UNCHARGED SOUL CATCHER on (N).
- Press (N).
- Drag (N) to (Q).
- Drag (O) to (P) and take the SOUL CATCHER.
- Go back 6 times, then go up, then go right.
- Use SOUL CATCHER on (R).
- Press (R).
- Use OEGIN'S MEDALLION on (S).
- Click CRYSTALS and LENSES.
- Press (T).
- Use the RITUAL MASK on (U).
- Go back 2 times.
- Take the RAM SKULL (V).
- Go forward.
- Take the HORSE SKULL (W).
- Go forward 2 times, then go right.

- Take the EAGLE SKULL (X).
- Walk backwards, then walk down, then walk forward 8 times.
- Take the WOLF SKULL (Y).
- Go back 5 times, then go up, then go left.
- Use the HORSE SKULL on (A).
- Use the RAM SKULL on (B).
- Use the WOLF SKULL on (C).
- Use the EAGLE SKULL on (D).
- Press (E) and complete the puzzle.
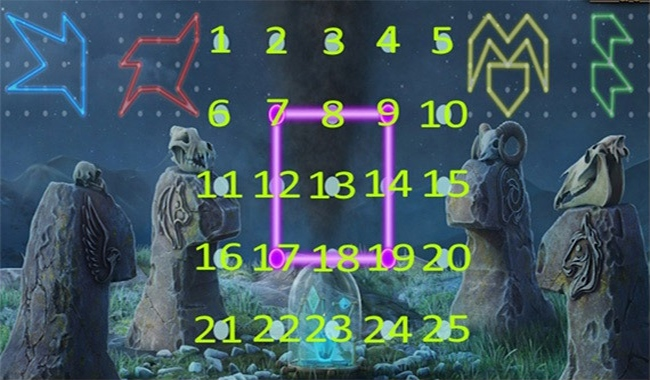
- Passage: 1. (7, 9)-1, (9, 19)-25, (9, 25)-10, (9, 10)-4, (17, 7)-13, (17, 13)- 16.
- 2. (9, 19)-10, (9, 10)-5, (17, 7)-12, (12, 7)-11, (17, 12)-21, (19, 17)-18, (19, 18)-25.
- 3. (7, 9)-8, (8, 9)-4, (4, 9)-10, (10, 9)-20, (7, 8)-2, (7, 2)-6, (7, 6)-16, (17, 7)-13, (9, 19)-13, (17, 13)-12, (13, 19)-14, (19, 17)-23.
- 4. (7, 9)-3, (7, 3)-2, (17, 7)-13, (9, 19)-13, (9, 13)-8, (17, 13)-12, (19, 17)-23, (19, 23)-18.
This was our walkthrough of Lost Lands 9: Tales of the First Brotherhood. I hope our guide helped you solve all these tricky puzzles. Good luck!
Was the article helpful?