
New World is a historical multiplayer action role-playing game with a third-person view. The game will send you to an alternative universe of the era of the colonization of America. The game world is filled with incomprehensible creatures, dark magic, spirits, living trees that are ready to kill at any second. It will be possible to defend yourself with the help of relics, spells against spirits, words of power. You will also need to protect your settlements from the invasion of thugs-players and supernatural dark forces, with the help of weapons and magic. Or you can explore the game world to discover new lands and strange curses.
New World LIFE STAFF: Staff of Life Guide, Best PvE and PvP Builds.

Special offer
Want to learn how to use the power of light in New World? This guide is a detailed description of everything related to the Staff of Life (Life Staff), including assemblies!
By the end of this guide, you should have a complete understanding of the Staff of Life and, with practice, be able to fully master it.
Life Staff Overview
The Staff of Life is New World's primary healing and support weapon. It offers many ways to heal and support your allies with buffs. However, it lacks damage compared to many other weapons, but the healing effects allow it to control itself well.
One side of the Life Staff deals with healing, playing the role of your standard MMORPG healer, who can quickly heal in huge bursts. The other side focuses more on healing over time, preferring to buff allies to help them mitigate or avoid damage rather than heal it.
Life Staff Skills, Passives and Perks
We'll start with skills and passives first. We'll talk a little about each of them, their uses, and how effective they are. There's a lot to talk about here, so we'll break it down tree-wise to keep everything organized.
Along with general information, they will be rated from C to S for both PvE and PvP. Tier C is solely for passive skills that aren't as good or useless at all. Tiers A and B are mid-tiers, placing them between the worst passives and the best, leaning one way or the other. Tier S are good passives, the ones you almost always pick if you're acquiring a skill or want it, because it's useful in so many scenarios.
tree of healing
As the name suggests, this skill tree focuses solely on healing. While it has some utility in some of the passive skills and skill upgrades in the tree, it is capable of providing the strongest healing. The active skills for this tree consist of Divine Embrace, Sacred Ground, and Burst of Light.
Divine embrace


Holy Land
| Icon | Title | Rating | Description |
|---|---|---|---|
 | Holy Land | A — PvE and PvP (S on improvement) | Sacred Ground creates a healing field that restores 20% of weapon damage per second and lasts for 15 seconds. On its own, this skill is a solid and reliable heal. After the update, it becomes absolutely essential for any content. Good use of this skill can change the course of any fight. At a cost of 15 mana and a cooldown of 20 seconds, Sacred Ground is one of the cheapest mana costs of Life Staff, but one of its higher cooldowns. Sacred Ground is one of those skills that ends up being very useful, and area healing helps a lot in many large scale PvP situations or even small skirmishes. In PvE, upgrades help your tank block much more reliably and with less risk overall. |
 | holy Land | A — PvE and PvP | Holy Ground increases stamina and mana regeneration of all allies by 100% while in Scared Ground. This gives the skill a much-needed utility that prevents it from being purely a healing ability like the others in the Healing Tree. To be honest, increasing stamina is the most important part of it. This allows your tanks to take much more punishment in PvE and PvP. Mana regen is good if you want to use it for self-healing as well, as it would act as a mana refund in a sense. |
 | Blessing | S — PvE and PvP | Blessing increases healing received by allies in Holy Ground by 50%. This easily makes this Staff of Life ability one of the most effective, greatly increasing its healing effect. This is a huge boost to your healing. This is a good way to keep your front line alive and fight in PvP, and your tank will have a much easier time in PvE. Nothing else in the Staff of Life Tree gives that boost on its own. |
burst of light
| Icon | Title | Rating | Description |
|---|---|---|---|
 | burst of light | C — PvE and PvP | Burst of Light is a short cast heal that heals all allies in your party within 50 meters for 50% weapon damage. Good and reliable party healing, but not effective enough without stacking healing buffs. Splash of Light is one of the cheapest Life Staff spells with a moderate cooldown, costing 15 mana and a cooldown of 15 seconds. The cast time is the same as Divine Embrace, but heals much less. Can be useful in more chaotic situations where you want to quickly heal everyone, but the cooldown is quite long compared to using even Divine Embrace. |
 | Joint recovery | C + - PvE and PvP | Collaborative Healing restores 3% of your maximum mana for each target under 50% health healed by Burst of Light. In an ideal scenario, this almost removes the mana cost of this skill. In most cases, this will reduce the cost, which is not a bad thing. It's just meant to be paired with some healing tree passives, but is rarely useful. If it didn't have such a low threshold, it might be more useful. Add to this the cast time and cooldown, and in most situations it becomes an unnecessary skill slot. |
 | Purification | B + - PvE and PvP | Purify allows Splash of Light to remove a single debuff from all allies in range. This is a nice bonus to this skill's usefulness, making it a pretty reliable cleanse if multiple people are getting the debuff at the same time. In most situations, it is quite pleasant to remove debuffs in a team. However, that's not really enough to justify it, given that Absolved allows you to do this with a Heavy Attack on everyone in the projectile's path. |
Passive
| Icon | Name | Rating | Description |
|---|---|---|---|
 | Desperate Speed | B — PvE and PvP | Desperate Haste reduces the cooldown of all Life Staff by 10% when healing an ally below 50% health. This effect only triggers once every 5 seconds. Combined with any Life Staff's Heal Over Time skill, this helps reduce the cooldown a bit. However, Revitalize is vastly superior. Though it can be a nice bonus to healing over time if you potentially trigger it 2-3 times in a single cast. However, the health threshold and cooldown pushes it back a bit, making it unreliable unless you intentionally keep an ally at 50% or less. |
 | Holy Protection | S — PvE and PvP | Holy Protection increases the party's incoming healing by 5%. It's a free healing bonus, there's no reason not to take it. It's a weak bonus so not worth prioritizing, but when you're trying to squeeze out as much healing as possible, it's a free increase with no requirements, unlike a lot of bonuses in this tree. |
 | Exemption | S — PvE and PvP | Absolved removes the mana cost of light and heavy attacks for Life Staff. There is absolutely no reason why you should ever give up this passive skill. While it's not something that needs a lot of attention, it can be really helpful early on if you want to use the Staff of Life in combat. This reduces your mana cost slightly and allows you to take full advantage of many other Life Staff passives. |
 | Healing Touch | A — PvE, B — PvP | Mending Touch allows Life Staff Heavy Attacks to remove one debuff when it passes through an ally. Requires Absolved as a prerequisite. This is a free way to remove debuffs from your tanks, which can be a bit niche, but useful when you have to deal with a lot of more annoying ones like Disease or Rend. This is more useful for PvE than PvP, as there are even many common enemies that can inflict Diease. In PvP, it's most useful for removing Rend, but there are so few weapons that actually deal significant damage that it's useful in many cases. |
 | Blissful touch | A — PvE and PvP | Blissful Touch allows Life Staff's light attacks to heal allies for 20% weapon damage when it passes through an ally. Considering how much you have to spam Light Attack to activate Revitalize and the fact that it allows you to heal and DPS at the same time makes it a great choice. Keep in mind that you will need a ton of reduced aggro modifiers to make this work in PvE. It's a free heal that can be spammed and can heal almost as well as a Beacon. It's not a strong heal, but using it for damage and healing can make it quite good. |
 | Revitalization | A - PvE and PvP (S with Absolved) | Revitalize reduces the cooldown of Life Staff by 5% when hit with a light attack. This allows you to have constant or near-constant uptime depending on your duration-based skills, and makes your quick heal skills much more dangerous to spam. Without Absolved it's almost as good, but when you have both it's a powerful points duo that can result in Beacon and Sacred Ground having no downtime. The only downside is that you won't be able to keep up with mana costs in general. Luckily, there are mana rations and mana potions. |
 | Enchanted Justice | C — PvE and PvP | Enchanted Judgment creates a healing aura around you when you reach 50% health or less. The aura heals you and allies within 4 meters for 10% weapon damage per second for 6 seconds. This effect has a two-minute cooldown. A nice little buff if you're in danger to heal random damage from AoE attacks and also heal a DPS that should be near you. While this may have some niche use in PvP, chances are that if you have less than 50% in PvP you are unprotected and will most likely die easily. The healing it provides will never be enough to save you or your allies. What kills him the most is the long cooldown: two minutes of waiting for a small heal when you can apply stronger heals every 10 seconds or less is confusing. |
 | Enhance | S — PvE and PvP | Intensify grants a Stacking Buff on successful Heavy Attacks that increases your healing by 10% for 10 seconds. (Max 3 stacks, for 30% increased healing) These passives are one of those that are very good and make great healers that can support the buff even better while slightly increasing the weapon skill ceiling. If you can consistently land heavy attacks, this passive will really pay off. Once it is fully stacked, one heavy attack is enough to save all stacks. It's definitely a passive that rewards the skill with a significant healing bonus. |
 | divine blessing | B + - PvE, A + - PvP | Divine Blessing increases healing effects by 30% for targets below 50% health. This Ultimate will help you save people's lives much easier. 30% increased healing is a pretty powerful buff that will affect all of your healing over time skills as well as your quick healing skills. While this is a strong buff, in most scenarios you wouldn't want someone below 50%. Without it, it's easier to keep people healthy in PvE than to spend everything on it. This works much better in PvP, where the chance of someone healing him under 50% is much higher. This can be a way to give your PvP tank a second wind and keep it up and running very easily. |
Defender
Skills and abilities
Sphere of protection
| Icon | Name | Rating | Description |
|---|---|---|---|
 | Sphere of protection | S — PvE and PvP | Fires a light projectile that grants 10% Fortify for 20 seconds , heals an ally for 10% weapon damage, and deals 146% weapon damage when it hits an enemy. (Fortification reduces incoming damage.) Costs 16 Mana . |
 | Blessing of the Defender | S — PvE and PvP | If Projection Orb hits an ally, they gain Cooldown for 10 seconds. (Recovery restores 7,5% weapon damage every second.) |
 | General protection | S - PvE and PvP (C in single player) | If you successfully heal an ally with an Orb of Protection, you will also gain Fortify and Restoration. |
 | Aegis | C — PvE, B + - PvP | When this projectile hits, it hits all allies within 3 yards. |
Lighthouse
| Icon | Title | Rating | Description |
|---|---|---|---|
 | Lighthouse | A — PvE and PvP (S on improvement) | Fires a light projectile that deals 146% weapon damage to enemies, attaches itself to its target, and heals all nearby allies for 20% weapon damage every second for 10 seconds. Costs 16 mana. |
 | charged light | S — PvE and PvP | Beacon's area of effect is now 50% larger. |
 | blessing of radiance | S — PvE and PvP | The beacon lasts 5 seconds longer. |
 | Speed of light | A — PvE and PvP | When Beacon heals a target, it also applies 20% Haste for 3 seconds. (Acceleration increases movement speed.) |
Light's Embrace
| Icon | Title | Rating | Description |
|---|---|---|---|
 | Light's Embrace | S — PvE and PvP | Targeted healing for 100% weapon damage + 30% more per buff on that target. Costs 18 mana. |
 | inspiration | A — PvE and PvP | When you heal a target with Lights Embrace, the target gains 25 stamina. |
 | communication | S — PvE and PvP | When you heal a target with Lights Embrace, you gain 1% of your maximum mana for each buff your target has. |
 | Increase | A — PvE and PvP | When you heal with Light's Embrace, increase Life Staff's buffs by 2 seconds. |
Passive
| Icon | Title | Rating | Description |
|---|---|---|---|
 | Refraction | S — PvE and PvP | After dodging, your healing is 20% more effective for 5 seconds. |
 | Protective light | C — PvE and PvP | When you block a melee attack: gain 5% max. Mana . |
 | Protector's Touch | S — PvE and PvP | Life Staff's light and heavy attacks grant 15% Fortify for 3 seconds when hitting an enemy. (Fortification reduces incoming damage.) |
 | Defender's Strength | S — PvE and PvP | If you have the buff, you heal 10% more. |
 | Balance | C - PvE, B - PvP | When you are hit while below 50% health, your haste is increased by 10% for 5 seconds. (cooldown 20s) |
 | Spirits United | B + - PvE and PvP | Increases mana regeneration for you and party members by 3%. |
 | glowing focus | A + - PvE and PvP | Buffs you apply last 20% longer. |
Lifestaff Skill Perks
These perks can be found on armor and weapons. Perks modify skills beyond passive skills and can give them additional utility. Often they are best placed on armor as the weapon has access to the best perks in general.
It's worth noting that these perks also scale with gear points, so they'll be weak early on, but good in the later stages of the game. The value range shown is for Gearscore 200-600.
Refreshing Divine Embrace
Divine Embrace's cooldown is reduced by 17-46% when healing an ally below 50% health.
For such a strong healing ability, reducing the cooldown can make a big difference.
Refreshing Divine Embrace Rating: A - PvE and PvP
While the cooldown is good, this ability already has such a low cooldown and the health required to trigger it isn't really worth it as you can get better bonuses in most places.
Strengthening the sacred ground
Holy Ground applies Fortify, granting 5-14% damage reduction to allies in Holy Ground.
Given that Sacred Ground is a stationary AoE, it gives Fortify, even a minor one, very well.
Fortify the sacred ground Rating: S - PvE and PvP
This perk is widely applicable and useful in any situation. If you are using Sacred Ground you will need this.
Invigorating burst of light
Restores 5-14 Stamina to each ally hit by Surge of Light.
While this is a good effect overall, it is very niche to use. Especially when Light's Embrace can give the target twice as much.
Energy Surge Light Rating: C - PvE and PvP
It would be nice in large scale PvP if Burst of Light could affect more than just your group. Because it cannot be limited to small skirmishes for any practical value.
Security Fix
Mending Protection increases your healing by 11-37% when Orb of Protection heals an ally with no active buffs.
Since any buffs are taken into account, this is very difficult to use reliably. Each weapon has buffs that it will use at any time.
Fix Protection Rating: C - PvE and PvP
Despite the massive increase in healing, there are very few weapons to even work with. Almost all of them have buffs that can be applied frequently enough to only trigger it in small windows.
Embrace of the Accelerating Light
Accelerating Light's Embrace grants 9-24% haste for 3 seconds when healing an ally at full health.
Considering how often this can be used, this is actually a solid perk.
Accelerating Light's Embrace Rating: A - PvE and PvP
This is a useful perk, especially with the duration of the buff, as it allows you to apply haste without spending a point on light speed. This allows Light's Embrace to boost its own healing when used without a cooldown.
Restoring Beacon
Revitalizing Beacon increases self-healing by 11-37% after using a Beacon.
This can be incredibly effective for both solo and group play as it minimizes the amount of time you'll ever need to heal yourself. In any case, it should be low in groups, but still a great solo.
Revitalizing Beacon Rating: B - PvE and PvP (S alone)
This is a great perk to complement the Orb of Protection upgrades, but other than that it's not very good. It's a lot stronger if you want to solo the level with Life Staff, as you'll only be healing yourself.
Life Staff Builds)
For now, Life Staff only has three builds that it will typically use, focused on solo play as well as group content for PvE or PvP. Skills overlap a bit, but the way they are used is different - that's what sets the game apart from every build.
Solo / DPS Build
This setup focuses on creating a high healing zone that allows you to collide with tank mobs when you hit them with your Life Staff or other weapons. It focuses on using the protection sphere, beacon, and sacred ground.
This set of abilities gives you a lot of offensive and defensive power. This allows you to take out enemies fairly quickly and safely with or without switching weapons.
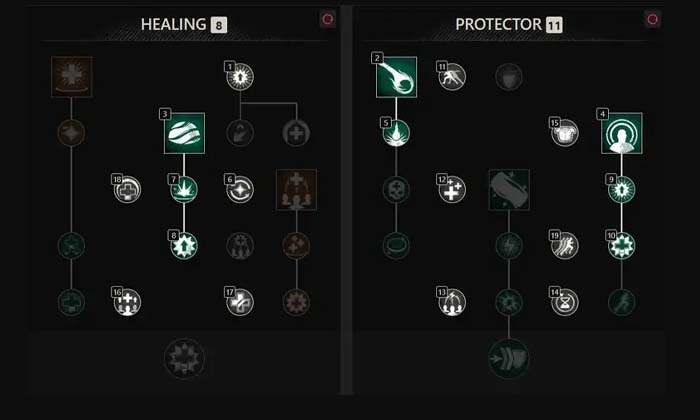
Leveling up starts with accepting Absolved. This allows you to freely use light and heavy attacks for consistent damage without mana issues. Then we take the Orb of Protection mainly for the extra damage, it's more important to defeat the enemies faster than to get the Forty effect early on. Then Sacred Ground for sustain and then Beacon for damage and sustain.
Now let's start working on passives and improvements. We only add one extra point to the Orb of Protection, so we can keep buffs active on ourselves if we switch weapons and also let him heal. The other two passive skills are also only useful for grouping. We opt for Revitalize to help push more DPS out of Orb of Protection, using a light attack to reduce cooldown. It also allows you to maintain both the Sacred Ground and the Lighthouse at all times.
Then we max Sacred Ground. The former upgrades help maintain mana alone, while the latter enhances all healing. The Beacon is then upgraded to increase its range and duration.
After that, we focus on capturing healing and defensive passives. Bend Light and Protector's Strength take precedence as they provide the most consistent and strong bonuses. We then take Spirits United and Glowing Focus to help with mana regeneration and keep buffs active respectively.
After capturing our passives in the Defender Tree, we move on to the Healing Tree and grab everything that might be useful there. Sacred Protection increases healing very little; Intensify helps you heal a lot, but also asks you to use heavy attacks more, which this setting will do less to activate Revitalize as often as possible. Although points 13-19 can indeed be taken in any order.
Skill perks, their use and rotation
This build doesn't have any set rotation, mostly using spells on cooldown or as they expire, whichever takes longer.
Orb of Protection is mainly used for damage, but also gives Fortify and Recovery when you hit something that is on top. It will spawn often enough that using it early on is not a bad option at all, but using it later also has its benefits in providing buffs.
Sacred ground will always be used at your feet at the end of your first spell round. This maximizes the mana regen you get and saves your health while you spam for recovery.
Beacon is more or less the first skill you want to use to get extra early damage, the healing will stick to the enemy and they will bring it to you if he's a melee enemy so you're only missing out on a little healing you get anyway not needed initially.
For weapon perks, we absolutely need Blessing, even if it's primarily intended to self-heal. This is a very useful and flexible perk. Other than that, we're mainly looking for Enchanted and Refreshing Move so we can use your damage spells more often.
For armor perks, Refresh is a solid perk overall. Revitalizing Beacon and Fortifying Sacred Ground are also fantastic items if you can get them too. Other than that, you basically prioritize the kind of protection you want to get.
For Amulets, the best three you can get would be Divine, Strike Protection, and Strike Protection. Overall, this will help you stay on your feet. Divine will speed up your self-healing, and like Blessed, it's a very flexible perk. Defense perks cover most of your overall defense.
For earrings, focused and regenerating offer a lot in this setting. Focus is incredibly useful for mitigating any potential mana issue. Regeneration offers the same, but for additional healing.
Sacred and Keen Awareness are great for Rings. Sacred is similar to a smaller version of Blessed, offering about half the healing bonus. Keen Awareness grants a small critical strike chance to reduce damage.
Like Fire Staff, Life Staff also wants to weave spells between attacks. If you attack and immediately cast Beacon or Orb of Protection, you will land two attacks almost at the same time. We are leading with Beacon for the reasons stated above, in particular because it has a longer recovery time.
We lead with a heavy attack to get one stack of Intensify and a bit more heavy damage with the initial hit, but this is not necessary. We keep using light attacks after we deplete our spells because they are better DPS overall and trigger Revitalize.
After that, he mostly uses Orb of Protection and Beacon as they come off cooldown. This is usually more than enough to keep you on your toes, but keeping Sacred Ground active is also good.
Expedition (PvE) Build
This build is more focused on keeping your tank alive, but you can still freely heal other allies. It focuses on Light's Embrace, Orb of Protection, and Sacred Ground.
If you're playing in a group, this can also be a great build for other PvE content, but works best on expeditions.
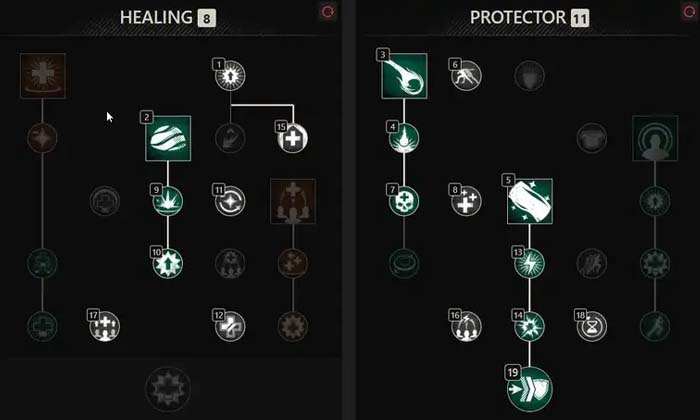
As with other builds, we start with Absolved, so we get constant damage without mana issues. We then take Sacred Ground for healing, Orb of Protection for damage, and then maintain Light's Embrace for a lot of healing power early on. We've also received an upgrade to the Protection Orb so that you can heal earlier as well.
After that we take Bend Light, Shared Protection, then Protector's Strength to get strong heals very quickly. Then we will completely upgrade the Sacred Ground, as it provides a powerful boost to healing.
Then we take Revitalize and Intensify to help with recharge and further increase the healing potential. Then we finally maxed out Light's Embrace, save for the last passive we need to get Glowing Focus and Spirits United to get to it.
Sacred Protection can be grabbed either before or after maxing out the Protective side of the tree. It's only a 5% healing bonus, so it's pretty insignificant overall.
Skill perks, their use and rotation
There are no set rotations on this build as you heal as needed. Although there is a way to quickly set up a strong Light's Embrace spell.
The Orb of Protection is mainly used to apply Fortify and Restore to your tank. It's a very negligible amount of healing overall, but fortify helps your tank absorb more damage.
Sacred Ground should be used whenever tanks pull a group and choose where they want to hold it. Casting this on a moving target or a kiting target is a waste of time, so shouting when you use it can be helpful.
Light's Embrace is your big healing skill. It should not be spammed after reloading and should be focused on your tank first, unless someone else has gone very low.
Weapon perks require Blessing to increase healing power. Siphoning Blow can be a good pick to help with mana. You can also use Refresh Move to gain even more light attack cooldown reduction. Kindness will also be useful for reducing the aggro generated by your healing and damage.
For armor perks, Refresh, Fortify Sacred Ground, and Haste Light's Embrace are some of the best you can get. The update helps reduce your base cooldowns by making Holy Ground spawn more often, but it's not really necessary here.
Amcleth will be a defensive part, choosing health, fortified and enhanced recovery. Health simply gives us a percentage bonus to our total health, and in most cases CON will be a secondary stat for Life Staff. Fortified strengthens our Orb of Protection so that the fortification lasts a little longer, and also slightly increases the bonus from Fortified Recovery.
For our earring; Beloved, Focused, and Revitalizing are all great options here. Beloved reduces your aggro generation, as does Kind for weapons. Focused gives you better mana regen to help you maintain it more often. Regeneration helps you survive random hits without having to focus on self-healing.
For our Ring, we want Sacred and Siphoning. Scared increases our healing and Siphoning helps with mana maintenance. For the last slot, it could be Brilliant for extra mana, Hearty for extra stamina, or Nature Damage to increase your own DPS in fights.
The idea is to use a strong attack and then a spell, starting with the Sacred Ground spell with the longest duration. By the time you've landed all those heavy attacks and stacked up all those buffs compared to others, you should almost triple the power of Light's Embrace by the number of buffs and perks you're using.
PvP build in war / skirmish
This build focuses on skills that can affect multiple allies at the same time, favoring powerful AoE healing over bust healing options. It focuses on using Sacred Ground, Splash of Light and Orb of Protection.
This works because in war situations you won't need single target healing because you often won't be the only healer. However, in small skirmishes, you can set up another skill to turn one on if it's a small skirmish.
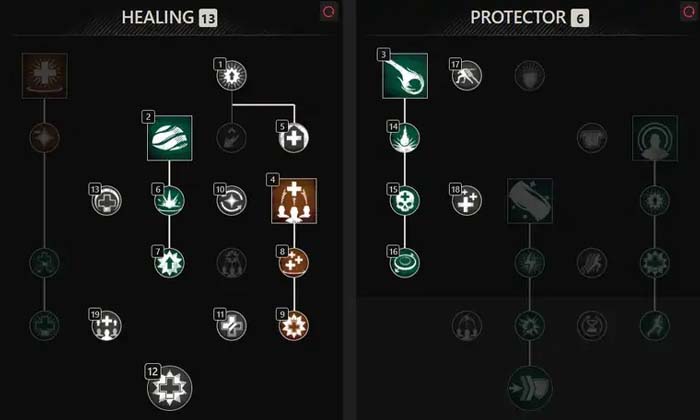
As usual, we start with Absolved for lighter and more consistent damage when leveling. We then pick up Sacred Ground, Orb of Protection, and Surge of Light for more healing and damage. You can also pick up a Beacon to start taking extra damage while leveling and then switch to Splash of Light later on.
We will then take Blissful Touch to be able to heal and activate Revitalize at the same time. We then focus on upgrading Sacred Ground to increase the healing effect, and Light Burst to reduce its cost and provide a cleansing effect.
Then we take Revitalize and Intensify to get access to Divine Blessing as soon as possible. Revive is important in order to be able to keep our skills up and running and heal our allies. Intensify and Divine Blessing help to greatly increase the effectiveness of our healing, although Intensify will require maintenance to keep it going. While Divine Blessing requires an ally to be below 50% health to trigger, this can be quite common when fighting in a war or skirmish.
We're choosing Desperate Speed to speed up your cooldown recovery in these clutch situations, allowing us to cast more Burst of Light spells faster, aiding in mass recovery. We then switch to the Protector tree to take our important passives here: Bend Light and Protector's Strength.
The last point is the rivalry between Spirit United and Sacred Protection. Holy Protection is generally the more useful of the two and works better in more situations. Spirit United can be useful if you're in a squad of mages, increasing their mana regen as well as your own.
Skill perks, their use and rotation
Burst of Light is one of those skills that, while not very useful in most cases, can actually earn its place in PvP, mostly due to other skills being harder to use in general in war or other PvP situations. . The beacon could replace it in some situations, such as Skirmishes, or practiced in Wars; but otherwise much more reliable. to heal your entire squad at once. Burst of Light also acts as Purification, helping to reduce damage from burns and the like.
Shield Orb is great in wars because it's not a target, so you can send it through a bunch of your own melee teammates, granting them all Fortify and Restore. Both of these effects help make Sacred Ground much stronger, providing additional healing and damage reduction.
Sacred ground on a well-equipped healer can make a difference for a tank living or dying on a Wars spot. It heals so much on its own, apart from any other healing effects you add.
Weapon perks require Blessing to increase healing power. Siphoning Blow can be a good pick to help with mana. You can also use Refresh Move to gain even more light attack cooldown reduction. Keen can be considered if you want to squeeze out some extra damage in PvP.
For armor perks Refresh, Invigorating Surge of Light, Fortify Sacred Ground, Fix Defense are the best you can get. The update helps reduce your base cooldowns by making Holy Ground spawn more often, but it's not really necessary here. Energy Burst adds more utility to Light Burst, allowing it to also replenish stamina. The defense fix will have a high chance of being useful in wars, as you will be hitting multiple people at the same time, rather than just a few.
The amulet will be a protective part, choosing health, fortified and enhanced recovery. Health simply gives us a percentage bonus to our total health, and in most cases CON will be a secondary stat for Life Staff. Fortified strengthens our Orb of Protection so that the fortification lasts a little longer, and also slightly increases the bonus from Fortified Recovery.
For our earring; Focused and regenerating are great options here. Focused gives you better mana regen to help you maintain it more often. Regeneration helps you survive random hits without having to focus on self-healing. Nimble can help here by giving you the chance to dodge more often, but chances are if you get jumped on you won't last very long.
For our Ring, we want Sacred and Siphoning. Scared increases our healing and Siphoning helps with mana maintenance. For the last slot, it could be Brilliant for extra mana, Hearty for extra stamina, or Nature Damage to increase your own DPS in fights.
Skill Rotation
There is no set rotation here, mostly using items without reloading and trying to keep the Sacred Ground on your front(s). As long as you keep the sacred ground active and maintain your buffs, you will heal normally.
This is the end of the detailed guide to Life Staff in the New World. We hope you've learned everything you need to know about this weapon, its uses, skills, perks, builds, combos, and ability rotations. The icons used in this guide are from bases data newworldfans.com . The skill trees shown were created using the skill builder at nwdb.info .
We have a ton of helpful New World guides, and more and more are posted regularly. We also have all the news and updates to keep you up to date with all the happenings in New World!
Detailed weapon guides and the best builds of the new world
Each of the guides below focuses on one of the weapons available in the New World and is very detailed from an initial overview of each individual ability and passive to the best builds you can use when leveling up or in the final game.
Was the article helpful?


