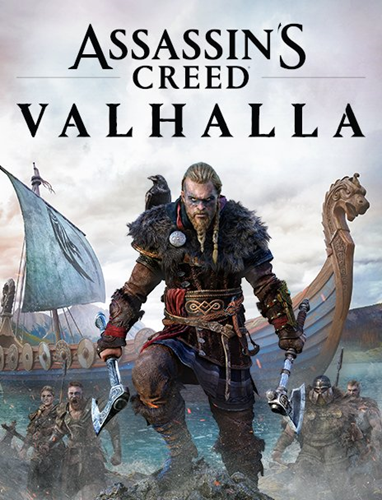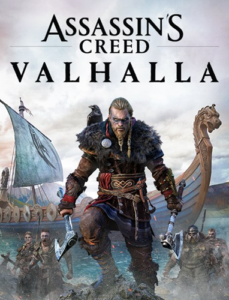
A multi-platform action/RPG video game developed by Ubisoft Montreal and published by Ubisoft. It is the twelfth installment in the Assassin's Creed series. The game was released on Windows, PlayStation 4, Xbox One and Xbox Series X/S on November 10, 2020, and on PlayStation 5 on November 12, 2020.
Assassin's Creed Valhalla Walkthrough 100%, Guide, Guide
Walkthrough walkthrough Assassin's Creed Valhalla guides you through the entire storyline from the opening cutscene to the end credits, including each collectible location, boss strategy, and more.

Contents:
- Battle for the Northern Route
- Arrival in England
- Ravensthorpe
- Song of the Catfish (Grentebridgeshire)
- The Saga of Who Makes Kings (Ledecestershire)
- The Saga of Then Oswald (East Anglia)
- Paladin Stone (Oxenfordshire)
- War City (Lünden)
- Dragon Book (Shiropshire)
- Tool of the Ancients (Kent)
- Breviary of Broken Hearts (Essex)
- Siege of Portchester (Sussex)
- Song of Hunwald (Lincolnshire)
- City of Greed (Jorvik)
- Sayings of Halfdan (Jorvikshire)
- The Wicker Man Saga (Gloucestershire)
- The Saga of the Two Jarls (Snottinghamshire)
- City of Faith (Winchester)
- In the Hall of the Fallen (Hordafylke)
- King's Prophecies (Hamptonshire)
You can choose separate difficulty levels for combat, stealth and exploration . It is not necessary to choose the same settings for all game elements. If, for example, you only have problems with combat, you can reduce their difficulty. You can change the difficulty level at any time.
In addition to completing quests, you can also complete events and explore the map . This will allow you to gain experience points faster and therefore gain skill points faster. You need them to increase Eivor's power so they can explore more difficult regions.
Find as many skill books as you can to unlock new skills . They can greatly increase Eivor's effectiveness in combat, including stronger bosses or legendary beasts.
Upgrade your main character's equipment regularly . You can do this in two ways - improve the quality of equipment by bringing ingots to the blacksmith Gunnar in the settlement, and spend regular crafting materials to buy more upgrades. Item stats will increase and you will gain access to rune slots.
Plan well the first buildings in the settlement , since building materials obtained from raiding monasteries are limited. We recommend building the office of the Hidden Ones as soon as possible - it will unlock an extensive storyline in which you hunt members of the Order of the Ancients.
Save game status before each conversation - you may be forced to make important choices . You make many important decisions throughout the game. In addition to small choices, you will also have important ones that the game does not highlight on the screen. A bad choice can result in the death of the NPC or anger the person you're talking to. Saving the game will reduce the risk of negative consequences.
Battle for the Northern Route
A matter of honor
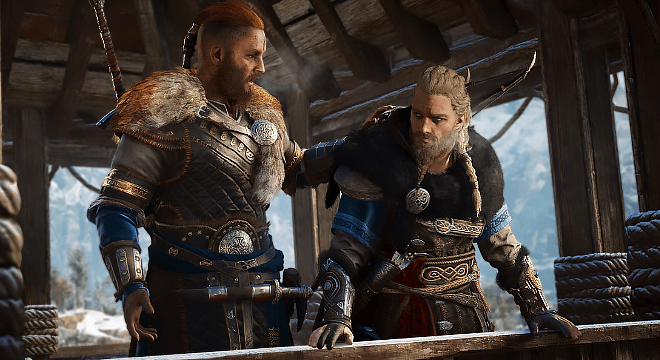
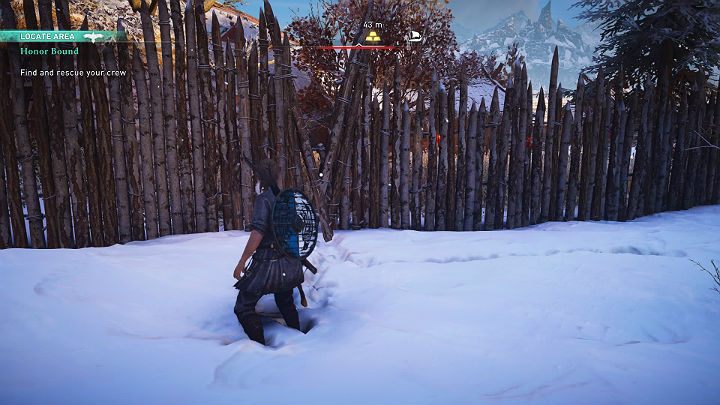
First full mission Assassin's Creed Valhalla begins in 872 AD in Norway. Eivor must do everything to get his comrades back from the hands of Kyotwe, the murderers of Varin and Rosta. During this quest, you will have the opportunity to learn the basics of rock climbing, combat, and navigation on the Drakkar (Viking boat).
Quest reward: 5 XP.
Find and rescue your team
After a short cutscene with the executioner of Eivor's parents (Kjotwe the Cruel), you will play as the protagonist and take on the task of finding and saving your team from the hands of the cruel leader's people.
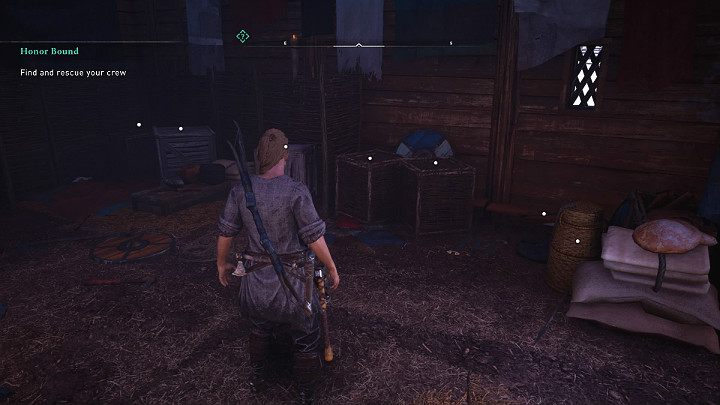
As you move towards the main mission marker, it's worth taking a look at the passing huts, because inside you can find additional items - some silver, as well as other useful things. Larger baskets and crates can be smashed with weapons.
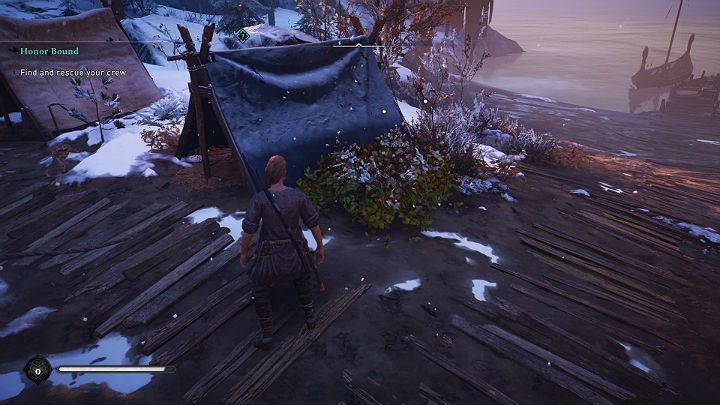
Stop at the tents to collect fruits that grow in the bushes, which can restore some of the lost health. After eating a few of them, Eivor will immediately get better. Surplus food will now be stored in extra food rations.
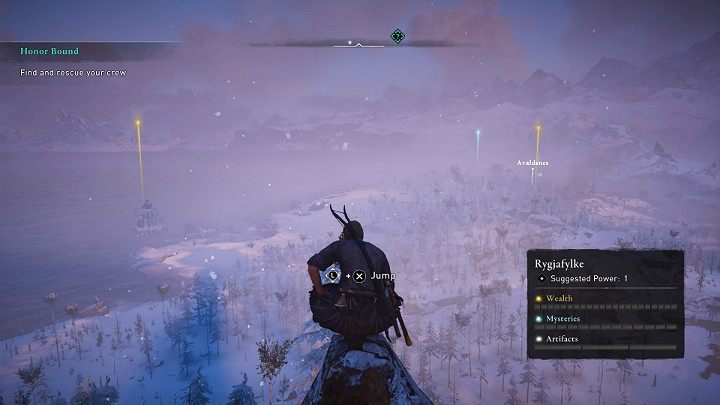
As soon as you climb a little higher, you will notice the first viewpoint, which is worth climbing to synchronize. Thanks to him, you will discover additional points on the map that will show you the places where artifacts, puzzles and valuable treasures are located. Visiting these points, of course, is completely optional.
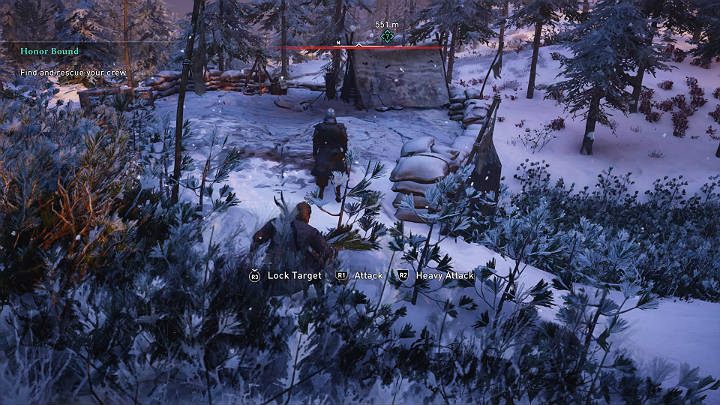
As you move further towards the main objective of the mission, you will begin to get to know the people of Kyotwe. You will have the opportunity to practice fighting them. Don't forget to use bushes where your character can hide. The best moment to attack is when the enemy turns away from you.
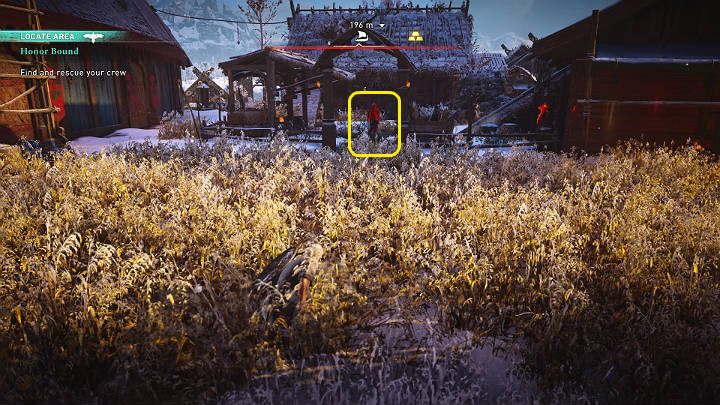
In a small camp on the right side of the island, you will meet two more warriors. The easiest way to eliminate them from a distance is to use a bow. Stretch the cord and aim it at the opponent's neck or head to finish him quickly and effectively. . After killing opponents, don't forget to collect arrows from their bodies to use them later.
The best way to enter the Avaldness camp is through the side gate, because the main entrance is guarded by warriors. A frontal attack will alert the enemy and make the game more difficult. In the wooden palisade between one and the other entrance to the camp, you will find a gap through which you can slip.
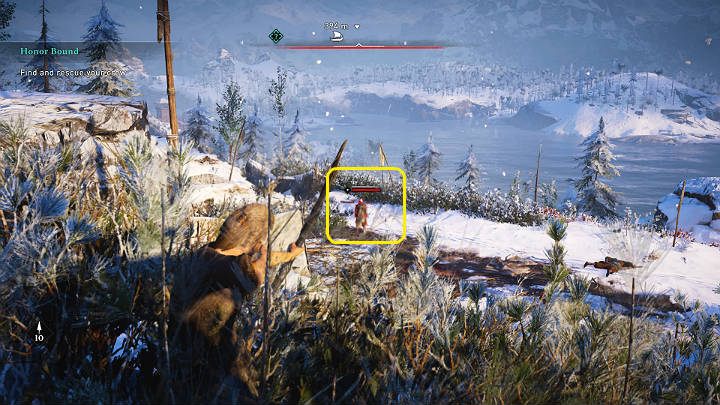
The safe entrance to the building where the enemy is holding Eivor's allies is on the roof, so you'll have to climb up there. Please note that on the right side of the scaffolding, one warrior is patrolling the area. Wait for him to turn his back and walk in the opposite direction .
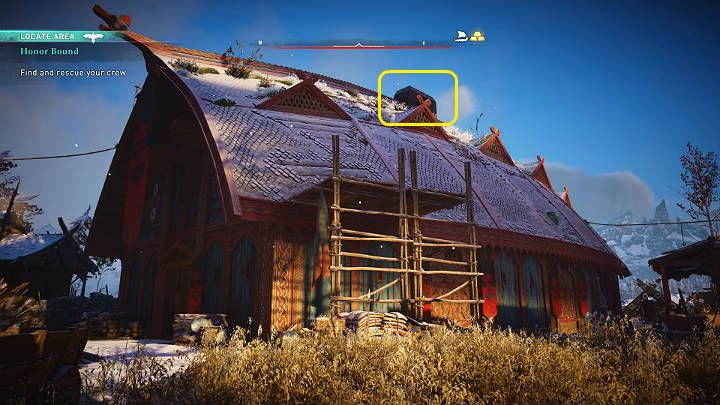
Take advantage of this moment to jump onto the scaffolding and sneak into the passage at the very top, where you will get inside. Then jump into the building.
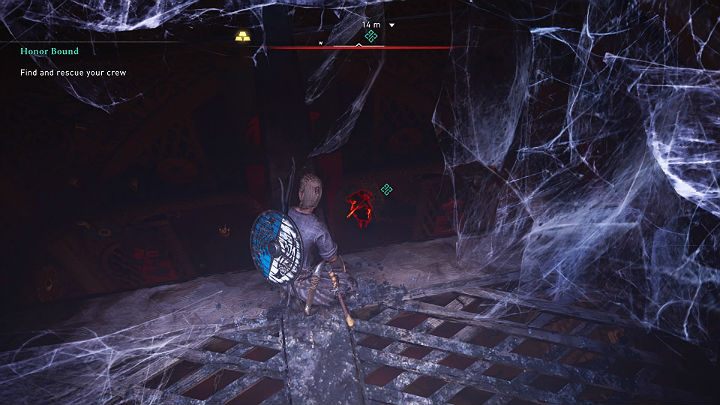
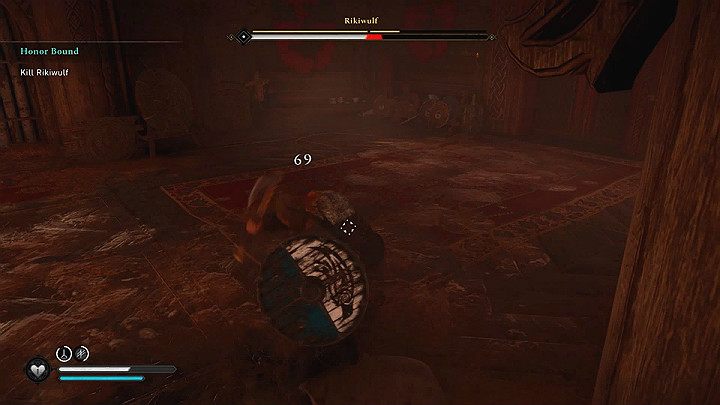
When you use Odin's Gaze, you will locate the first major enemy. The enemy is on the first floor, so you need to get to him first. Jump off the beam and go further along the corridor on the right. When you jump to the lowest level of the hut, you will see a short cutscene, after which you will meet with Rikiwulf - the first boss in Assassin's Creed Valhalla .
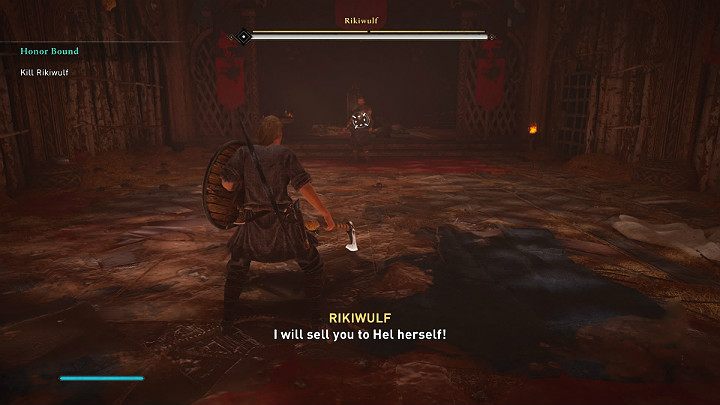
The opponent has two sets of weapons: a two-handed ax with a long reach and two one-handed hammers. Rikiwulf uses an ax to swing slowly. Two one-handed weapons allow him to attack much faster and land multiple hits in a row.
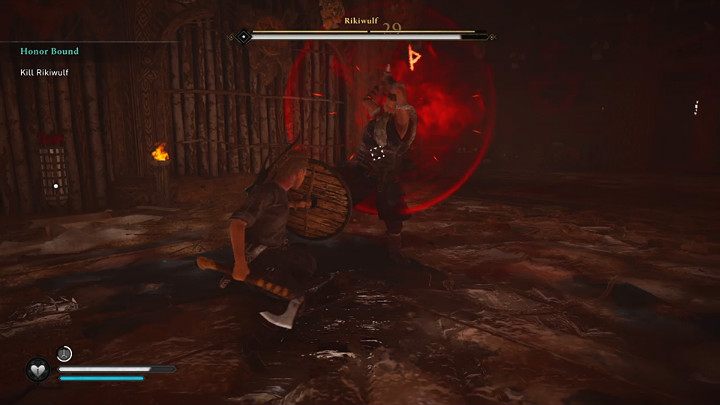
When Rikiwulf uses a two-handed ax, he will often report his stronger attack . Pay attention to the red aura surrounding the boss right before he uses skills such as overhead strike, uppercut strike, or left-to-right attacks - this is a sign to avoid sideways or backwards. Your opponent is defenseless for a while after a missed attack - this is your chance to attack him several times .
At some point, Rikiwulf will drop a bulky two-handed weapon and start working with two hammers. This will make the boss much faster.
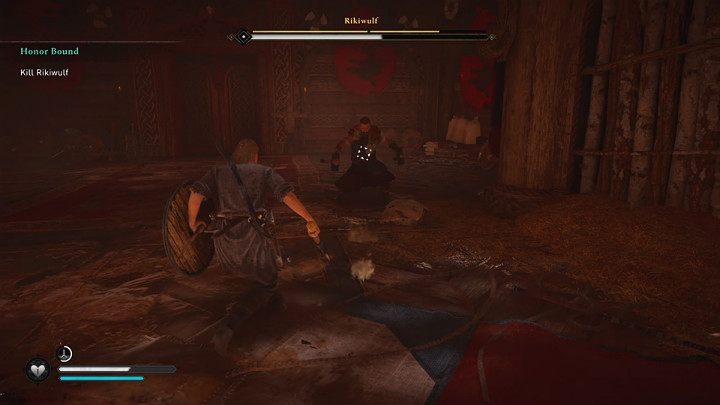
Rikiwulf's quick attacks can be avoided, but it is better to block them with a shield and parry to gain an advantage . Remember to press the block button just before you get hit.
Parrying throws the opponent off balance, leaving them vulnerable to attacks for a short time. . You will notice that Rikiwulf is on his knees - try to attack him as many times as possible.
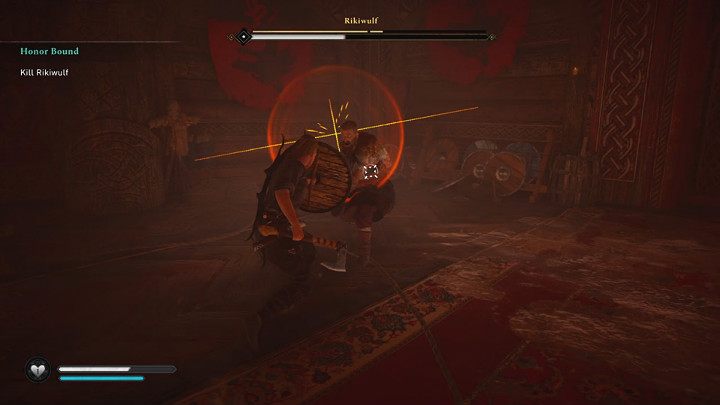
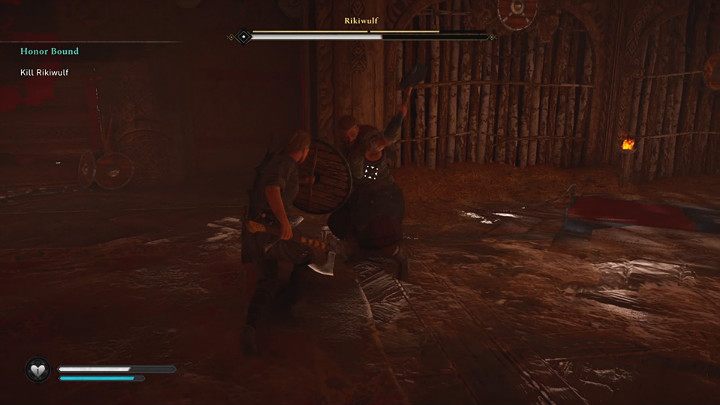
Dual hammers give Rickywolf access to an additional special move - forward strike . You can recognize this attack by a red flash around the enemy - then the boss will strike with his right foot. The attack can be avoided or blocked.
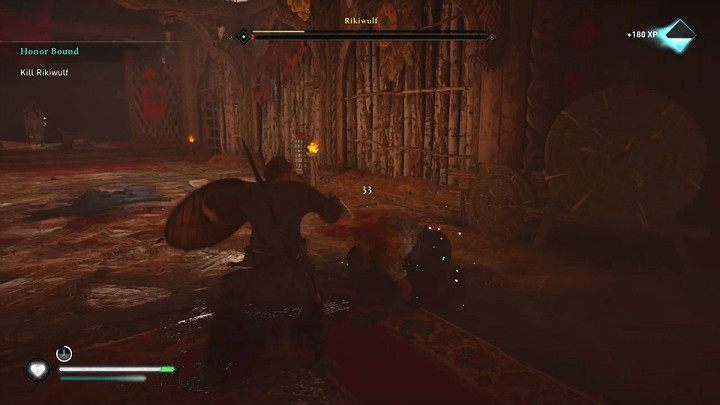
Take advantage of your opponent's mistakes, parry his attacks and perform counterattacks and you should quickly defeat the first boss in Assassin's Creed Valhalla . Defeating Rikiwulf gives you 180 XP .
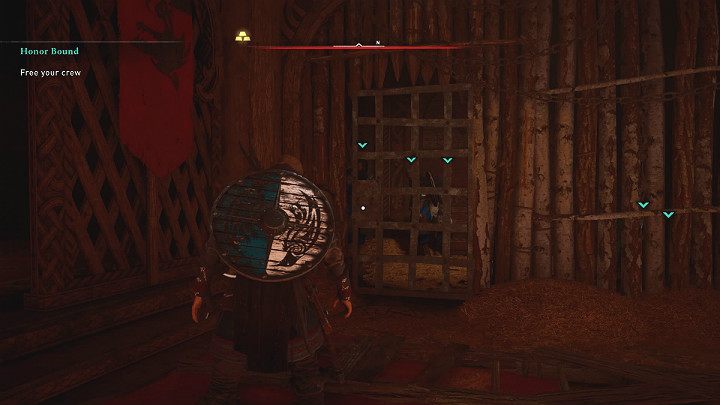
After the battle with Rikiwulf, release the first prisoner from the bonds and release the rest of his comrades from the cage. With this support, you are ready to take on the warriors of Kyotwe.
Velva consolation
The task "Family Matters" can be partially completed, but the continuation requires the completion of the current quest. Randvi will point this out when you talk to her in front of the king's house. Follow the marker until you find Valka's house. Go inside and watch the video. While sleeping, move forward behind the silhouette of Sigurd and the wolf. In the end, you will see how the brother falls off the cliff. Talk to Valka to complete the quest.

From here you can head to the nearest sync point. Climb up and activate the point. In addition, the path to the top is more difficult than last time. Eivor cannot climb ice floes, so you need to look for those parts of the rock that are not covered by them.
Family affairs
Explore your settlement. There are many interesting things here. First, you can take part in a drinking contest. Outdrink your opponent and earn 40 silver. Press "Space" in time, and to maintain balance - A or D. You can also play dice. This Norwegian game is called Orlog. The rules are simple: carefully read the hints in the game. To defeat an opponent from this village, it is enough to choose bones that deal damage. Then go to the blacksmith and improve the ax in communication with him. Here you can also pass the first test in fluting. Such competitions are held in most settlements. By defeating them, you increase the charisma of the main character, thanks to which you will gain access to special skills. In flutings, not only rhyme is important, but also meaning. Try to choose phrases wisely when answering your opponent. And don't scold.

You can also talk to Tuve. Shoot in front of her with a bow and get a new tattoo, which you can get from another character marked with a blue marker. Finally, the old woman will give you a hunting leaf and ask you to prove your skills: kill three deer and bring the antlers to the woman.
When you're ready, talk to Randvi. She will say that the king is still busy, and therefore you need to go to Valka. Complete the "Consolation of the Velva" quest if you haven't already done so. Return to Randvi and confirm the desire to communicate with the king. After talking with him, the task will end.

The Return of the Prodigal Son
Move to the pier to meet your brother. Then visit the king with him. Listen to Sigurd's story and then talk to him. Do not rush to follow: you can chat with the rest of the characters. When you're ready, speak to Sigurd to receive the Hidden Blade of the Assassins. After that, visit the training camp with Sigurd and the Assassins. Land two blade strikes on different targets. Then you will need to hang on the edge of the ledge and attack the third target from above. If there is still a marker on the targets after the attack, just leave the camp and go back: the target will again be on top, and you can repeat to make the action count. Finally, attack another target by jumping from above. Having done all this, walk with Sigurd to the pier and talk with your brother. The mission will then end.
disturbed sleep

At night, get out and follow the marker to the first scout. Kill him in any way (now you can act stealthily). After that, move uphill through the snow (with a crow you can see the search area highlighted in blue) and finish off two more opponents from the Kietvi clan. Having done this, go to the pier and listen to the king and Sigurd. When everything is over, follow the marker to the Kietvi camp. You can do this in two ways: sail right now from the longship or move to the first sync point. In the second case, go to the shore and press J to blow the horn and summon a longship. It is necessary to stand near the shore so that the camera zooms in on the image of the main character.
When you get to the right place (on the way, you can look into the village and perform side actions - fight Orlog, flute, drink, complete world events, collect artifacts, and so on. Arriving at the Kietvi camp, find 5-6 wagons on which there are red jugs with oil.There is definitely a fire nearby.After killing the enemies, go to the fire and hold down the T key to pick up the torch.Throw it with RMB + LMB.There are several enemies near each wagon, so you can first kill them.After completing the destruction of supplies, go to coast to Sigurd.

cruel fate
After the cut-scene, a new task will begin. Climb the tower, where Sigurd is already waiting for you. After the video, you will have to fight with Kietvi. During combat, dodge as often as possible with the ALT key. This is important, since most of the Kietwi's attacks are unparryable. But absolutely everyone is telegraphed. You can use a bow to deal additional damage to the enemy.
After the victory, wait for your people to install the ladders, and then get over the fence. Defeat a couple of enemies, go down to the gate and destroy the two mounts on the left and right. And then unlock the gate. Move to the next gate. To get on the other side of the fence, go to the right and look for a place where you can climb over. Having unlocked the second gate, get to the temple and listen to Gorm. When he hides, go upstairs and try to catch up with him. The task will end.

Birthright
Before completing this mission, I recommend activating the nearest synchronization points. And then visit the specified settlement. A truce has been established here, and Gorm will be here with his people. Get to the middle of the village and pay attention to the tavern on the left, near which there will be a man on a horse. Go inside, because Sigurd is there. After talking with your brother, follow Basim, who will teach you stealth. Hold B to put on the hood, and then go into the building ahead. Don't worry, no one will find you. Inside, watch the cut-scene, and then get to the meeting place, where Harald will declare himself king. Watch the video, tell me what you think about the fate of Gorm. In any case, Harald will not kill him, but simply expel him. Then the task will end.

Seas of fate
Follow the marker and talk to Sigurd. It is located inside the king's building. After the cut-scene, talk to him on the pier and jump into the longship. Please note that you will not be returning here. At least until the end of the storyline.

Arrival in England
Swan road home
Wait for your Drakkar to float down the river. You can enjoy panoramic views. In the end, the path forward will block the chain. When the Drakkar stops, go down to the shore and infiltrate enemy territory. If possible, kill enemies by sneaking up on them from behind. After defeating everyone, go through the building and see the device holding the chain. Shoot a bow at the left and right handles, then return to the Drakkar. In the end, you will land on the shore.

You are not welcome here
Faced with a group of robbers, defeat them all in combat. Search the camp, go up to the long building and free the hostages inside. One of them will become the groom of your settlement, and the girl will become a merchant.

New home
After the cutscene, go outside and talk to Gunnar. He will talk about the construction of the forge, but this requires supplies and materials. There are supplies, but the materials will have to be obtained during the raid. Red weapon markers will appear on the map. These are the places you can raid. Moreover, this can only be done from a drakkar, so that in addition to Eivor there are other Vikings. The first place to raid will be marked with a marker. Swim there. You can press Z to make your Drakkar float down the river at maximum speed. A hint will appear near the place of the raid - press the E key.

Kill all the enemies, examine the place of the raid with a raven and you will see two gold markers. They point to chests with materials. The first chest is located in the church, the door to which you can open with another viking (just interact with it and wait). And the second chest is in a building with dilapidated doors. They are bolted from the inside, but you can easily break them with an ax blow. Open both chests (although one is enough) to collect the required materials.
You can return to the Viking settlement right now or go to the markers and activate several nearby synchronization points. Fortunately, there are not so many mountains here and it takes less time than in Norway from the prologue. Back in the settlement, interact with the sign near Gunnar and build a forge. Go inside the longhouse and talk to Sigurd. Examine the three active points in Eivor's room, and then go outside and talk to Sigurd near the stable. He will leave.

Ravensthorpe
The settlement grows
The task is activated after the quest "A New Home". Go inside the longhouse and listen to Randvi near the map. Choose which territory of England to make an alliance with. To complete the quest, you need to increase the level of the settlement to the second. To do this, you need not only to build new buildings, but also to enter into alliances with different territories of England. The task will continue until the moment you upgrade the settlement to level 6.
You will increase the level by entering into alliances (that is, by completing the back story) and building new buildings. Again, with the passage of story missions and the conclusion of new alliances, new NPCs will appear in the settlement, for which buildings are needed. Construction requires materials and supplies. Both can be obtained during raids. Also, supplies can be found in small chests of any location.

Raids are not as easy as they seem. All of them are marked with red markers on the map. The difficulty of the raid depends on whose territory the icon is located. That is, if the marker is located on the territory of Grentebridgeshire with a power level of 20, then the same power is assigned to the enemies defending the monastery. But if the raid icon is set somewhere in a more dangerous zone, you should go there only after a significant leveling of the character.
Also during the raid, you must open all the gilded chests hidden inside the buildings. Some buildings are opened by force (just go to the red door and ask for the help of an ally). Others are locked up. It can be inside a nearby building or one of the enemies. Use the raven after examining the door locked with the key. Often it will highlight the key icon. Also, the building can be locked from the inside. In this case, either look for a crack in the wall (sometimes you need to break through a wicker wall), or try to break the window and shoot through it at the bolt holding the door.

To serve the light
The task is activated after the quest "A New Home". Chat with Haytham, marked with a marker. You should have enough resources to build the Office of the Unseen. Build a building, talk to Khaysum and agree to walk. Follow him, climb onto the boat to get to the other side. Climb up and jump down after Haytham. Eivor will now perform Leaps of Faith. Keep following Haytham, talk to him to complete the quest. Two new tasks will start immediately.
A Brief History of the Unseen
The quest starts after the previous quest. You are asked to find notes in six Offices of the Unseen.

Legend of Beowulf
Creature from the Underworld
To take this quest, read the letter from the woman in Eivor's chambers in the longhouse. This can be done after the conclusion of the first union. Follow the marker and find the village. Walk towards the crowd. It is not necessary to fight angry villagers. You can just give in. After that, talk to Wulfhilde, then examine the animal corpses. In the paddock, inspect the cow, talk to the old woman, examine the corpse of the animal on the roof of the barn and chat with the two children on the outhouse on the right. There are four objects in total. Having done all this, talk to Wulfhilda again.

Shelter of doom
This task follows from the previous one. Move to the indicated place and talk with the old woman. Then defeat the three wolves, and then return to Wulfhilde. Move to the indicated place, along with the abbess, until you find yourself in the church. Look around below, shoot the fasteners on the stairs above and climb under the roof to find the Dan leader. Chat with him, and then sit down and wait for the monster to appear. When Grendel arrives, attack him with a surprise strike from above. Defeat the bull, then inspect his corpse. Talk to Wulfhilde.

Fate is immutable

Follow the green mold trail outside. You need to go southwest along the path until you find the camp. There will be a hole in the center. Climb down and move deeper into Grimes Graves Cave. In the very depths you will find a cursed place. You may have met them before. Examine the door on the right, and then find the key on the table opposite the door, against the wall on the right. Open the door for them and move forward until you run into Mom. Defeat her using predominantly powerful attacks. Once the fight is over, go to the end of the tunnel and move the rack. Climb up and move deep into the cave, but already on top. This path will lead you to another shelving unit. By sliding it, you can go upstairs. Go to the church and talk to Wulfhilda.

Mystery man

After making the first two alliances (in any order), talk to Thekla in the longhouse to receive this quest. Apparently, to start the quest, you also need to build a bakery (next to the pier of your settlement), since Gutban is the cook who settled in it. Talk to him, and then follow to the meeting place with his former associates. Listen to the leader of the gang, after which, together with Gutban, go to the camp of the Anglo-Saxons. Here I recommend killing as many opponents as possible before they reveal your presence. Also beware of the dangerous warrior brandishing the chain. This is a difficult opponent. Use strong counterattacks against him.
Wise friend
The quest begins after you make two alliances with Gruntebridgeshire and Ledecestershire, and repel a Danish attack. Perhaps a third level of settlement is also required. Go to Revenstrop's Wharf and talk to Valka. Take the load and escort the woman to her new home. The task will end, but a new quest will begin.

In the world of dreams
The first thing that is required of you is to build a hut for Valka. We'll have to collect the right amount of supplies and materials. To do this, make raids. Supplies are usually stored inside small chests in monasteries in England. You will receive materials by opening large gilded chests during raids. Read more about the raids in the task "The settlement grows". When you build the right building, talk to Valka and go to the waterfall nearby. The first two thistles grow to the left and right of the waterfall. Two more grow on the left and right at the top of the waterfall. Look for the fifth a little to the left of the river preceding the waterfall, by the tree. Bring the thistle to Valka to make a potion. Drink it, as a result of which you will go to Asgard. This quest line is discussed separately below. The quest "In the World of Dreams" will end after you deal with the tasks of Asgard.
Tail and mane
On your return from East Anglia, you will see two men arguing in a longhouse. Just judge them. If you take the side of the man who cut off the horse's tail, then everything will end in peace.
little trouble
Talk to the boy inside the longhouse after returning from East Anglia. Follow him, listen to the children and inspect the door of the house. There is a corpse on the right. To the right of the house, in the bushes, a wild boar is hiding. Kill him, search the carcass and get the key. Enter inside the house, go down and free the she-wolf. Together with the children, go back, defeat all the wolves (the she-wolf will help in the battle) and give the name to the beast. Return to the settlement to complete the quest. From now on, you will have access to the new ability "Man's Best Friend", which allows you to set the she-wolf on enemies.

Continue the work of the fallen
Also, after returning from East Anglia, you will learn about the death of a tattoo artist. Go to his grave and talk to Tuva. That's all. Proceed to the next stage of the passage of "Assassin Creed Valhalla".

thousand eyes
Follow the marker to the merchant and talk to him. The boy owns the shop. He wants to expand his influence throughout England, so he offers to fulfill his contracts. For 10 completed contracts, you will receive a reward. This will be part of the Viking for Hire quest.
When you are taken for granted

After making an alliance with a number of regions, when talking with Randvi, a question will appear about how she feels. After 4-5 alliances (in my case, after making an alliance with Lunden), when you ask Randvi this question, the quest will begin. Go with her to Gruntebridgeshire. It's best to get on the boat, hold down Z and E to swim to the marker automatically. In Gruntebridgeshire, talk to Magni and follow to the bandit camp nearby. Defeat them all. Randvi will jump on the stolen horse. Return to the city with her. Then fight Randvi, and then go to the tower together. Stop on the bridge, and then climb to the top of the tower with her. There is an important moral choice here. Randvi clearly has feelings for Eivor. You can reciprocate. If so, then they will spend the night, and you can kiss or make love with Randvi in your settlement at any time. But keep in mind that Sigurd will find out about this and he will not like it. If you do not want to anger your brother, either do not complete this quest, or at the top of the tower, tell Randvi that you perceive her as a friend.

Song of the Catfish (Grentebridgeshire)
Great Scattered Army

After talking to Randvi near the map at the start of the Settlement Grows quest, you will be able to choose one of two territories. First I pointed to Grentebridgeshire. Go there and talk to the man in the fortress. This is the temporary leader of the Summer Army. Immediately activate the synchronization point, and then move to the search site for the Drakkar. If you are sailing there by boat, you can select "Go down the river" (Z) and then press E to sail to the quest marker. Despite the fact that you are interested in the search area, the boat will automatically swim to the shore with reeds and a drakkar standing among rare trees. Kill the enemies and save the four hostages. By the way, if you release them earlier, they will help with the remaining Anglo-Saxons. After defeating one of them, you will learn that Soma led the enemies to the east.

Turn around so that the radar above points to the east (letter E). Move there. The path to the settlement is accompanied by the corpses of the Anglo-Saxons. On the spot, talk to Soma to complete the task.
Orphans in the swamps
The quest starts immediately after the task "The Great Scattered Army". Climb the tower to light the fire. There will also be a corpse with a note and a key. The key will allow you to unlock the distant house in the same settlement, behind the destroyed wooden bridge. Inside is a small loot.

You have three markers. Move to the right of them, cross the river and find a small ruin with a tower on which one of Soma's people sits. Defeat all the wolves, go upstairs and help the man to his feet. If you can't figure out where to go, activate the raven and it will highlight the search area in blue. Then go in the direction of the next marker, along the path, to the bandit camp. Defeat everyone and free the hostages, including another Soma man. Finally, go a little further to the next settlement. There will be 5-6 opponents in the forbidden territory. After defeating everyone, open the door to free the last hostages. Then return to Soma's camp and listen to the woman.
Return of former glory
Talk to Soma's people, and then talk to Soma herself. Meet Soma's army under Grentebridgeshire, watch the cutscene and run into battle. Explode the oil jugs in front of the gate and defeat the first enemies. Follow the other gate, kill the opponents hiding in the grass to the left and right, and then get over to the other side to the left of the gate. Break them from the other side and finish off the remaining opponents. Meet Soma in front of the longhouse, where the big man Wigmund's Right Hand will come out. In a fight with him, dodge as often as possible, but first try to kill ordinary opponents. After the victory, talk to Soma, go after her and blow the horn. Then watch the long video. The settlement has been taken over! Three new quests are activated at once.

Destruction of Ernningstone
Follow the marker and talk to Galinn. After that, together with other Vikings, attack the settlement. Kill all enemies, then interact with fire bowls and throw burning torches on the thatched roofs of buildings. The more buildings you set on fire, the faster you fill the damage scale to the settlement. Once it's full, chat with Galinn to complete the mission.

The game uses an unusual healing system. As you collect food, berries, and so on, you gradually fill up the dial in the lower left corner of the screen. If the number "1" appears there, then you can heal yourself once by pressing H. But all healing funds will be spent.
unholy father
Get to the right place and talk to Liv. Together with the Vikings, attack the settlement and kill all opponents. When the soldiers are finished, climb over the wall and go inside the church. Kill the priest indicated by the marker, and be sure to read the note to find out that the traitor asked not to attack the longship with yellow paint. After finishing off the priest, leave the settlement and talk to Liv.
In addition, the first Book of Knowledge can be found in the church. These books unlock new abilities for Eivor, which you can place in four different slots. In this case, we are talking about the Book of Knowledge "Fire Trap".

Attack on Ravensburg
Follow the marker and talk to Byrna. Attack the settlement. You will need to move in a circle until you find yourself at the very top, in the center of Ravensburg. Defeat all opponents. Toward the end of the battle, markers will appear indicating the last enemies. After the victory, talk to Byrna. One of the houses is locked. You can find the key on the corpse of the enemy (use the raven) and then unlock the door and read the note. Next to it there will be another Book of Knowledge, adding the melee skill - dash. Press the "1" key to make Eivor attack enemies from a running start, literally pushing them out of his way.
The smell of betrayal

The location of the drakkar with yellow paint
View the interrogation, then talk to Soma. Do not rush to draw conclusions. Chat with Liv, Byrna and Galinn. Each character's house has one note. Also head up from Gruntebridgeshire to the swamps. Between the three islands is a yellow drakkar. Not far from him, you met Galinn, who was attacked by wolves. Yes, and inside the drakkar there is a sign with the name of Galinn. The yellow paint was stolen from Liv. In general, everything points to the fact that the traitor is Galinn. Report this to Soma, and then confirm your decision. After the cut-scene, the task will be completed.
Ely Island
Follow the marker. You can pre-clear the monastery on the island of Ili using your team. By doing this, you will simplify the task. Meet with Soma, then follow together to the monastery. Wigmund will be in the main temple. Finish him off. If you have not cleared the monastery of the soldiers and they notice you, then the people of Soma will join the battle. After death, it turns out that Wigmund is one of the members of the Order of the Ancients.

Report on Grentebridgeshire
Go back and talk to Randvi to complete the quest. She will tell you that a merchant has come to the settlement.
The Saga of Who Makes Kings (Ledecestershire)
Perhaps you started this quest chain earlier than the previous one. In any case, both were available by default after the capture of the first settlement in England.

Sons of Ragnar
Follow the marker and talk to Ivar. Here, activate the synchronization point, and then meet with Ubba. After that, together with everyone, go to the Tamsworth fortress, which you need to capture. To do this, talk to the commander in the Viking camp. Help the Vikings break through the first gate. To do this, stand behind the ram and start hitting the gate with a running start. To hit, hold LMB. Use the Q key to raise your shields and hide from the arrows fired by the Anglo-Saxons. Do not focus on ordinary enemies, but immediately move to the palisade, which will have to be destroyed. And you will do it again with the help of a battering ram. Finally, destroy the last gate, then move to the top of the fortress and defeat the two best warriors of Burgred. Once done, watch the video. Then search the side rooms in the longhouse for a note with the symbol of the Tonna clan. It turns out that she was secretly collaborating with Burgred. The task will end, but a new quest will immediately begin.

Exchange
Follow the marker and listen to Sigurd. Go with him to Tonna's camp and talk to the woman. Please note that the outcome of this conversation will determine whether you will be welcome in the camp. If you refuse to pay, you will most likely have to fight Tonna and her mercenaries. But if you have enough charisma (seemingly, you need to win a couple of flutes), then you can reduce the fee from 520 to 260 silver. Having obtained the necessary information, return to Ubba and Ivar. Two new quests will start immediately.

Rumors of Ledecester
Follow the marker to Ledecester, climb to the top of the tall tower in the corner of the fortress, and talk to Ivar. After listening to him, search the church and the baths. In principle, you can not go to church at all. Move to the baths, enter through the main door or use the hole in the roof. Inside the baths, on the second floor there are two rooms. One of them is locked, so you will have to steal or take the key from the opponents inside the baths. Then open the door and talk to Kelbert. Follow the guy, fight the Anglo-Saxons in the market square. Once everyone is defeated, talk to Ivar. Don't forget to activate the sync point.

Templeborough walls
Speak with Sigurd near Templeborough Keep to find out what is hidden inside Æthelswitha, Burgred's wife. Get inside the fortress. To facilitate the battle, you can use the drakkar and your team. There is a flag bearer below. This is a dangerous adversary. Kill the rest of the enemies, then stand on either side of the standard bearer to deal with him faster. Or dodge in time. Then go upstairs, above the big door, go inside and finish off all the enemies. Then find a stand in the corner with the Book of Knowledge, which gives a new ranged ability - Piercing Shot.
Climb down the stairs and open the door to speak with Aethelsweet. Turns out she's a maid. Pursue Aethelswitha down the river, clear out the hideout, and tie up the woman. You can summon a steed and put Aethelsweet on top. Ride to Ubba, Ivar and Sigurd's camp. After the video, the task will be completed.

Strengthening positions
Return to Tamsworth Keep and speak with Aethelswitha. You can choose any reaction to Ivar's actions. It doesn't affect anything. Then open the map. Check out Ledecester. Look to the lower left at the intersection of two rivers, Aln and Arrow. There and look for the desired crypt. It is marked on the map as Offchurch. Upon arrival, clear the camp and go down to the crypt. The enemy will be on the left. After killing him, move the rack to get into the secret room with the artifact. Opposite this room, there is a gap in the wall that leads to a Book of Knowledge with the Norn Clarity ability. Move deep into the crypt. The enemy will be on the left. After killing him, destroy the racks (you can blow up the jug), step into the water and swim to the depth where the treasure chest is located. Finally, get to the back room. Kill the warrior and go to King Burgred. Defeat him in a fist fight. In the same room there is a chest with equipment - inside there is a Danish Grave Axe. Grab Burgred on your shoulders and carry him outside. Put it on the horse and ride to the meeting point. Then move to Tamsworth. A cutscene will complete the quest.

Heavy burden
Follow Ivar and sit down at the table. Chat with him. After a series of cutscenes, move to Tamsworth Longhouse where the coronation ceremony is to take place. But something will go wrong. Move to Repton, fight the enemies and follow the marker to the nearby shore. There you will find Leofrit. Fight a warrior in a fair fight. Take your time and don't attack if he raises his sword (it will simply block even your most powerful attacks). It is better to choose a counterattack tactic or try to pinch the enemy in a corner so that he cannot jump back. After the victory, you will be able to decide his fate. If you spare, he will tell you that Burgred left a scroll with his name for the Zealots. Do you remember the last game in the series? In general, if nothing is done, Zealots will hunt you. And these are warriors, for the destruction of which level 90 is recommended.

Hunting
So, having learned about the scroll, follow the marker to the indicated place. Use the raven to highlight the desired ruins, go through them and see a statue of a lying man. She has a jar with a scroll. Just interact with it.

Report on Lederchestershire
Return to the settlement and talk to Randvi. If both alliances are made, then the Danes will attack the settlement.
Wedding Crashers
Repel all Danes to complete the quest. No matter what you decide to do with the prisoner, Doug will disobey Eivor. The task will end.
The Saga of Then Oswald (East Anglia)
To start this quest chain, you need to make two alliances with Gruntebridgeshire and Ledecestershire. Interact with the alliance map and select East Anglia, ideal for a third alliance.

On the making of kings
Move to the indicated place and talk to the governor of the city. After that, meet with Oswald, who is located at the main gate, and together with him get to the desired mansion. Kill all the Norwegians, then inform Oswald about it. Then move to his settlement, where the celebration should take place. You need to come here at night, and you can use meditation to rewind time. Hold down the G key and select the appropriate icon. Enter the building at night and watch the video. Then fight the two brothers in a fistfight. I don't know what will happen if you defeat them, but if you lose, they will call Eivor and Oswald weaklings. But the task will still end, and for sure, in any case, you will have to complete the quest below.

The rightmost sync point in East Anglia has a tower. Inside it is a wobbly floor. Destroy it with a powerful attack (while holding Shift), jump down and explode the red jar to break the wall. In this secret alcove, you will find a Book of Knowledge with the Blinding Rush melee skill.
What do Norwegians want?
Follow the marker and talk to Oswald. Teach him how to flute, and then move to the marked island and fight the future king. You need to defeat him three times. Don't give in! And then attack the Norse camp Ruda. I recommend that you act covertly and direct your forces to eliminate enemies. You will have to kill them all anyway. Then burn the wagons and various buildings where there is straw or red jugs. It will be necessary to light the tents of the upper camp (there are three in total)! To set fire to the far tent, throw a torch into the straw to the right of it. Then talk to the man.

The winner returns
Chat with Oswald, then move outside the city and catch the scout standing near the river. Tie him up and take him (or take him by boat) to your allies. After the interrogation, move to the enemy fortress and infiltrate its territory. Finish off all enemies. Operate covertly or openly. Once all of Rud's Vikings have been destroyed, light the signal fire and watch the cutscene. At the end of the battle, run away from the fortress. No one needs to fight. Your allies won't linger, so don't worry about them.

The sound of iron
Talk to Finnir and go to the indicated settlement, where you need to talk with Reeve, who also opposes the Rude clan. Go to the specified location. You will need to capture a small monastery. And you need to do this with the help of your drakkar. However, you can start alone and try to covertly eliminate some targets. After destroying the enemies outside, enter the inside of the building and finish off three more elite Vikings. There will also be a chest with equipment - a master's mask. There is a key on the bench nearby, which will allow you to open the neighboring building and find another treasure in the chest - a nickel ingot. Then climb to the top of the monastery and blow the horn.

fury of the sea
Prepare for the attack, talk to Finnir, and then swim to Burg Fortress. Ram the marked gates, smash the first enemies and join the allies for the ram. Break the palisade, but do not rush to approach the gate. Above them are jugs of oil. If you do not destroy them, they will be on your head, and then the enemies will set fire to the ram. Therefore, first deal with the jugs and enemies above the gate, and then ram them. Do the same with the second set of gates, dealing with opponents along the way. After the cutscene, don't pay attention to anyone. Climb up the wall and fight Rude. Try to finish off his wolf first. Rude is so dangerous and very easy to take out with powerful attacks. After the victory, talk to Oswald and Finnir.

Roaring horns before the wedding
Return to Oswald's settlement and agree to start the fun. Take part in a couple of competitions. It is not necessary to win at all. Then go to the table with the pig. One of the brothers Vladis will offer you to retire. This is a romantic thread. Decide for yourself. The choice doesn't affect anything. Then go up to Finnir, talk to him, take him on your shoulders and go down together (along the columns on the right). After that, listen to Oswald, give any speech, and then fight Rude. Of course, if you spared him at the end of the Fury of the Sea quest. If you say that Oswald must fight him, the guy will surely die, and Vladis will rule the kingdom. But I'm not exactly sure about this. Say goodbye to Finnir. East Anglia - Allied with Crow Clan!

Paladin Stone (Oxenfordshire)
Select a new region on the alliance map and go there.
The coming uprising
Reach the specified city and find a tavern near the longhouse. You can mark it with your raven. Go inside and talk to different people. The hostess will tell you where to look. Go to the shore of the city and enter the shed where Basim and Sigurd are waiting for you. After listening to both, move to the indicated place. Avoid enemies and go around the long house. Enter through the door on the right, which can be opened with force. Having done this, listen to Idwin and defeat her soldiers.

After talking with Gedrik, go to the marked camp. Here you will find Shira thegns and they need to be rescued. Operate as long as possible in stealth, and then attack the enemies. In a large building, an elite enemy has a key to one of the doors leading to the room with the Book of Knowledge. It grants the melee ability False Death. To get into the next room with the artifact, you need to destroy the bolt by shooting through the barred window from the opposite side. After killing all the enemies and freeing the thegns, escort them to the indicated point near the camp. Having done this, return to Gedrik to complete the task. This will start two new quests at once.
Little by little
As part of this quest, you must complete the damage scale for the Idwin army. To do this, destroy any camps with red banners. As you complete other quests, you will definitely reach your goal. When you move through Oxfordshire, pay attention to the tooltips (in the upper left corner). It will say that there is a quest target nearby. Use the raven to look for blue areas - enemies, wagons and other objects that will damage Idwin.

Path to the abbey of St. Alban
Go to the indicated place on the right side of Oxfordshire and find the camp on the shore where Basim and Sigurd are sitting. Talk to them and move to the abbey. Go around the enemies and go inside the monastery. Finish off all opponents. One of them will have a key that should unlock the door with a lock. Go downstairs, talk to the priest. Use any means of persuasion to get the key and free Fulke. Talk to the woman and follow her to the stables. After a conversation in the stables, the quest will be completed.

Blood from stone
Follow the marker to the specified location. This should be done on horseback. Arriving at the tower, where the synchronization point is also located, go inside and look around. Break the crate near the shelving and move it to the side to open the door and reveal the body of Fulke's assistant. Search it, but you won't find the stone. Head outside and after the cutscene, fight the Idwin soldiers. After defeating everyone, talk to Basim and Sigurd to complete the quest and start a new task.

Flame Trap
While moving to Ethan Barn, you can visit Oxenford, located on the western edge of Oxfordshire. There is crypto. You need a key to open it. The key is in the next building. To get to it, climb the outer wall to the second floor and break the window. Make your way inside and break the ceiling to reveal a movable rack. But you cannot move it. Climb up the outer wall even higher and break the double windows. Shoot the fastener on the giant chandelier. He will fall down and break the jugs, and you will be able to move the rack. Take the key and open the nearby building to find the Book of Knowledge with the melee skill "Thor's Vengeance".

Move to Ethan Barn and talk to Fulke. If you haven't reached the required amount of scale for the quest "Little by little", blow up the wagons located here. Also note the cracked stone wall. Place a red jug next to it and shoot it. Behind the wall there will be a clue pointing to a member of the Musla Order, the Man of Word. Also here you will find a treasure map of Oxfordshire. Defeat the reinforcements and go upstairs with Fulke. Prepare for battle.
After talking with Gedrik, enter the fortress and destroy the two oil cauldrons above the gate in the center, as well as neutralize several throwing weapons. They are both in the first and in the second half of the fortress. After filling the scale, return to Gedrik.

Stone Sag
The siege will begin. Run to the main gate and shoot the fasteners to the left and right of them (in their upper part). Then follow to the lattice, go up and jump over to the second part of the fortress. Go to the grate on the other side and look up. Get inside through the hole and lift the grate using a special mechanism. Then move to the last building and defeat Idwin. After the victory, talk to Gedrik, go up to the second floor and talk to Sigurd. After the video, the task will be completed.
Oxfordshire report
Head back to Ravensthorpe's longhouse and speak with Randvi. You will receive a clue that indicates that Fulke is one of the five masters of the Order of the Ancients. It's funny.

War City (Lünden)
Select this region on the alliance map.

Shadows on the walls
Travel to Lunden via Oxfordshire. In the lower right corner of Oxfordshire there will be a village (near the border with Lunden). Look for a well there, break the boards and go downstairs to find the Lunden Treasure Map. Get to the main gate of Lunden and talk to Stowe. Help him defeat the big man. You will then have dialogue and the possibility of a romantic scene.

Well with a book
After that, move with Stowe to the governor. Go inside the building and look around. We need to understand what happened here. Examine the letter on the governor's throne, traces near the entrance, inside. In the corner, to the left of the entrance, break the boxes and inspect the barber's tools. Finally, go up to the ceiling and inspect the corpse of the hanged soldier.

Follow the marker and enter the inside of the temple, going down underground. First you need to bypass or kill enemies. Look inside for clues. One will be against the wall on the right (note) and the other one will be on the table on the left. Also move the shelving to the right of this table and move through the hole in the wall. In the depths of the dungeon, you will find a chest with a new shield. Not far from the chest, there are planks on the top of the wall. Destroy them with an accurate bow shot and move to the next room, where there will be the last piece of evidence. Report to Stowe and Erke. Two quests will start.

break arrow
Follow the marker and talk to Stowe. Then go to the market. Don't draw attention. Walk around until you hear two Norwegians talking. One of them will say that he has a coin. Chase him. He will go to the next courtyard. Steal a coin or take it from an enemy's corpse. Then move to the test site. You can train or immediately start the test. Your task is to hit all the targets within the allotted time. They are marked with blue checkmarks. Aim at the top two targets so that the crosshairs are slightly higher. After the victory, talk to the quest giver and go to the meeting point with the Arrow. You will recognize his real name - Avgos. While he is speaking, get ready and attack. We'll have to kill the rest of the enemies, and after that, finish off Avgos.
Bleed the Leech
Move to the meeting point with Erke. Then follow the man. Even if he notices you, you just have to run after him. In the closed area, go to the house on the right ahead to find a blacksmith behind the wooden door. Talk to him. Charisma will not be enough, so try to convince in another way. If you fail the test, the blacksmith will have to be killed. Then go to the location of the Arrow. Infiltrate the area using disguise. Follow the building from the side and look for the Arrow on the second floor. Kill a member of the Order. This woman's real name is Frideswide. Continue through Assassin's Creed Valhalla.

Smash Compass
After completing the two previous tasks, enter the cathedral and talk to Erke and Stowe. Enemies attack you. Climb the fence and move along the wall to the left. This will take you to the back of the cathedral. Make your way under the fallen beams to reach the far upper room. Then look up. You will see a hole. Climb up through this hole and leave the cathedral. Kill the enemies and free Stowe and Erke by breaking the crates and opening the door.
Then choose whose help to accept, or act independently. In any case, I strongly recommend that you destroy all the guns on the neighboring ships, and after that fight with the Compass, whose real name is Vicelin. In the fight with the Compass, use arrows. You can even use weapons from nearby ships, but keep in mind that he likes to throw stones. You can also call on your wolf and shoot at the red jugs if the Compass is next to them.
Report on Lunden
Return to your camp and speak with Randvi. Also chat with Haytham. If you give him 4 medallions of the killed members of the Order, you will get two skills - Poison Shot and Poison Strike. He will also say. That the next members of the Order are to be found in Jorvik.
Dragon Book (Shiropshire)
Select the next region on the alliance map with Randvi.

War-weary
Follow Kelbert and Ivar to the meeting point. Go to the cathedral and listen to everyone. Next, you will need to decide who to give 650 silver to in order to eliminate the conflict. But in fact, no matter who you give this money to, Ivar will still kill the king's brother Rhodri, causing a conflict. Even if you hand over the money to Ivar himself. Therefore, it would be wiser to communicate with everyone, and then tell the bishop that the money is in good hands (lie). So you keep them.
Then fight the enemies inside the church. Once everyone is finished, go outside and defeat the other Britons. Finally, go down to the river. Enemies in the river will appear one after another until you finish off their main, elite warrior across the river. And then talk to the bishop in the church. The task will end, but two new quests will be activated at once.

Valuable supplies
Move along the marker and chat with the poor fellows. Then head to the Hill Gate in the center of the map. This is the synchronization point. From them, move south until you find the Dhuston Quarry. When you arrive at the place, act stealthily and try to free the masons from the cages inside the cave. And then burn 4 wagons. One will be next to the masons, another one will be a little further down the gorge, and the other two will be above, to the left and to the right of the second. When all the supplies are burned, the mission will end.
Sack of Wenlocan
Chat with the indicated people, and then go to the right place on the map. Again, it is best to move from the Hill Gate sync point. Upon arrival, first visit the lower cave, where you need to free the Viking. Having done this, clear the camp with him. And then proceed to collect supplies from the chests. They look like ordinary small chests inside which you find supplies or other resources. They are in the cave where the prisoner was, in another nearby cave, as well as on platforms in the trees. Three chests on the trees are easy to get to, the fourth is more difficult, you need to follow from the top ledge along the branches and rope of neighboring trees. Finally, there are a few more chests at the very top of the outpost. Looking at the mountain, find the boards on the left that can be broken. To the right of this niche there is a ladder upward. There will be two more chests there. Unfortunately, there are just as many chests in the location as you need to complete the quest, so you will have to be patient and search carefully. From myself I will add that in the camp itself, on the ground, there is not a single chest (only in the caves of the first level).
To the world by blood
Travel to the meeting point with Ivar in West Shiropshire. He is waiting in the forest near the specified settlement. Then decide what to do, but in any case, setting fire to enemy houses for a long time and remaining secretive will not work. I decided to attack in the open. Burn the required number of houses. Your allies will also set fire to them. And then Ymir will appear with his troops. Defeat the opponents, including their leader, after which part of the mission will be completed.
Follow Ivar and talk to him. Follow Kelbert on a fishing trip. While he is fishing with a rod, jump into the water and swim left or right. Drive the fish to the edge of the pond. You will see streaks from the movement of the blackheads. Just attack them. Killing 3-4 desired eels is quite simple. Onions will be more difficult. After fishing with Kelbert, talk to Ivar and listen to the bishop.

Then you will find yourself in a peace camp. Chat with the woman and then go to Kelbert's tent. The guy is not there. Chat with Ivar outside and interrogate various people. To the left of Ivar, there is a tent near the cliff. Talk to the Norwegian warrior. He will say that his brother saw Kelbert. Grab your brother on your shoulders and carry him to the pool (if you pass the Charisma check). Bring him into the river, and then interrogate him. Follow the marker and then go up the path on the right, which leads up the mountain and to the cave entrance. Enter inside and move through the cave the only way. Move the stone to the right and find the wounded Kelbert. Pick it up on your shoulders and go to the exit from the cave. Moreover, you will need to climb in two places along the ledge near the right wall. Otherwise Eivor won't be able to get Kelbert out. Take him to the camp. The quest will end, but a new task will begin.
Kings killer
Follow Ivar until you reach Castle Castle, where King Rodri is located. Agree to start the siege. Talk to Ivar at the top of the hill and then defend the wagon from the Britons. However, somehow they can not damage it. Once the wagon is near the gate, approach it, hold T to light the torch, and set the wagon on fire. Run away from her, out of the affected area. When the gate explodes, get to the next ones. To the left and right there are corrals with red jugs. Place one of them near the gate and shoot it to blow it up. Finally, to get to the castle itself, you need to shoot at the mounts on the chain of the bridge. To do this, go alternately left and right to get a convenient angle. Kill the enemies and go inside the throne room. Watch the video.

Grab King Rodri and bring him to the horses. Put it on your horse and ride after Ivar. Climbing to the top, watch the video. Ivar will apply the famous "Bloody Eagle" death penalty.
After that, he will surprise you by talking about the fate of Kelbert and offering a fight to the death. Defeat Ivar. Try to attack only after his attacks. Especially after he tries to jump on you (red attack) and you dodge successfully. You can also use your wolf and other skills. When Ivar is dying, you can give him an ax in his hands. Do so so as not to upset Ubba. Return to the settlement and talk to the bishop and Ubba. Tell Ubba the truth about your brother, then say goodbye to him.

Shiorpshire Report
Just talk to Randvi in your settlement.
Tool of the Ancients (Kent)
Select this region on the alliance map.
Abbot's trick
Follow the marker and talk to Basim, who is standing under the canopy of one of the buildings. Follow him and talk to Abbot Kinebert. Then follow to the specified settlement. You can raid as it's all nearby. And then interrogate the local people. The person inside the building has the necessary information. Then cross the concrete bridge and look under it to find a drunken bard. After listening to him, pick it up and take it to the river, as you did in one of the previous tasks of Shiropshire. After learning where the message is, move to the fortress in the lower right corner of the map.

Upon arrival, make your way to the fortress. Operate covertly. Don't kill the messenger if you want a small bonus. Instead, hide in the grass and wait. He walks around the building, just through this grass. Follow him on tiptoe and press Space to steal the message. The task will end.
Dolls and captives
Return to Kinebert and talk to him. He is waiting for you in Folkensten. After a conversation with Basim, get to the desired village and enter the building on the hill to kidnap the future ealdorman. Tie up the man and take him to the right place. After the cut-scene, take it with you and get to the Danish camp, which you will have to clear. By doing this, you will complete the quest.

Real ealdorman
Go to the right place where you have to break the chains to let the Viking ship sail to the Rochester fortress. Having penetrated into enemy territory, find the desired building. The door inside is closed on one side with a bolt, and on the other - with a key. You can steal or take away the key from one of the guards. But it is better to find at the top of the wall, between two doors (side wall), wooden planks. Break them and you will be inside. If you followed this path, then break the floor and jump down. Go to the end of the corridor and shoot through the bars at the bolt. Go outside and unlock the door that was locked with a bolt. There will be a chest with a nickel. Shoot two mounts to lower the chains.
Then the siege will begin. Get to the right place and ram the first gate. After that, destroy all the boilers with oil (there will be two pairs of four boilers on both sides). You need to shoot the red oil jugs near the boilers. Break them and the boilers will definitely explode. Then shoot the two bridge mounts to lower it, and then ram through the last gate. Run to the indicated building and climb up the spiral staircase. At the very top, move the rack to the side and get out. Jump up the beams and fight the man. He will refuse to give up, so you will have to defeat him. After the victory, go down and follow Basim, and then watch the cutscene. The abbot promises to give information in a day.

bloody reception
Travel to the monastery and go inside to meet Fulke. Talk to her, then go outside and defeat all the enemies. After that, follow Basim and ride horses to Canterbury. Sorry, fast travel is not available. Use Z and E to move along the road and towards the marker respectively.
When you get to Canterbury, go to the indicated building and go down to the basement. Inside, you need to kill a powerful warrior, then take the key from him and unlock the door. Examine the many notes and go to the back room to trigger a cutscene. Basim will then tell you what to do next.
Report on Kent
Return to Randvi and report on the alliance.
An impending storm
This quest is activated after the "Tool of the Ancients" quest chain, during which you deal with quests in the Kent region. Doug will be unhappy that you never found Sigurd. Go to bed, after which Doug will challenge Eivor to a duel. Defeat him in a fair fight, and then decide whether to give the ax or not. If you do not give the ax, then Sigurd will be displeased with this.

Breviary of Broken Hearts (Essex)
Unusual offer
Drive to Essex and visit the city. Find the longhouse and ask the man for Birstan. He's not home. Climb up and talk to Estrid, Birstan's wife. Having done this, follow the marker until you find Birstan's camp. Examine the overturned tables, corpses and various footprints. The blood is a little further. Then follow deep into the forest, where the tracks go, and help Birstan repel the attack of two bears. Having done this, follow the man back to the city and help him deal with disgruntled subjects. Having done this, follow up to the second floor and talk to Estrid. The task will end, but two new quests will begin.

Old wounds
Follow the marker and talk to Estrid. Follow her to the brothel and knock on the door. Chat with Rollo, then defeat the guards. Then meet up at Rollo's camp. The Saxons made a pogrom in it. Interrogate two dans. One of them is a traitor. You can look at the meat in the background. Both dans are lying, but who is to blame? The real traitor is Gredhild. If you choose Lorca, then Estrid will get injured during the escape. However, Rollo will join your settlement anyway.
Child love
Go to the indicated village and find a barn near the house where Alfida's brother is hiding. Interrogate him, then go to the enemy camp. Arriving at the place, deal with opponents and with the help of a raven find the necessary house. It's locked up. And look for the key from one of the elite enemies. There are other doors locked with a key. For one, the key is also located at the enemy, for the other, it lies on a box near the cages with wolves. One of the enemies has a treasure (nickel). Grab Alfida in your arms and carry her to the house by the lake. If necessary, you can ride there on a horse.

Stolen
The task will begin after the completion of the two previous missions. Return to Colchester and talk to Rollo. You can choose a stealth approach or order Rollo to attack the Saxons. In any case, it is important for you to get to Estrid, tie her up and kidnap her. Take the woman to the specified location to complete the quest.
ups and downs
Meet Birstan at his camp and talk about various topics. Go to the hunting place and finish off all the marked boars. Then talk to Birstan, and then return to Colchester and meet with the alderman and his lover. You will learn that Alfred found Estrid and sent troops to rescue her. Run to the meeting point with Rollo, and then with him get to the shore, where Estrid is. Destroy all Saxons. There will be 4 separate waves in total. Use jugs of oil arranged in a circle. The task will end.

Essex Report
After returning home, talk to Randvi. Also be sure to read the letter in your room from Birstan. He will give you a bow.
Siege of Portchester (Sussex)
Thunderstorm of the southern lands
Go to the specified settlement, enter the building and chat with old friends. At the very end there will be Basim. After talking with him, you will need to kill three scouts. First, move to the nearest marker. The scout will already be dead, and you will have to kill a pack of wolves. Be sure to inspect the lifeless body. Then follow to the monastery, which can be raided. The scout stands in the company of other opponents. Go around the wagon and shoot the red jugs to damage them. And then finish off everyone, including the scout. If the latter hides in the monastery, you will have to launch a raid. Finally, get to the third scout on the river bank. Kill all enemies and finish off the scout. Even if he falls into the water, jump after him and just interact.
Return to Basim and the others. After the cut-scene, the Saxons will attack. Kill them until the scale is full, and then defeat the Defender of Fulke. At the end of the fight, you will have the option to kill or spare him. The choice you make does not affect anything! Then take Brothir's body to the camp and listen to Guthrum. You have the right to decide how to communicate with him.

Like a bolt from the blue
Meet up with Stowe and Erke and then attack the Saxon camp. As soon as you kill all the enemies, the task will end. The three quests described below will start simultaneously.
Scorched earth
Head to the meeting point with Soma and choose an approach. You can use archers to set houses on fire. If you choose the first option, then everyone will rush into battle together. Set fire to the thatched houses and shoot the red jugs of oil on the wagons. When the scale is full, the quest will end.

Break the defenders
Meet with Basim and go to the specified location. Before you do anything, go into the fortress on the left ahead. Go inside and kill the commander on the second floor. Kill the commander at the pier by the river and blow up all the boats by shooting at the oil jugs. Climb the wall first and destroy the guns so that they do not cause you problems.
Ash instead of food
Meet with Ubba and go to the settlement. You are interested in towers with a red roof. Their side walls are lined with straw. Throw torches at it. If the main character refuses to light a torch, go to the nearest fire and use the same key. This is a large village, so look for towers in different parts of it.

Siege
When you complete all of the listed tasks, the Siege quest will begin. Meet up with your allies and then start the siege. The first thing to do is get to the gate. There are two boilers at the top left and right. Shoot at their mechanisms, which will be highlighted in red, so that the enemy cannot burn your allies behind a ram. This is important to do, otherwise you will not get anywhere. I also recommend destroying other weapons in the form of a crossbow.
After the destruction of the gate, move deeper into the fortress and destroy any fence by shooting at the jug of oil. Get to the grate, go up to the left and find a mechanism to raise the grate. Break the last gate, then go to the fortress. The bottom door is closed, so head up the side stairs. Find the room where Sigurd was tortured. After that, look outside through the balcony and see Fulke. Follow her to the church and watch the cutscene.

Move through the crypt until the battle begins. Attack Fulke only after her lunges. Also, don't go into the dark. If you see Fulke standing nearby and lighting a bomb, try to be in time and attack her. When Fulke puts out the fire, run to another light source. Keep going until she runs away. Go outside and finish off Fulke. At the end of the mission, you will need to survive the last onslaught of the Saxons.
Reminisce about the past...
Talk to Sigurd in the longhouse, then follow him to Dag's grave and listen again.
Report on Sussex
Report everything to Randvi.
Song of Hunwald (Lincolnshire)
Lord Escort
Talk to Hunvald, who is in your settlement. Move to the indicated settlement and chat with Hunvald in the longhouse. Deal with the intrusive Saxons, then go outside and help Hunvald.

Homecoming
Summon a horse and go to Lincoln with Hunvald on one horse. Arriving in the city, act covertly, remembering to put on a disguise. Get to Hunvald's house and go inside. One of the doors is bolted, but the other is open. And use it. After talking with the man, escort Hunvald to the town hall and listen to the opinion of his supporters.
In the absence of the ealdorman
Follow the marker and climb over the walls to find yourself in the middle of the almshouse. Interrogate several people until you get intelligible answers. You need to search the towers.

Get to the bathhouse and get inside in the same way as in the case of the almshouse - through the roof. Having done this, kill the enemies and find a hole with a wooden fence. Destroy it and move through the sewers. Kill all robbers. On the lower floor there is a room with a chest, inside of which equipment is hidden. Then go upstairs and find a passage leading in the direction of the marker. Once outside, inspect the corpses and the green cloak with the image of a swan lying on the right. The third clue is behind the door. To open it, jump down from the bridge and find the key at the very depths. Don't forget to use Odin's vision while holding the V key. After opening the door, find the note.
Go to Bolingbroke Castle. You can get there only through the main fortress. There will be a door in the fortress. To open it, you will have to kill the standard-bearer who has the key (use the raven). Then shoot the two fasteners holding the bridge and run inside the castle. Kill enemies. Go downstairs and inspect the corpse of the Eldorman. Find a chest on the left with his old things. Eivor will discover the brooch. Give it to Hunvald. The task will end, but two other quests will begin.

Ointment for a fresh wound
Go to Akha and talk to her. Follow the big tree and have a drink with Hunvald. Accompany him to the village to his beloved. Along the way, you will need to deal with a lot of enemies who have taken positions at the top of the gorge. Having done this, continue moving and talk to the girl that Hunvald loves. The task will end.
Tan of Lincoln
Talk to Elfgar, and then go hunting with him. After meeting with Grim, get to the cave and destroy all the wolves. Then get outside to see that the settlement was attacked. Kill all opponents and talk to Elfgar. He will ask you to support his candidacy as ealdorman. The task will end.

Where will the stone fall?
The quest will start after the previous two missions. Return to Lincoln and chat with Ahoy. Interrogate all the people on the vote. You can choose an ealdorman between Herefrith, Hunwald and Elfgar. If you choose the second or third, you will immediately find out that Herefrit is a member of the Order under the nickname Staff. You have to kill all the guards. If you chose Herefrit, you will learn about his membership later.
Rain of swords at Ancaster
Talk to the new ealdorman, then prepare for the siege. Go on the assault. Destroy the first gate, climb over the fence near the palisade and find a jug of oil nearby. Place next to the palisade and detonate with an accurate bow shot. Then climb the wall near the bridge and destroy the two mounts, after killing the enemies. Next you need to get to the cathedral to the bishop. The doors are locked, so go ahead and see the crypt. Get inside and go down. Be sure to find the key below (from the neighboring building with various resources). At the end of the tunnel there is a rise up to the Bishop's Cathedral. Kill him. Kill to end the battle. Killing all other enemies in the cathedral will be optional. Then talk to the current ealdorman.

The canvas dispute
Return to Randvi, but you will find yourself in the middle of another dispute. Whatever decision you make, Sigurd will appear and make Holger pay 30x. Support Sigurd to put another "plus" in your favor. If you collect more negative reactions from Sigurd, he will return to Norway. Remember this!
Report on Lincolnshire
Talk to Randvi.

City of Greed (Jorvik)
Old friends
Get to Jorvik. Cross the stone bridge in the direction of the synchronization point and look at the pier on the right. Ask questions to people, and then notice the house opposite the pier, near which there are people. Go there and talk to Gregory. He will direct you to Lufwina's house. Follow the marker, go up the hill and find an open house surrounded by flowers. Go inside and examine the corpse. Examine another piece of evidence near the window above and jump out. Examine the broken barrels and the corpse along the path on the right. Move forward and talk to Lufwina. Together with her, get to the royal court, acting stealthily, and then talk to Hier and the king. Chat with Lfvina to complete the quest. Two other tasks will begin.
Burn down Golovnya
Follow the marker to the archives and go inside. Examine the note on the far left table for Audun to appear. Talk to him, then go to another building. In the courtyard, you can examine the house on the left (move the object behind it and shoot through the window). But you are interested in the house on the right. Climb to the roof and see a yellow cross. Above it, you can break the wicker fence and get inside. Listen to the priest.

Go to the indicated building. All doors will be closed, including the huge gates. But you can walk in circles, killing enemies, and find the only open door in the backyard. Having done this, clear the hall with fire and go upstairs so that the abbess comes. Defeat her. This is another member of the Order. Report everything to Lufwyn.
Pierce Needle
Head to the warehouses and make your way inside using the large hole in the roof. Kill all opponents. Behind the wooden fence there is a chest with supplies. But you are interested in another door that leads to a chest with equipment, expensive items on the left and a note on the table on the right. After reading the note, go to the market and follow to the right to find a seller's shop with a black cloth. Talk to the seller so that the boy can hear you. Listen to the boy and move east from the market (to the right on the map). There will be a courtyard with a stone statue. Near the statue there are bricks, among which the key is hidden. A little further from the statue is a building with a locked door. Open the door with the key and go downstairs.

Follow below and climb over the wall on the left. Dive into the water and swim into the adjacent corridor. Get to the hall with merchants, kill the enemies and find the key from one of them. Unlock the next room and chat with Gregory aka Needle. After listening to him, kill all the enemies, then get out of the sewers. In the market, kill Igloo and his associates, and then talk to Lufwina.
cover the stash
This quest is activated immediately after the previous two quests. We need to deal with the leader of the Scarlet Hand. Go to the archives and look around. Examine the far left corner. There is a table on the side, it covers something. Examine the table, move and break the boards to find the cache. Examine the table ahead to learn about the poisoned wine. Run to the amphitheater and chat with all the suspects. The cache is Audun. Inform the king about the poisoned wine, and after that tell Lufwyn that you know who the Cache is. Kill the Cache and the rest of the enemies, and then look for Hier and Lufvina. Go to the palace and talk to the king. Decide who should give the Scarlet Hand silver.

Report on Jorvik
Report everything to Randvi.
Sayings of Halfdan (Jorvikshire)
War in the north
Head to the Anlaf Outpost. Eivor will notice signs of a fight. Follow the mountains through the gorge until you find the remnants of the troops. Speak with Faravid and then fight off two enemy waves. Moreover, melee fighters will run at you, and archers will run along the mountain to the right. After defeating everyone, talk to Faravid again and watch the video. Move to Halfdan's fortress, go up to the main building and talk to him. Follow Halfdan upstairs. If you wish, you can participate in different competitions. At the very top, talk to Halfdan, standing on the balcony of his room. The task will end.
Two sides of honor
Go to the meeting point with Faravir and talk to him. Move towards the cave, killing the Pictish soldiers along the way. After reaching the cave, go inside and finish off the two enemies. On the right there are white ledges. Use them to get over the stalactites and move on. Use the white ledge again, this time on the left. In a large adit, you need to climb onto the central platform with an offering and climb a tree. From its branch, move to the hill nearby and jump further along the white ledges. Kill the enemies and take the note. Exit the cave and catch three scouts. It is best to use your horse.

After finishing off the scouts, get to the Pict fortress. Clear the first territories until you run into a closed door. Unfortunately, the key is needed, but the man inside the fortress has it. To the left of the door along the wall, behind the fence, there is a tall tree. Find a place where you can jump off the wall and follow the tree. Finish off the beasts and climb the tree to the ledge. There will be a hole through which you can get inside the fortress. If you do not want to fight alone, you will have to take the key from the enemy (he can be killed with a suspended load) and open the door. After defeating everyone, enter the building from above and jump into the pit to the leader. Defeat him and talk to Faravir.
Path to Hamartia
Return to the fortress and talk to Halfdan. It doesn't matter what you say about Faravir. This quest will continue with Halfdan asking to know more about Moira. In addition, the quest "This son of Jorvik" will begin. Climb down and go to the gate. Moira lives in the house on the left. Go inside, but the woman will not be there. There is a note on the table, from which it follows that she went to Vic. Follow there, find a house on the outskirts of the village and find peasants near it. Talk to them, enter the house through the roof, breaking the wicker fence on top, and talk to Moira. Go outside and convince the peasants to disperse. Then leave this place with Moira. Talk to the woman.

Move to the meeting point with Halfdan. Talk to the ruler and follow to the ruins opposite. Climb the high columns to find the murdered Olaf on one of them. Lower his body down and take it to Halfdan. Follow his dog until you come across some ruins. Get inside and go down. Move through a small hole in the wall and find a body of water. Dive and swim through the holes until you reach a room where you can get jugs of oil. Use these jugs to destroy the wall (the second one is optional).
In general, the far wall can not be destroyed. The main thing for you is to deliver Halfdan to the red door in order to open it together by force. After the cut-scene, pick up the key and open the door opposite. You will meet Olaf and other Vikings. They are responsible for Olaf's death. Then you will need to decide how to deal with them. If you say that they are traitors, you will have to kill everyone. And maybe they deserve to die.

This son of Jorvik
Meet Faravir at the indicated location, talk, and then get to Jorvik. It doesn't matter if you win the races or not. Follow him to the king and chat on various topics. Having done this, move to the tavern, where Hier should be. Help him deal with the local bullies, and then return to the palace. Meditate (hold G and select a command in the action wheel) to make Hyer appear, and then go to the palace and convince the king. The task will end.
Complacency of honor
Move to the fortress of Magnis and talk to Liufvida. It doesn't matter if you covered up the truth about Faravid or not. Then the attack will begin. First, destroy the ambassador, and then make your way to the fortress. Shoot at the mounts of the two ladders, move on and get over the fence at the red gate. Break two fasteners and open this gate. Get to the stockade and kill the enemy at the oil cauldron on the upper left. Destroy the cauldron itself, go downstairs and find a jug of oil. Place it near the palisade and shoot. It remains to destroy the two fastenings of the bridge and capture the courtyard, killing all enemies in the marked area.

Next, you will need to defend the fortress. Kill enemies by jumping down. Kill everyone when markers appear on them. Be sure to finish off the Pictish hero. Then you will see Rixig running away. Chase the scoundrel and finish him off with a rear stab (F). Return to Jorvik and discuss the future with Halfdan.
Blood and bonds
Travel to Jorvik and go to the king's hall. Halfdan is not here. Find Moira and talk to her. Exit to the backyard and go up the steps on the right to find Halfdan and Faravir. Talk to the future king and go inside the hall. Chat with him again and confirm that you had plenty of fun. And then it will be necessary to make a decision - to protect Faravir or not. If you don't protect him, then Halfdan will surely kill him. If you protect him, he will drive him out of the city.

Report on Jorvikshire
Report everything to Randvi.
lost glory
The quest will begin immediately after you complete the Jorvikshire main chain. Return to Jorvik's palace, but instead of Halfdan meet Moira. Get to the indicated place and chat with Halfdan. Then follow the marker, kill the wolves in the forest and pick up the hammer. Move to the lighthouse on the outskirts of the region and hand it over to the king. Climb the tower, activate the sync point and light the chalice using the torch (T).

The Wicker Man Saga (Gloucestershire)
First Night of Samhain
Get to Gloucester, which is at the very bottom of Gloucestershire. Cross the bridge to the left of the city on the map, where the houses are underground. Find Gunnar here (to the right of the bridge). Chat with him, move to the local ealdorman and talk on all topics. Follow Teudur and talk to him at the statue. Kill three boars and talk to Teudur again.
Then return to the city and talk to Gunnar. Knock on different houses and choose peaceful phrases to get sweets. Then find Gunnar at the pier and help him fight the big man. After the battle is over, find Teudur and say you are ready for fun. Compete in drinking. You can even have an affair with him. And then follow the man until Eivor passes out. In the end, the hero will go to sleep.

Traces and mysteries
In the morning, examine the corpse of the Anglo-Saxon on the floor. Then examine the scattered fruits and traces of blood. Move the shelving and inspect another piece of evidence. Break the jugs by the window behind the table and take Gwilym's bag. All evidence has been collected. Go outside and kill the soldiers. Follow the same bridge on the left side of Gloucester and find among the houses on the left (without crossing the bridge) a fire with Modron. Talk to the woman to find out that Gwilym slipped a sleeping pill. You need to get to the druid's house. He lives on the right side of Gloucestershire, not far from the place where two rivers intersect (to the left of the T-junction).
Talk to the druid, then light the straw effigies. Three are directly in front of the house, another one hangs on a tall pole on the right, and another one hangs on a tree on the left. When you burn five straw effigies, talk to the druid. He will ask you to answer his questions. Walk towards the house. Look for the note outside, by the window to the left of the entrance to the house. Enter the house and read all the notes on the first floor. Go down through the hatch to the grave under the house and read two more messages. Then stand in front of the entrance to the house, outside, and go around the corner on the right. Find the note on the turtles. After that, go to the back of the courtyard and jump into the water. Examine the note by the stone statue of the maiden. Come back and answer all questions. If suddenly there is no answer option, then use the V key to see blue streaks indicating the location of clues that have not yet been explored.

The stolen king
Meet with Modron, follow her and get to the cache of Thieves. Kill the enemies and go to the makeshift in the middle to find Guilim and Theudur. Lay the last one on your shoulders and take it to Modron. The task will end.
Forgotten love
Return to Gloucester, sneak into the longhouse without being seen, and speak with Gunnar's lover. Then go outside and interrogate the maid to the left of the entrance. You can learn from a person a little lower about the stained-glass window of the church. But for this he needs to be drunk. You can break the window to get to the church opposite the longhouse. Or you can go a little further and meet another maid across the road. She will say that the woman you need is waiting for the box. Pick it up, go to the church and follow the graves on the left, where the woman is standing. She will open the door for you, and you can get inside. Or you can steal the key from her. Break the wooden railing inside the church and talk to Keenon. He will tell the truth about Modron. You can not kill him, because he will still be sacrificed.

sacrificial lamb
Go to the elven forest. Get to the right place until Eivor hears the voice of Modron. Climb down and move the only way, bypassing obstacles (you will need to move the rack to the left). Get to the back room where Modron is going to perform the ritual. Defeat her in combat. Note that her "red" attack includes two hits (not one). After the victory, decide what to do with Modron. You don't have to kill her, just like Kinona.
The burning of the wicker man
Return to Gloucester and speak with Gunnar and Cynon (if the latter is alive). Watch the video.

Report on Gloucestershire
Talk to Randvi.
The Saga of the Two Jarls (Snottinghamshire)
Old friends
Travel to the designated location and meet Trygve inside the longhouse. He will be on the second floor. Follow him, get into your drakkar (Trygve will jump into it) and swim to the marker. Don't linger with the Picts. Instead, skillfully bypass the obstacles that arise. In the end, you must moor at the pier. The other two boats should do the same. You don't need to protect them! Sooner or later they will come to you. Ride your horse into the fortress and talk to Hemming.

Attack the fortress. The main thing here is not to rush. Destroy the enemies one by one and get to the tower. The leader of the Picts is at the very top. Climb up the outer wall if you want to avoid most of the fights. After the victory, tell Hemming that Trygve could be a great jarl. You will have to achieve this so that Wily joins the team of your drakkar.
Last days of life
Head downstairs and talk to Willy. Follow him along the path until you find the burning Stoneburg. Move into the city and run along the trail of corpses to save people. First save the man in the building on the right, then a little further. After that, move to the left and go around the barn. The door inside is locked, so you need to go upstairs and get through the hole in the roof. The woman will lift the man, and you break the drawers and the bolt from the door so they can get out. Run back to Willy's call and look for him a little to the left. He is trying to move a large column from another burning house. Take the woman on your shoulders and drag to the indicated place.

Follow the waterfall marked on the map, go up and about halfway to the top you will find the Vili Cave. Talk to him and move to Hemthorp. Chat with the dying jarl in the longhouse, then move to the place of his burning. To do this, use the crow. Chat with Trygve to start 3 new quests.
Last Honors
Talk to Vili and move to the indicated cave. Go inside, follow through the rift and make your way deep, bypassing various rocks. Talk to the hermit and build the cairn of stones on the right. It is necessary to build a turret of four stones. Then choose what Hamming was, after which the quest will end.

Pacify the brawlers
Speak with Trygve in Hemthorpe. We need to deal with the noisy people. In one place, you will have to kill the roosters to help the man. The other is to pull vodka out of a burning house, which looks like a standard jug of oil. To do this, use arrows to break the boxes near the vodka and on the hill at the exit so that you can climb over, avoiding the fire. Pull out the jug and talk to the woman. In the third place, you need to talk to the screaming Vikings, go around the house, shoot at the wicker fence just above the wagon and get inside. Talk to the man, pick up the key and open the door. Decide how to deal with it. You can say that he should not have performed the rites. In this case, he will only be beaten, and you can raise him to his feet. Let Trygva know when you've dealt with everyone.
Blood and gods
Talk to the velva in her house, then follow to the corral. Together with the sheep, go up to the tent. Then follow to the very top, where the synchronization point is located. Meditate on the marked stone to speak with Hemming's spirit. Then strike him down. The battle will consist of three stages. I recommend using small axes. Hit 3-4 times and roll forward to keep Hamming. After winning the quest will end.

What's inside
The task will begin after you complete the three quests described above. Talk to the woman and follow to the specified cave. Go inside and look for Vili. Defeat all the enemies and move deeper into the cave. Leave the cave with Vili and talk by the fire.
Farewell and legacy
Follow to the burial place and talk to Vili. Return to the longhouse and chat with Sinnuva. Decide how to be. If Trygve is alive, you can tell Vili that you see Trygve as a Jarl. Thanks to this, Wily will join your drakkar! Do not forget to select it in the barracks of your own settlement.

Report on Snottinghamshire
Talk to Randvi. Be sure to read the letter from Wily in your room to receive a Hamming Ax as a gift.
City of Faith (Winchester)
Reeve of Winchester
Go to the indicated place, enter the large temple and look for the man in white in the right wing. Chat with him. If there is not enough charisma (level 4), you will have to look for clues about Jesus. One is in the same room, the other two are in the side rooms. Talk to the man again. Choose sequence:
- In the river he was cleansed from sin.
- His face lit up.
- The women did not find the body.
Follow the man, talk to Alfred. He will give one hint for three members of the Order - Sax, Loop and Feather. Then move to Goodwin's house. Kill the guards and go inside. Find evidence on the first floor and another one on the second. Outside the house, on the side of the entrance, there is a key to a chest located on the second floor.

Head to the fortress where Goodwin is being held. You need to get to the center, but the door is locked. If you look at the door, then the key should be sought in the building on the right. After opening the door, get inside the tower and go down to the basement. Open the three detention cells. One of them will be Goodwin. Release him and escort him outside the fortress. Talk to Goodwin. He will tell about all three members of the Order, but will reveal the identity of the Loop. His name is Selvin.

Strangle the Loop
Get to the indicated place and you will see how Selwyn is trying to execute someone. Kill him along with the guards, then search the body to get a clue about Pera.
Rip Feather
Move to the church and talk to Alfred and Goodwin. Give the girl money and chase her. Talk to the boy on the left and another child a little higher (who is being interrogated by the guard). A cutscene should start. Follow to a new place and talk to the girl. Pay the extortionists or beat them up (there's also an option with charisma) and then you'll find out that Feather is Hilda. Go to the river and find the entrance to the sewers. You already have the key. Open the door, move the rack and move deeper until you find Hilda. Kill normal enemies and finish off Hilda herself.

Pierce Sax
Chat with Goodwin and go to the funeral. If you have charisma, you can immediately convince Sister Harriet to tell everything (she is standing to the left of the corpse). If not, examine the corpse, go back and in the far left corner, near the graves, find peasant things. Here is the big Wemba. Interrogate him. After collecting all three clues, talk to Harriet. Defeat the guard and talk to the woman again. Then go to the cathedral. Get inside through the upper window, to which the scaffolding leads. Kill Sax, then move to the shelter of the Order. Go down to the basement, find the first note and open the far left door. Move the shelving to reveal a dilapidated wall. To the right of it there are other stones and a hole under them. Get into the next room and bring down the bolt from the door. Grab a jug of oil and place it near the rocks to blow them up. Take the second clue. Go back and talk to Alfred.
Report on Winchester
Talk to Randvi.
In the Hall of the Fallen (Hordafylke)
Where legends are born
When you capture everything that is in England, talk to Randvi and Sigurd. On the map of Randvi, select the region of Norway (move the cursor down). Go to the pier and agree to return to Norway (in conversation with Sigurd). After downloading, select the marina of your hometown so as not to waste time traveling by sea. Talk to Sigurd's father, then return to the pier and get into the drakkar. Swim to the indicated place (use the keyboard shortcut Z and E.

Side by side with brother (How to escape from Odin?)
Move after Sigurd until you find yourself in a cave. Break the thin ice and go through the doors. When you go down, you will see the Tree of Life. Get to the sphere and then stand in the center of the platform. Move forward towards Sigurd and Svala. Go through the gate and fight in the field. Repeat the day several times. Eventually, you will start fighting Odin. Play him a couple of times to make Sigurd and Randvi appear. Having done this, open your inventory and remove the ax from the slot. Run to the gate and watch the cutscene.
How to beat Bashim
After the cutscene, fight Bashim. Let him jump on top of you so that he tries to cut your neck. The elevator will move. When it stops, fight Basim and wait for the stun attack tooltip to appear. Lead her, pursue Basim and fight him below, near Sigurd. You need to wait for another opportunity to attack with a stun.

Our time
While controlling Layla, talk to your friends and agree to go to Boston. Get to the Animus. To do this, you have to go down, climb through a hole in the wall and jump into the water. Dive deep and swim to the other side to climb the columns. Jump further and move up the many ledges until you reach the Animus. Watch the final video. Upon completion of all events, you can return to the past at any time using the Animus inside the house.
King's Prophecies (Hamptonshire)
The death of the kingdom
After completing the storyline, another region awaits you, available for conquest. In addition, you will learn that Sigurd and Randvi have separated, which means that you no longer need to hide the relationship. Interact with the alliance map and select the last available region. Unfortunately, high demands are made on him - 340 power. Try to leave the room, but Valka will stop you.

After that, you can use fast travel. Follow to the indicated place, talk to Guthrum, and then go outside and burn as many houses and barns as possible. Having done this, meet up with Soma and escort the Danes down the country road. Don't forget to activate the sync point first. On the way to the marker, you will have to kill several of Alfred's soldiers.
After arriving at the place, talk to Guthrum and move to the outpost together. Attack from the river. There is a key on the table by the river. Take it. Some of the hostages are in the tower on the right (go inside and jump down). The other part is in the hole. Free the bound ones and open the cage with other prisoners. Leave this place with Guthrum and talk about everything.

Holy holiday
Go to the camp, talk to everyone and enter the church at the top. Defeat Goodwin. Attack only after his attacks! You can kill him or take him prisoner. Next, you will need to help three allies. Enter the building nearby. Guthrum needs a prisoner. The door is closed, but you can climb through the gap above the door, under the ceiling. Kill everyone and tie up the hostage. Get to Lfvina and help her in battle. Take an ally to the nearest building. Finally, find another ally. Climb over the fence to the right of the gate, using the stone, kill all the enemies and blow up the barrels near the gate. Get to the meeting point with allies and kill everyone you see. Eventually, the mission will end.
Report on Hamptunshire
Return to your settlement and inform Randvi about everything. Also chat with Lebezhya Article. England has been taken!
Congratulations! Completed the Assassin's Creed Valhalla storyline.
Was the article helpful?