In Lost Ark there is a collection of "Souls of the Islands". Collecting "souls" is not just the extraction of some items, but addictive, sometimes long, sometimes ...
Lost Ark Engraving Guide: Best and Negative Engravings, Ability Stones
The engraving system is the key to increasing your character's lethality in Lost Ark, so here's a rundown of how to use them, outlining all of the engravings available right now in the game.
When it comes to the magical world of Arcesia in Lost Ark, you need to learn a lot to feel confident in the crowded world of the game and make the bards add epics and stories about your exploits about you.
From the Pirate Coin System to the Mysterious mococo seeds, there's a lot to sort out - and that's before we even talk about engraving.
Here's everything you need to know about Lost Ark's engravings, as they will become essential to your character's growth and will also dictate how your journey unfolds.

What is engraving in Lost Ark?
The engraving is done on accessories and ability gems (more on that later) and is essentially gives buffs to your character - provided that this is a regular engraving.
These buffs can be divided into damage boosts, utility buffs, and character class-specific engraving, the latter of which can completely change how you play your character.
How to use engravings and ability stones in Lost Ark
Each engraving has three different levels in Lost Ark, with each level increasing specific engraving buffs. Your level of engraving depends on the rarity of your accessories, and for the activation of levels it is required 5, 10 and 15 points respectively.
The points given by each item are listed below, and Ability Stones contribute a lot of points. You can only equip one of themand you will have to cut (cut) it on stonecutting abilitiesto activate points:
- Rare accessory: 1 point
- Rare Ability Stones: 0 - 6 points
- Epic accessory: 2 - 3 points
- Epic Ability Gem: 0 - 8 points
- Legendary accessory: 2 - 3 points
- Legendary Ability Gem: 0 - 9 points
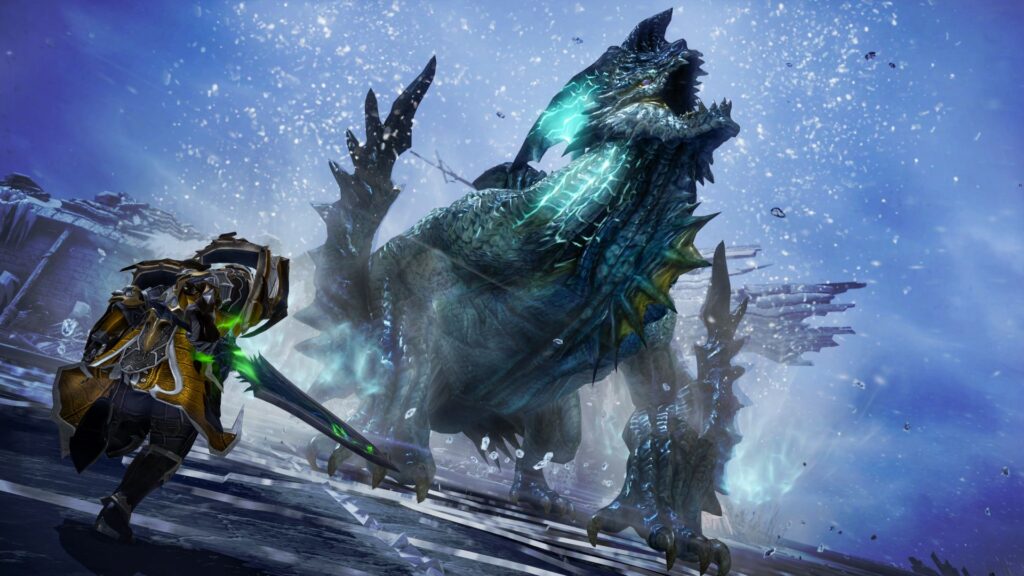
In order to destroy the creatures of the deep, you will need a good set of engravings.
The best engravings in "Lost Ark"
Once you reach level 50, get exactly these engravings that we recommend you take:
- Offense - deals increased damage to you against bosses and higher ranked enemies (but also increases the damage you take from them).
- cursed doll - increases attack power (but reduces healing).
- Specialist – Increases shields and healing.
- Awakening - Reduces the cooldown of the Awakening skill and allows you to use it more often.
- Any of the engravings in your class
All engravings in Lost Ark
While at first glance it seems like there is an overwhelming amount of engravings, most of them will provide you with positive buffs - so don't worry!
Below we have listed all common engravings, divided into groups according to class.
General engravings
Mage
Minstrel
Cantata of Valor
- Level 1 (5 counts): Aria of Valor increases damage dealt by an additional 10% and critical strike chance by 10%. The engraving effect only applies to the minstrel.
- Level 2 (10 counts): Aria of Valor increases damage dealt by an additional 15% and critical strike chance by 10%. The engraving effect only applies to the minstrel.
- Level 3 (15 counts): Aria of Valor increases damage dealt by an additional 20% and critical strike chance by 10%. The engraving effect only applies to the minstrel.
Ecstasy
- Level 1 (5 points): Upon completing Aria of Healing, the minstrel heals himself and allies for 8% of his maximum health.
- Level 2 (10 points): Upon completing Aria of Healing, the minstrel heals himself and allies for 16% of his maximum health.
- Level 3 (15 points): Upon completing Aria of Healing, the minstrel heals himself and allies for 24% of his maximum health.
arcanologist
The Emperor
- Level 1 (5 points): Common card skills fill the Arcane Gauge 50% faster and their damage is increased by 10%. The Major Arcana "Emperor" is added to the deck.
- Level 2 (10 points): Common card skills fill the Arcane Gauge 50% faster and their damage is increased by 20%. The Major Arcana "Emperor" is added to the deck.
- Level 3 (15 points): Common card skills fill the Arcane Gauge 50% faster and their damage is increased by 30%. The Major Arcana "Emperor" is added to the deck.
The Empress
- Level 1 (5 points): If an enemy is marked with four doom cards, hitting them with a debilitating card skill deals 20% more damage and restores 30% of the mana spent.
- Level 2 (10 points): If an enemy is marked with four doom cards, hitting them with a debilitating card skill deals 25% more damage and restores 30% of the mana spent.
- Level 3 (15 points): If an enemy is marked with four doom cards, hitting them with a debilitating card skill deals 30% more damage and restores 30% of the mana spent.
Summoner
Wisdom of Envissa
- Level 1 (5 points): Summoning Ancient Spirits cost 1 less Wisdom Orb. Elemental damage is increased by 5%.
- Level 2 (10 points): Summoning Ancient Spirits cost 1 less Wisdom Orb. Elemental damage is increased by 10%.
- Level 3 (15 points): Summoning Ancient Spirits cost 1 less Wisdom Orb. Elemental damage is increased by 15%.
arcane genius
- Level 1 (5 pts): Karmacul, Ignis, Carnivorous Plants, Shinty, and Hellis summon duration by 20% and their damage by 10%.
- Level 2 (10 pts): Karmacul, Ignis, Carnivorous Plants, Shinty, and Hellis summon duration by 25% and their damage by 15%.
- Level 3 (15 pts): Karmacul, Ignis, Carnivorous Plants, Shinty, and Hellis summon duration by 30% and their damage by 20%.
Martial Artist
Berserk
recklessness
- Level 1 (5 pts): Critical damage dealt while enraged is increased by 30%. The Berserker is no longer subjected to the Powerless effect after exiting a frenzy.
- Level 2 (10 pts): Critical damage dealt while enraged is increased by 40%. The Berserker is no longer subjected to the Powerless effect after exiting a frenzy.
- Level 3 (15 pts): Critical damage dealt while enraged is increased by 50%. The Berserker is no longer subjected to the Powerless effect after exiting a frenzy.
Dark recklessness
- Level 1 (5 points): The rage bar is always filled to 100%, while the berserker falls not just into a frenzy, but into "Dark Recklessness". While in this state, damage dealt is increased by 4%, movement and attack speed is increased by 15%, and all damage taken is reduced by 65%. However, at the moment Dark Recklessness is activated, the character's health becomes equal to 25% of the maximum amount, and this limit cannot be increased even with the help of healing potions. Also, the power of all protective effects applied to the hero is reduced to 25%. To exit this state, press the X button. The character will instantly recover 25% of their maximum health, but will not be able to fall into "Dark Recklessness" for 30 seconds.
- Level 2 (10 points): The rage bar is always filled to 100%, while the berserker falls not just into a frenzy, but into "Dark Recklessness". While in this state, damage dealt is increased by 9%, movement and attack speed is increased by 15%, and all damage taken is reduced by 65%. However, at the moment Dark Recklessness is activated, the character's health becomes equal to 25% of the maximum amount, and this limit cannot be increased even with the help of healing potions. Also, the power of all protective effects applied to the hero is reduced to 25%. To exit this state, press the X button. The character will instantly recover 25% of their maximum health, but will not be able to fall into "Dark Recklessness" for 30 seconds.
- Level 3 (15 points): The rage bar is always filled to 100%, while the berserker falls not just into a frenzy, but into "Dark Recklessness". While in this state, damage dealt is increased by 18%, movement and attack speed is increased by 15%, and all damage taken is reduced by 65%. However, at the moment Dark Recklessness is activated, the character's health becomes equal to 25% of the maximum amount, and this limit cannot be increased even with the help of healing potions. Also, the power of all protective effects applied to the hero is reduced to 25%. To exit this state, press the X button. The character will instantly recover 25% of their maximum health, but will not be able to fall into "Dark Recklessness" for 30 seconds.
crusher
Gravitational contraction
- Level 1 (5 pts): Increases Critical Strike Chance by 3% and Critical Damage by 5% in proportion to the number of charges consumed while using Unleash skills.
- Level 2 (10 pts): Increases Critical Strike Chance by 4% and Critical Damage by 10% in proportion to the number of charges consumed while using Unleash skills.
- Level 3 (15 pts): Increases Critical Strike Chance by 5% and Critical Damage by 15% in proportion to the number of charges consumed while using Unleash skills.
stable gravity
- Level 1 (5 points): The gravitational energy gauge automatically fills in combat by 1% per second. While Gravity Field is active, Critical Strike Chance is increased by 10%. Damage dealt is increased by 4%.
- Level 2 (10 points): The gravitational energy gauge automatically fills in combat by 1.5% per second. While Gravity Field is active, Critical Strike Chance is increased by 20%. Damage dealt is increased by 10%.
- Level 3 (15 points): The gravitational energy gauge automatically fills in combat by 2% per second. While Gravity Field is active, Critical Strike Chance is increased by 30%. Damage dealt is increased by 20%.
Paladin
Healing Faith
- Level 1 (5 points): While Blessed Aura is active, the paladin and his allies take 10% less damage and regenerate 2% of their maximum health every 2.5 seconds.
- Level 2 (10 points): While Blessed Aura is active, the paladin and his allies take 15% less damage and regenerate 2% of their maximum health every 2 seconds.
- Level 3 (15 points): While Blessed Aura is active, the paladin and his allies take 20% less damage and regenerate 2% of their maximum health every 1.5 seconds.
Master Swordsman
- Level 1 (5 pts): Using sword skills fills your faith bar 100% faster, and their damage is increased by 15%. Warrior of Light special skill lasts 100% longer.
- Level 2 (10 pts): Using sword skills fills your faith bar 100% faster, and their damage is increased by 20%. Warrior of Light special skill lasts 100% longer.
- Level 3 (15 pts): Using sword skills fills your faith bar 100% faster, and their damage is increased by 25%. Warrior of Light special skill lasts 100% longer.
sentinel
lone hero
- Level 1 (5 points): When using bayonet rifle skills, the critical strike chance is increased by 5% and the critical damage is increased by 30%. Ardent Defender is no longer available, and Invincible Bulwark consumes stamina twice as fast.
- Level 2 (10 points): When using bayonet rifle skills, the critical strike chance is increased by 10% and the critical damage is increased by 40%. Ardent Defender is no longer available, and Invincible Bulwark consumes stamina twice as fast.
- Level 3 (15 points): When using bayonet rifle skills, the critical strike chance is increased by 15% and the critical damage is increased by 50%. Ardent Defender is no longer available, and Invincible Bulwark consumes stamina twice as fast.
Champion's Zeal
- Level 1 (5 pts): Normal skill damage is increased by 20%, and the energy field strength of your Rampart is increased by 30%. When a Guardian is attacked while Rampart is active, they are afflicted with Defender's Zeal l, increasing damage by 4% for 10 sec. The effect can stack up to three times (max. one effect per second).
- Level 2 (10 points): Increases the damage of normal skills by 20% and the energy field strength of your Rampart by 40%. When a Guardian is attacked while Rampart is active, they are afflicted with Defender's Zeal ll, increasing damage by 5% for 10 sec. The effect can stack up to three times (max. one effect per second).
- Level 3 (15 points): Increases the damage of normal skills by 20% and the energy field strength of your Rampart by 50%. When a Guardian is attacked while Rampart is active, they are afflicted with Defender's Zeal lll, increasing damage by 6% for 10 sec. The effect can stack up to three times (max. one effect per second).
Monk (female)
Key Master
The embodiment of strength

- Level 1 (5 points): From now on, there is only one level of Strength for a ki master - the third. While in the Strength state, Ki regeneration is increased by 200% and damage dealt is increased by an additional 10%.
- Level 2 (10 points): From now on, there is only one level of Strength for a ki master - the third. While in the Strength state, Ki regeneration is increased by 200% and damage dealt is increased by an additional 20%.
- Level 3 (15 points): From now on, there is only one level of Strength for a ki master - the third. While in the Strength state, Ki regeneration is increased by 200% and damage dealt is increased by an additional 30%.
Meditation
- Level 1 (5 pts): Ki is no longer reduced below 30, but additional effects that increase Ki regeneration no longer apply. When a Ki Master is below 5% of his maximum energy, damage dealt is increased by XNUMX%.
- Level 2 (10 pts): Ki is no longer reduced below 30, but additional effects that increase Ki regeneration no longer apply. When a Ki Master is below 10% of his maximum energy, damage dealt is increased by XNUMX%.
- Level 3 (15 pts): Ki is no longer reduced below 30, but additional effects that increase Ki regeneration no longer apply. When a Ki Master is below 15% of his maximum energy, damage dealt is increased by XNUMX%.
Dualist
jubilant spirit
- Level 1 (5 points): Spirit skill damage is increased by 10%. The Dualist regenerates 2% of the maximum amount of spirit energy every second.
- Level 2 (10 points): Spirit skill damage is increased by 15%. The Dualist regenerates 3% of the maximum amount of spirit energy every second.
- Level 3 (15 points): Spirit skill damage is increased by 20%. The Dualist regenerates 4% of the maximum amount of spirit energy every second.
Chosen path
- Level 1 (5 points): Increases Ki over time by 300% and the damage of Ki skills by 30%. Spirit skill damage is reduced by 30%.
- Level 2 (10 points): Increases Ki over time by 450% and the damage of Ki skills by 45%. Spirit skill damage is reduced by 30%.
- Level 3 (15 points): Increases Ki over time by 600% and the damage of Ki skills by 60%. Spirit skill damage is reduced by 30%.
Picture
fourth chakra
- Level 1 (5 points): The avatar gains additional elemental chakra. Elemental skill damage is increased by 8% per active chakra.
- Level 2 (10 points): The avatar gains additional elemental chakra. Elemental skill damage is increased by 10% per active chakra.
- Level 3 (15 points): The avatar gains additional elemental chakra. Elemental skill damage is increased by 12% per active chakra.
Rebirth
- Level 1 (5 points): Increases damage by 15%, but the avatar loses the ability to store elemental energy.
- Level 2 (10 points): Increases damage by 20%, but the avatar loses the ability to store elemental energy
- Level 3 (15 points): Increases damage by 25%, but the avatar loses the ability to store elemental energy
spear master
Full moon
- Level 1 (5 points): Spear Master can no longer use Sun Stance. Lunar Stance Skill Damage is increased by 18%.
- Level 2 (10 points): Spear Master can no longer use Sun Stance. Lunar Stance Skill Damage is increased by 27%.
- Level 3 (15 points): Spear Master can no longer use Sun Stance. Lunar Stance Skill Damage is increased by 36%.
Superiority of the Luminaries
- Level 1 (5 points): If all three elemental energy slots are full, the effect that will be placed on the Spearmaster after changing the stance is greatly increased.
- Level 2 (10 points): If all three elemental energy slots are full, the effect that will be placed on the Spearmaster after changing the stance is greatly increased.
- Level 3 (15 points): If all three elemental energy slots are full, the effect that will be placed on the Spearmaster after changing the stance is greatly increased.
Shooter (male)
Ranger
last flight
- Level 1 (5 points): When using the Self-Destruct skill, the ranger returns half of the accumulated concentration. Enemies hit take 20% more damage from the ranger for 8 seconds.
- Level 2 (10 points): When using the Self-Destruct skill, the ranger returns half of the accumulated concentration. Enemies hit take 30% more damage from the ranger for 8 seconds.
- Level 3 (15 points): When using the Self-Destruct skill, the ranger returns half of the accumulated concentration. Enemies hit take 40% more damage from the ranger for 8 seconds.
Second model
- Level 1 (5 points): The ranger summons a second-generation Silver Falcon model. The movement speed of the entire unit is increased by an additional 4%, and the duration of the summoning of the falcon by 30%. The Falcon's Basic Attack damage is increased by 100% and its range is increased by 60%. They also place the "Mark of Death" on opponents. The ranger deals 4% more damage to marked enemies. In battle, the amount of accumulated energy of concentration is increased by 10%.
- Level 2 (10 points): The ranger summons a second-generation Silver Falcon model. The movement speed of the entire unit is increased by an additional 4%, and the duration of the summoning of the falcon by 60%. The Falcon's Basic Attack damage is increased by 200% and its range is increased by 60%. They also place the "Mark of Death" on opponents. The ranger deals 8% more damage to marked enemies. In battle, the amount of accumulated energy of concentration is increased by 20%.
- Level 3 (15 points): The ranger summons a second-generation Silver Falcon model. The movement speed of the entire unit is increased by an additional 4%, and the duration of the summoning of the falcon by 100%. The Falcon's Basic Attack damage is increased by 300% and its range is increased by 60%. They also place the "Mark of Death" on opponents. The ranger deals 12% more damage to marked enemies. In battle, the amount of accumulated energy of concentration is increased by 30%.
Demon Hunter
Pistols and bullets
- Level 1 (5 points): The Demon Hunter can only use pistols, but their damage is increased by 30%. Withering damage is increased by 40%, and the damage of Awakening skills is increased by 15%.
- Level 2 (10 points): The Demon Hunter can only use pistols, but their damage is increased by 45%. Withering damage is increased by 40%, and the damage of Awakening skills is increased by 22%.
- Level 3 (15 points): The Demon Hunter can only use pistols, but their damage is increased by 60%. Withering damage is increased by 40%, and the damage of Awakening skills is increased by 30%.
Universal
- Level 1 (5 points): When switching weapons, your critical strike chance is increased by 20% for 9 seconds.
- Level 2 (10 points): When switching weapons, your critical strike chance is increased by 25% for 9 seconds.
- Level 3 (15 points): When switching weapons, your critical strike chance is increased by 30% for 9 seconds.
S.K.A.U.T. Agent
Legacy of Genesis
- Level 1 (5 pts): Hitting a Synchronization Skill inflicts an effect on the Agent that increases the damage of these Skills by 2%, stacking up to 0.5 times. The cooldown of other Synchronization Skills is reduced by 40 seconds. When exiting the synchronization mode, the agent saves XNUMX% of the remaining energy of the reactor.
- Level 2 (10 pts): Hitting a Synchronization Skill inflicts an effect on the Agent that increases the damage of these Skills by 4%, stacking up to 0.5 times. The cooldown of other Synchronization Skills is reduced by 40 seconds. When exiting the synchronization mode, the agent saves XNUMX% of the remaining energy of the reactor.
- Level 3 (15 pts): Hitting a Synchronization Skill inflicts an effect on the Agent that increases the damage of these Skills by 6%, stacking up to 0.5 times. The cooldown of other Synchronization Skills is reduced by 40 seconds. When exiting the synchronization mode, the agent saves XNUMX% of the remaining energy of the reactor.
Ardetine Technology
- Level 1 (5 points): Increases damage from drone operator skills and cooperative skills by 15% and battery charge by 10%. When the drone is following an agent, movement speed is increased by 10%.
- Level 2 (10 points): Increases damage from drone operator skills and cooperative skills by 20% and battery charge by 15%. When the drone is following an agent, movement speed is increased by 10%.
- Level 3 (15 points): Increases damage from drone operator skills and cooperative skills by 25% and battery charge by 20%. When the drone is following an agent, movement speed is increased by 10%.
Mechanist
cyber soldier
- Level 1 (5 points): Damage taken is reduced by 20%. Critical strike chance is increased by 15%, 20% or 25% depending on how many sectors the firepower bar is filled.
- Level 2 (10 points): Damage taken is reduced by 20%. Critical strike chance is increased by 22%, 27% or 32% depending on how many sectors the firepower bar is filled.
- Level 3 (15 points): Damage taken is reduced by 20%. Critical strike chance is increased by 30%, 35% or 40% depending on how many sectors the firepower bar is filled.
Cyber Soldier 2
- Level 1 (5 counts): Increases skill damage in turret mode by 20%. If the hero is not affected by the Firepower effect, the amount of accumulated energy is increased by 10%. When the Firepower Meter is filled to 100%, the Overcharge effect is reset.
- Level 2 (10 counts): Increases skill damage in turret mode by 30%. If the hero is not affected by the Firepower effect, the amount of accumulated energy is increased by 20%. When the Firepower Meter is filled to 100%, the Overcharge effect is reset.
- Level 3 (15 counts): Increases skill damage in turret mode by 40%. If the hero is not affected by the Firepower effect, the amount of accumulated energy is increased by 30%. When the Firepower Meter is filled to 100%, the Overcharge effect is reset.
Assassin
Blade of death
Strong will
- Level 1 (5 points): Focus of Will, a special skill that can only be used while in a combat trance, no longer scales with the number of orbs filled. If during a combat trance the character deals damage (excluding damage from Awakening skills and basic attacks), the Strong Will effect is activated (no more than once every 0.4 seconds). The effect stacks up to 20 times. Steadfast Will increases the damage of Focused Will by 7.5%. Also, for each * Effect Level, Deathblade accumulates 5% Willpower at the moment of exiting the combat trance.
- Level 2 (10 points): Focus of Will, a special skill that can only be used while in a combat trance, no longer scales with the number of orbs filled. If during a combat trance the character deals damage (excluding damage from Awakening skills and basic attacks), the Strong Will effect is activated (no more than once every 0.4 seconds). The effect stacks up to 20 times. Steadfast Will increases the damage of your Focus of Will skill by 7.5% and increases your attack power by 0.5%. Also, for each * Level of effect, Deathblade accumulates 5% of Will energy at the moment of exiting a combat trance.
- Level 3 (15 points): Focus of Will, a special skill that can only be used while in a combat trance, no longer scales with the number of orbs filled. If during a combat trance the character deals damage (excluding damage from Awakening skills and basic attacks), the Strong Will effect is activated (no more than once every 0.4 seconds). The effect stacks up to 20 times. Steadfast Will increases the damage of Focused Will by 7.5% and increases attack power by 1%. Also, for each * Effect Level, Deathblade accumulates 5% Willpower at the moment of exiting the combat trance.
Residual energy
- Level 1 (5 pts): When the Deathblade enters a combat trance, Will Orbs do not empty for 2 seconds. After using Concentration of Will, the Death Blade is afflicted with a buff that lasts for 30 seconds. increases her attack and movement speed by 6%, as well as her attack power by 8%, 16% or 25% (depending on the number of spheres filled at the time of using the skill).
- Level 2 (10 points): When the Deathblade enters a combat trance, Will Orbs do not empty for 2 seconds. After using Concentration of Will, the Death Blade is afflicted with a buff that lasts for 30 seconds. increases her attack and movement speed by 9%, and her attack power by 10%, 20% or 30% (depending on the number of orbs filled at the time of use of the skill)
- Level 3 (15 points): When the Deathblade enters a combat trance, Will Orbs do not empty for 2 seconds. After using Concentration of Will, the Death Blade is afflicted with a buff that lasts for 30 seconds. increases her attack and movement speed by 12%, and her attack power by 12%, 24% or 36% (depending on the number of orbs filled at the time of use of the skill)
Fury
Dark side

- Level 1 (5 points): Upon entering demonic form, the fury instantly restores all demonic skills. Upon returning to normal form, Ravage will not activate.
- Level 2 (10 points): Upon entering demonic form, the fury instantly restores all demonic skills. Increases critical strike chance by 15%. Upon returning to normal form, Ravage will not activate.
- Level 3 (15 points): Upon entering demonic form, the fury instantly restores all demonic skills. Critical strike chance is increased by 30%. Upon returning to normal form, Ravage will not activate.
Absolute control
- Level 1 (5 points): Fury can no longer transform into demonic form. Normal skill damage is increased by 20% and Chaos Energy generation rate is increased by 50%.
- Level 2 (10 points): Fury can no longer transform into demonic form. Normal skill damage is increased by 25% and Chaos Energy generation rate is increased by 50%.
- Level 3 (15 points): Fury can no longer transform into demonic form. Normal skill damage is increased by 30% and Chaos Energy generation rate is increased by 50%.
reaper
Thirst
- Level 1 (5 points): Skills fill the Chaos gauge 30% faster. When the gauge is full, the attack power is increased by 12%.
- Level 2 (10 points): Skills fill the Chaos gauge 30% faster. When the gauge is full, the attack power is increased by 18%.
- Level 3 (15 points): Skills fill the Chaos gauge 30% faster. When the gauge is full, the attack power is increased by 25%.
The voice of the moon
- Level 1 (5 pts): When summoning a shadow double, the damage of harvesting skills is immediately increased by 120% instead of the effect of increasing damage every second.
- Level 2 (10 points): When summoning a shadow double, the damage of harvesting skills is immediately increased by 140% instead of the effect of increasing damage every second
- Level 3 (15 points): When summoning a shadow double, the damage of harvesting skills is immediately increased by 160% instead of the effect of increasing damage every second
monk (male)
Taigon
All-in
- Level 1 (5 points): Tygon gains additional elemental chakra. When using elemental skills, all filled chakras are consumed. For each additional chakra, elemental skill damage is increased by 17%.
- Level 2 (10 points): Tygon gains additional elemental chakra. When using elemental skills, all filled chakras are consumed. For each additional chakra, elemental skill damage is increased by 26%.
- Level 3 (15 points): Tygon gains additional elemental chakra. When using elemental skills, all filled chakras are consumed. For each additional chakra, elemental skill damage is increased by 35%.
Balance of elements
- Level 1 (5 points): The damage of elemental skills is increased by 8%, and using them only consumes elemental chakra.
- Level 2 (10 points): The damage of elemental skills is increased by 13%, and using them only consumes elemental chakra.
- Level 3 (15 points): The damage of elemental skills is increased by 18%, and using them only consumes elemental chakra.
Shooter (female)
Demon Hunter
Shooting
- Level 1 (5 points): Critical strike chance with pistols and carbines is increased by 20%, but the hunter can no longer use a shotgun.
- Level 2 (10 points): Critical strike chance with pistols and carbines is increased by 27%, but the hunter can no longer use a shotgun.
- Level 3 (15 points): Critical strike chance with pistols and carbines is increased by 35%, but the hunter can no longer use a shotgun.
Peacemaker
- Level 1 (5 points): When changing weapons, the hunter becomes stunned for 9 seconds. activates the effect corresponding to the type of weapon. Selecting pistols increases the hunter's attack speed by 8%. When using a shotgun, the chance of a critical hit is increased by 15%. When choosing a carbine, the damage dealt is increased by 10%, and enemies with less than 50% health take additional damage equal to 10% of the base damage.
- Level 2 (10 points): When changing weapons, the hunter becomes stunned for 9 seconds. activates the effect corresponding to the type of weapon. Selecting pistols increases the hunter's attack speed by 12%. When using a shotgun, the chance of a critical hit is increased by 20%. When choosing a carbine, the damage dealt is increased by 10%, and enemies with less than 50% health take additional damage equal to 20% of the base damage.
- Level 3 (15 points): When changing weapons, the hunter becomes stunned for 9 seconds. activates the effect corresponding to the type of weapon. Selecting pistols increases the hunter's attack speed by 16%. When using a shotgun, the chance of a critical hit is increased by 25%. When choosing a carbine, the damage dealt is increased by 10%, and enemies with less than 50% health take additional damage equal to 30% of the base damage.
negative engravings
With great power comes great responsibility, and if you're unfortunate enough to land with one of the game's negative engravings, you'll see that your statistics decreased.
Fortunately, there are only four of them:
| Engraving | Effect level 1 | Level 2 | Level 3 |
| Attack power reduction | Reduces attack power by -2% | Reduces attack power by -4% | Reduces attack power by -6% |
| Attack Speed Decrease | Reduces attack speed by -2% | Reduces attack speed by -4% | Reduces attack speed by -6% |
| Reduced Defense | Reduces Defense by -5% | Reduces Defense by -10% | Reduces Defense by -15% |
| Decrease in speed | Reduces speed by -2% | Reduces speed by -4% | Reduces speed by -6% |
Engraving activation
Engraving points are mainly given to jewelry and feltanites.
You can activate the engraving effect by summing the engraving points on the jewelry and feltanites you are wearing.
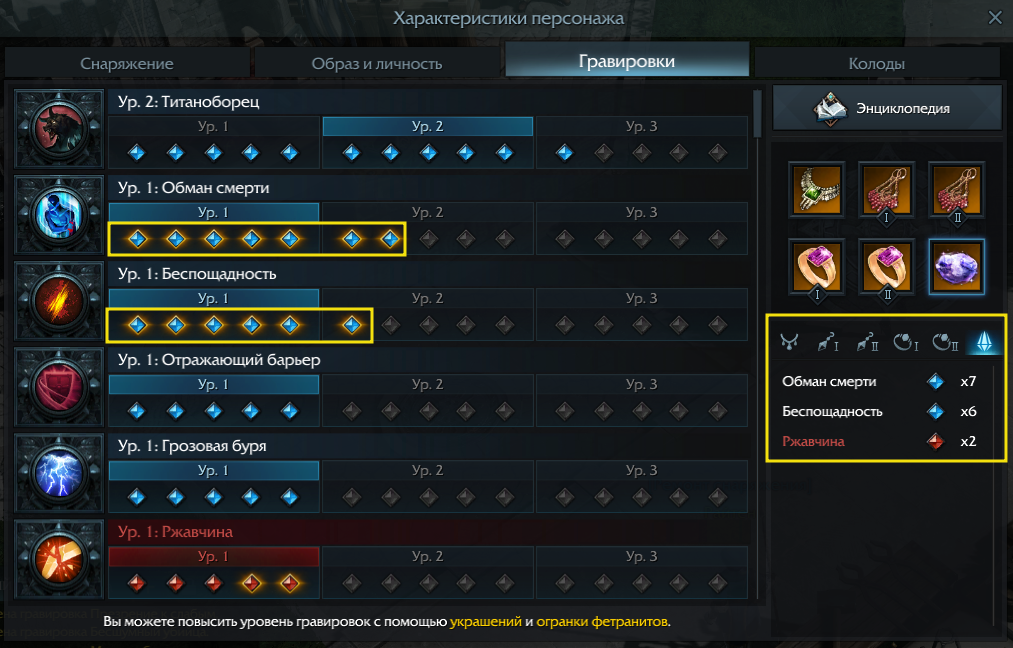
- You can check information about the effect of engravings in a special window in the character information (P).
- Check the number of engraving activation points on the items you are wearing.
- Upon receiving 5 engraving points, the engraving level corresponding to the number of points typed is activated.
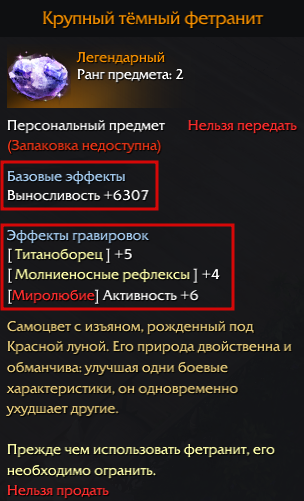
Fetranit
Fethranite is an ability stone that provides increased stamina and gives additional stats due to the effects obtained after cutting.
- When obtained, the engraving effect is given randomly and can be activated when cutting.
- Not all characteristics can be activated, as there is a certain chance of success when cutting.
- You can equip Fetranit only after cutting is completed.

Shown above is the difference between Fetranite that needs to be cut (left) and Fetranite that has already been cut (right).
Fetranite cut
Cutting can be done with the Fethranite Cut NPC located in every major city.

※ Be sure to complete the quest [Guide] Cutting.
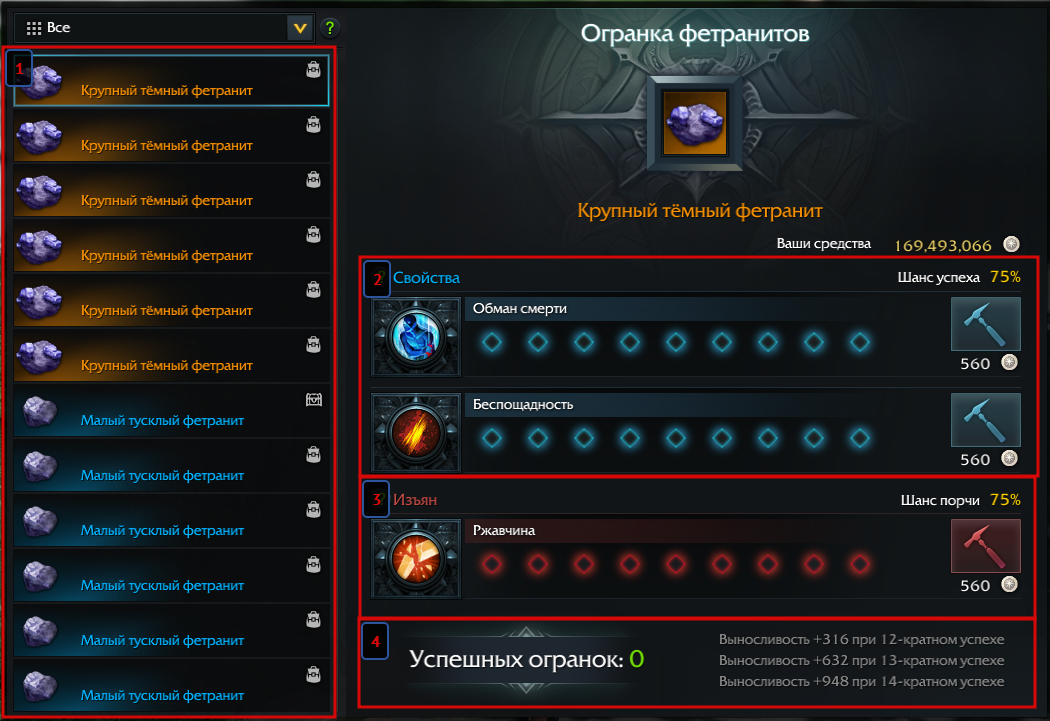
- List of Fetranites that need to be cut. Fetranit, which is currently being cut, is surrounded by a special frame.
- An engraving that is activated upon successful cutting. The higher the chance of success, the higher the probability of activation. The chance of success varies depending on luck/failure.
- This indicator decreases upon activation. The higher the chance of damage, the higher the probability of reducing the ability. Changes depending on luck/failure.
- This is a bonus effect that is given when it is successfully cut more than a certain number of times. Fethranites with the same ability may have different effects when cut. The number of successful cuts required to activate the bonus effect depends on the level of Fethranite.
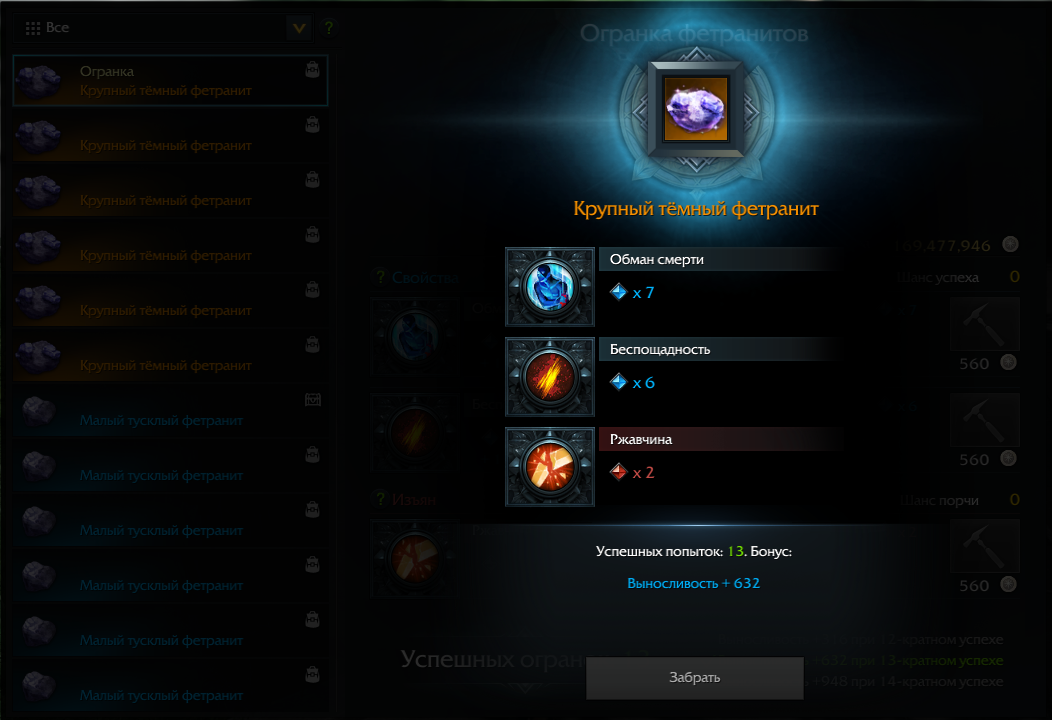
engraving effect
Engraving points are activated as many times as there were successful cuts during the processing of Fetranite. They are displayed in the character information after you equip the Fethranite.
Spraying Fetranites
Fetranits with engravings you don't need or with unsuccessful cuts can be sprayed.
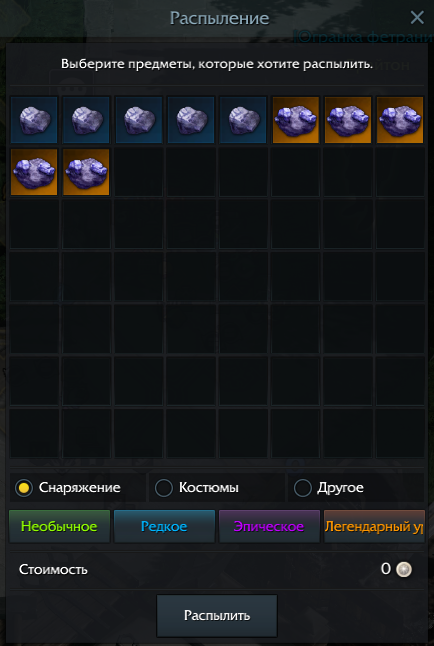
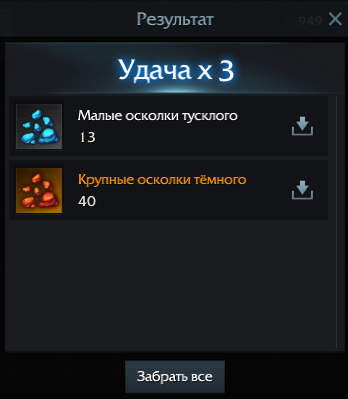
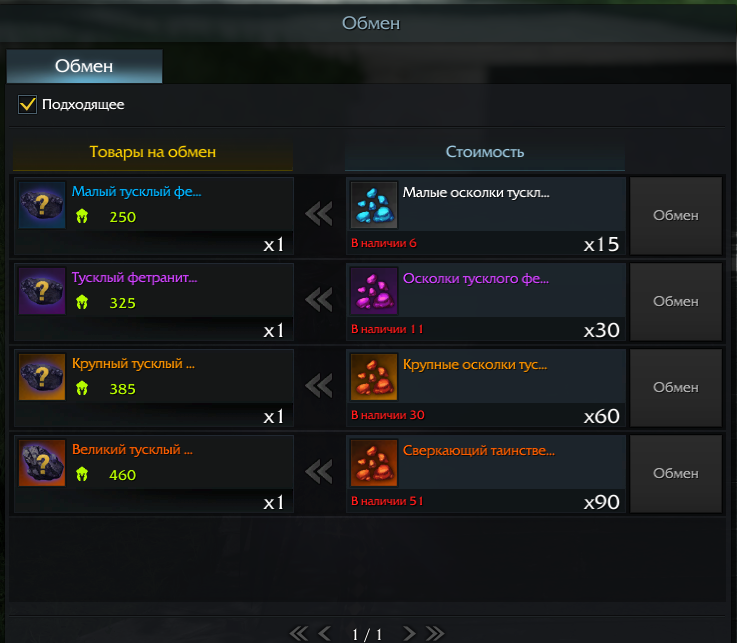
Depending on the level of Fetranite, you can get the corresponding fragments. They can be exchanged at NPC "Fethranite Cut"
engraving books
In addition to Fetranites, you can collect engraved books and put them on rings.
- After obtaining the book of engravings, a certain amount must be studied. Depends on the type and level of engraving.
- The engraving book can be obtained from various activities and is distributed to Legacy.
- You can check information about engravings collected using books in the Achievement - Engraving menu or using the [Alt + I] button combination.
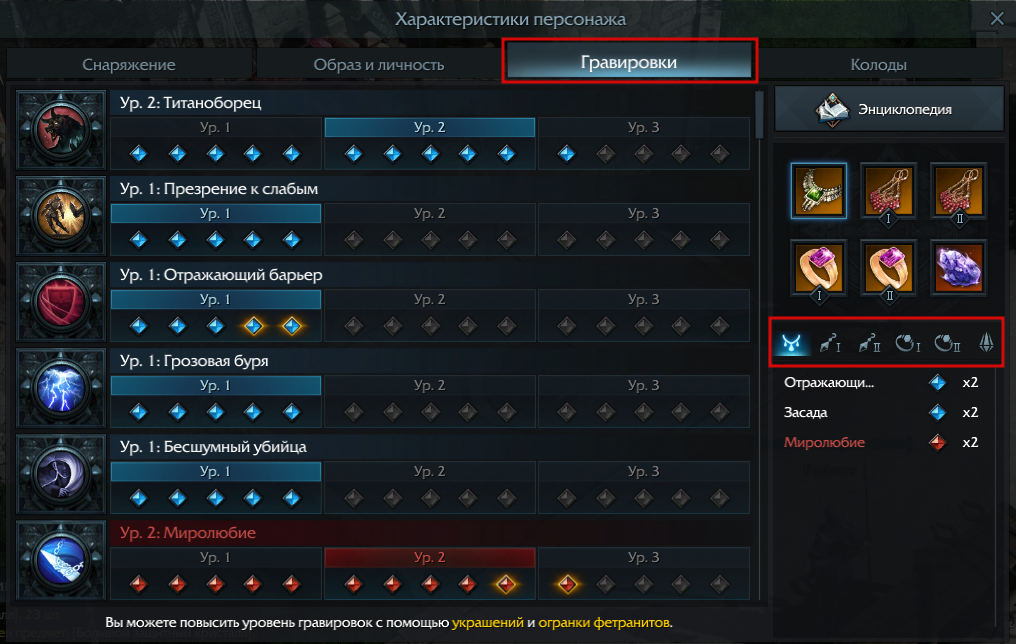
Engraving installation
Engraving can be set in the character window [P]

- Select a cell to set the engraving.
- Select the desired engraving from the list. The list will show the studied engravings and how many points they will give when applied.

Information about the installed engraving is shown in the “Engravings” tab

Was the article helpful?